Broken Smartphones: Laptops In Disguise

Modern smartphones are a dizzying treatise on planned obsolescence. Whether it’s batteries that can’t be removed without four hours and an array of tiny specialized tools, screens that shatter with the lightest shock, or (worst of all) software that gets borked purposefully to make the phone seem older and slower than it really is, around every corner is some excuse to go buy a new device. The truly tragic thing is that there’s often a lot of life left in these old, sometimes slightly broken, devices.

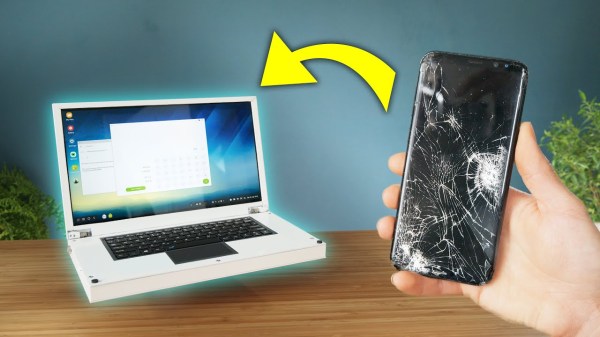
This video shows us how to turn an old smartphone into a perfectly usable laptop. The build starts with a screen and control board that has USB-C inputs, which most phones can use to output video. It’s built into a custom aluminum case with some hinges, and then attached to a battery bank and keyboard in the base of the laptop. From there, a keyboard is installed and then the old phone is fixed to the back of the screen so that the aluminum body doesn’t interfere with the WiFi signal.

If all you need is internet browsing, messaging, and basic word processing, most phones are actually capable enough to do all of this once they are free of their limited mobile UI. The genius of this build is that since the phone isn’t entombed in the laptop body, this build could easily be used to expand the capabilities of a modern, working phone as well. That’s not the only way to get a functioning laptop with parts from the junk drawer, either,  if you’d prefer to swap out the phone for something else like a Raspberry Pi.

Thanks to [NoxiousPluK] for the tip!

Continue reading “Broken Smartphones: Laptops In Disguise”

Magnets Make This Panda Move

A single board computer on a desk is fine for quick demos but for taking it into the wild (or even the rest of the house) you’re going to want a little more safety from debris, ESD, and drops. As SBCs get more useful this becomes an increasingly relevant problem to solve, plus a slick enclosure can be the difference between a nice benchtop hack and something that looks ready to sell as a product. [Chris] (as ProjectSBC) has been working on a series of adaptable cases called the MagClick Case System for the LattePanda Alpha SBC which are definitely worth a look.

The LattePanda Alpha isn’t a run-of-the-mill SBC; it’s essentially the mainboard from a low power ultrabook and contains up to an Intel Core M series processor, 8GB RAM, and 64GB of eMMC. Not to mention an onboard Atmega32u4, WiFi, Gigabit Ethernet, and more. It has more than enough horsepower to be used as an everyday desktop computer or even a light gaming system if you break PCIe out of one the m.2 card slots. But [Chris] realized that such adaptability was becoming a pain as he had to move it from case-to-case as his use needs changed. Thus the MagClick Case System was born.

Continue reading “Magnets Make This Panda Move”

Repurposed Plastic Protects PCBs

An errant wire snipping across the wrong electrical pins spells the release of 
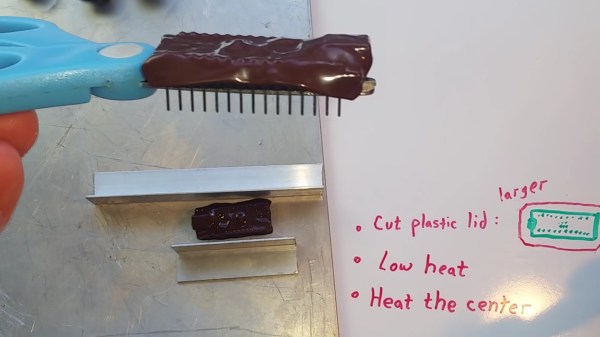
your magic smoke. Even if you are lucky, stray parts are the root of boundless malfunctions from disruptive to deadly. [TheRainHarvester] shares his trick for covering an Arduino Nano with some scrap plastic most of us have sitting in the recycling bin. The video is also after the break. He calls this potting, but we would argue it is a custom-made cover.

The hack is to cut a bit of plastic from food container lids, often HDPE or plastic #2. Trim a piece of it a tad larger than your unprotected board, and find a way to hold it in place so you can blast it with a heat gun. When we try this at one of our Hackaday remote labs and apply a dab of hot glue between the board and some green plastic it works well. The video suggests a metal jig which would be logical when making more than one. YouTube commenter and tip submitter [Keith o] suggests a vacuum former for a tighter fit, and we wouldn’t mind seeing custom window cutouts for access to critical board segments such as DIP switches or trimmers.

We understand why shorted wires are a problem, especially when you daisy-chain three power supplies as happened in one of [TheRainHarvester]’s previous videos.

Continue reading “Repurposed Plastic Protects PCBs”

A Lasercut ATX Case For Your Next Desktop Rig

Case modding exploded in the late 1990s, as computer enthusiasts the world over grew tired of the beige box and took matters into their own hands. The movement began with custom paints and finishes on existing cases, with competitions and bragging rights then taking over to further push the state of the art. It’s one thing to mod a case, however, and another to build one entirely from scratch. [Wesley]’s lasercut case build is an excellent example of the latter.

The build is designed for the ATX form factor, making it suitable for regular desktop computer parts. There are provisions for 3.5 and 2.5 inch drives, as well as a standard ATX PSU and provisions for case fans. The large lasercut panels are supplemented by some 3D printed parts, and the usual metric M3 hardware used with the ATX standard.

It’s a tidy build you can replicate yourself, with the parts available on Thingiverse for your making pleasure. [Wesley]’s build is resplendent in orange, but we’d also love to see an all-transparent build with blinding LED light effects. If you build it, you know where to send it.

Of course, if you’re looking for something more compact, you could always build the whole computer inside the power supply. 

The Tiniest RetroPie

The RetroPie project is a software suite for the Raspberry Pi that allows the user to easily play classic video games through emulators. It’s been around for a while now, so it’s relatively trivial to get this set up with a basic controller and video output. That means that the race is on for novel ways of implementing a RetroPie, which [Christian] has taken as a sort of challenge, building the tiniest RetroPie he possibly could.

The constraints he set for himself were to get the project in at under 100 mm. For that he used a Pi Zero loaded with the RetroPie software and paired it with a 1.44″ screen. There’s a tiny LiPo battery hidden in there, as well as a small audio amplifier. Almost everything else is 3D printed including the case, the D-pad, and the buttons. The entire build is available on Thingiverse as well if you’d like to roll out your own.

While this might be the smallest RetroPie we’ve seen, there are still some honorable mentions. There’s one other handheld we’ve seen with more modest dimensions, and another one was crammed into an Altoids tin with a clamshell screen. It’s an exciting time to be alive!

Continue reading “The Tiniest RetroPie”

High End PC Gets A Rustic Woodworking Piece Of Art For A Case

As [Matt] from [DIY Perks] was about to assemble a new PC, he decided to take a unique direction when it came to building a case. Despite the appearance of a woodworking piece with weird industrial radiators, there is actually a full-fledged, high-end PC hidden inside.

Those radiators are a pair of almost-the-biggest-you-can-buy heatsinks — one of which has been modified to fit the graphics card. Separating the graphics card’s stock cooling fan unit cut down significantly on noise and works with the stringent space requirements of the build. Those fans however keep other components on the card cool, so [Matt] cut pieces of copper plate to affix to these areas and joined them to the heatsink with a heat pipe, bent to shape. The elm wood case then began to take shape around the graphics card — cut into pieces to accommodate the heat pipes, and sealed with black tack to dampen the ‘coil whine’ of the GPU; it turns out the likely culprit are the MOSFETs, but close enough.

Continue reading “High End PC Gets A Rustic Woodworking Piece Of Art For A Case”

Simple Jig Gives Plastic Homes To Orphaned Projects

Look around your bench and chances are pretty good that there’s a PCB or scrap of perfboard or even a breadboard sitting there, wires and LEDs sprouting off it, doing something useful and interesting. Taking it to the next level with a snazzy enclosure just seems too hard sometimes, especially if you don’t have access to a 3D printer or laser cutter. But whipping up plastic enclosures can be quick and easy with this simple acrylic bending outfit.

At its heart [Derek]’s bending rig is not much different from any of the many hot-wire foam cutters we’ve featured. A nichrome wire with a tensioning spring is stretched across a slot in a flat work surface. The slot contains an aluminum channel to reflect the heat from the wire upward and to protect the MDF bed; we wonder if perhaps an angle section set in a V-groove might not be more effective, and whether more vertical adjustment range would provide the wider heating area needed for wider radius bends. It works great as is, though, and [Derek] took the time to build a simple timer to control the heating element, for which of course he promptly built a nice looking enclosure.

We can imagine the possibilities here are endless, especially if you use colored acrylic or Lexan and add in some solvent welding. We’ve covered acrylic enclosure techniques before; here’s a post that covers the basics.

Continue reading “Simple Jig Gives Plastic Homes To Orphaned Projects”