Custom Monitor For Pi-Powered Commodore 64

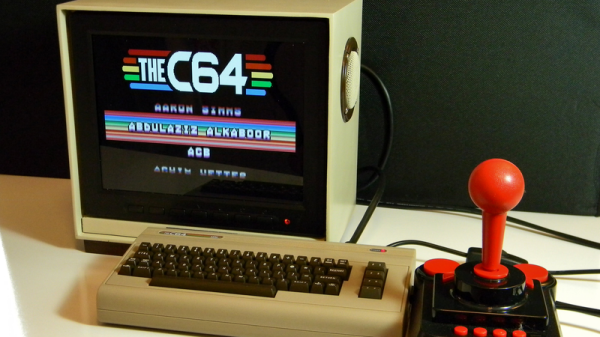
Classic games never seem to have gone out of style and with the emulation powers of the Raspberry Pi, there seems to be no end of projects folks have been coming up with. [Chris Mills] project is a great looking monitor to get his Commodore 64 fix by combining the retro looks of a home-made 64-style monitor with the Raspberry Pi.

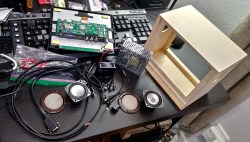
[Chris] is only interested in Commodore 64 emulation, at least with this project, and wanted something that would fit on a desk without taking up too much room. An eight inch LCD security monitor fit the bill perfectly. [Chris] ended up building a wooden enclosure for the monitor to give it that Commodore look. The monitor, power supply and cable connections fit inside along with speakers; each of these having their inputs on the back. A fan vents in the back as well and the Pi sits outside running the Combian 64 emulation software.

[Chris] has put up some galleries of build pics. The logo from the old Commodore logo is a nice touch. Read over the Hackaday site and you could build your own Commodore 64, or use the Commodore 64 itself to house the Raspberry Pi if you wanted.


Twenty Five Years Since The End Of Commodore

This week marks the twenty-five year anniversary of the demise of Commodore International. This weekend, pour one out for our lost homies.

Commodore began life as a corporate entity in 1954 headed by Jack Tramiel. Tramiel, a Holocaust survivor, moved to New York after the war where he became a taxi driver. This job led him to create a typewriter repair shop in Bronx. Wanting a ‘military-style’ name for his business, and the names ‘Admiral’ and ‘General’ already taken, and ‘Lieutenant’ simply being a bad name, Tramiel chose the rank of Commodore.

Later, a deal was inked with a Czechoslovakian typewriter manufacture to assemble typewriters for the North American market, and Commodore Business Machines was born. Of course, no one cares about this pre-history of Commodore, for the same reason that very few people care about a company that makes filing cabinets. On the electronics side of the business, Commodore made digital calculators. In 1975, Commodore bought MOS, Inc., manufacturers of those calculator chips. This purchase of MOS brought Chuck Peddle to Commodore as the Head of Engineering. The calculators turned into computers, and the Commodore we know and love was born.

Continue reading “Twenty Five Years Since The End Of Commodore”

The Repair And Refurbishment Of Silicone Keyboards

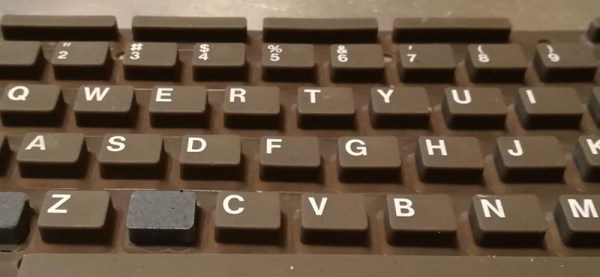
There are a lot of retrocomputers out there sitting in garages and attics, and most of them need work. After thirty or forty years, you’re looking at a lot of corrosion, leaking caps, and general wear and tear. When it comes to extreme refurbishment, we haven’t seen anyone better than [Drygol], and this time he’s back with an exceptional example of how far repair and refurbishment can go. He’s repairing the silicone keyboard of a Commodore 116 using some very interesting techniques, and something that opens up the door to anyone building their own silicone keypad.

This project comes from from a member of a demoscene group that found an old C116 that needed a lot of work. The C116 shipped with a silicone membrane keyboard instead of the mechanical keyswitches of the C64 and other, higher-end computers. Unfortunately, this silicone keypad had a few keys ripped out of it. No one, as far as we can tell, has ever figured out how to make these silicone keypads from scratch, but [Drygol] did come up with a way to replace the ripped and missing keys. The process starts with making a silicone mold of the existing keyboard, then casting silicone into the negative of that mold. After a few attempts , [Drygol] had a custom silicone button that matched the shape and color of the original C116 keyboard. The only thing left to do was to attach tiny conductive carbon pads to the bottom of the newly cast buttons and fit them into the existing keyboard.

This is an interesting refurbishment, because there are a lot of vintage computers that used silicone keyboards in the place of mechanical keyswitches. The Speccy, The Commodore TED machines, and a lot of vintage calculators all used silicone keyboards. Until now, no one has figured out how to make DIY silicone keypads, and repairing silicone was out of the question. [Drygol]’s attempt isn’t perfect — it needs key labels, but screen or pad printing will take care of that — but it’s the best we’ve seen yet and opens the doors to a lot of interesting projects in the world of vintage computer repair.

Make Your Commodore 16 64k, But Not A Commodore 64

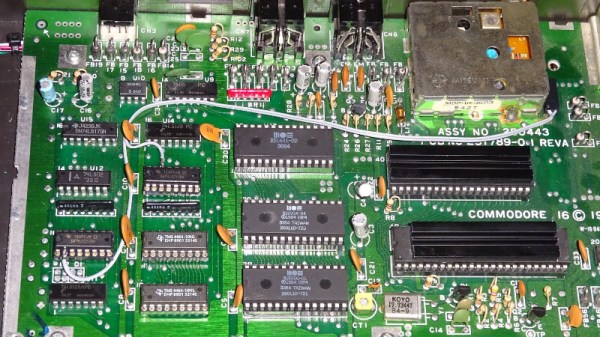
The Commodore 16 was a budget home computer from the mid 1980s, the entry-level model in a wider range of machines. As its name suggests it only has 16k of memory in keeping with its budget status, and while it has the rest of the hardware necessary to run software intended for its 64k stablemates, that 16k is impossible to expand without modifying the machine. Should you have a ’16 in your collection this is not a particularly arduous process, and Tynemouth Software have gone into great detail over how it can be achieved.

As was quite common in machines of the period, the address lines for the RAM area above the fitted 16k are not wired to disable it when those addresses are selected, so the same 16k appears mirrored three times in the space between it and the 64k limit. Thus simply plugging in a 64k cartridge would result in the top 48k being unusable, and some means of disabling or supplanting the internal chips was called for. Contemporary upgrades required pin or track snipping, but as they go on to show us there are some less ugly alternatives both permanent and reversible. Whichever you might favor they all at least don’t carry the huge cost hurdle in 2019 that they might have been when the machine was new. Sadly even though their cases may be similar the resulting machine will not be a Commodore 64, not even a new one.

Long-time Hackaday readers will know that the hardware designer for these machines was our Hackaday colleague [Bil Herd], and all followers of Commodore and his work should read his account of the CES trade show at the heady height of Commodore’s  fame.

3D-Printed Rotary Dial Keypad Is Wonderfully Useless

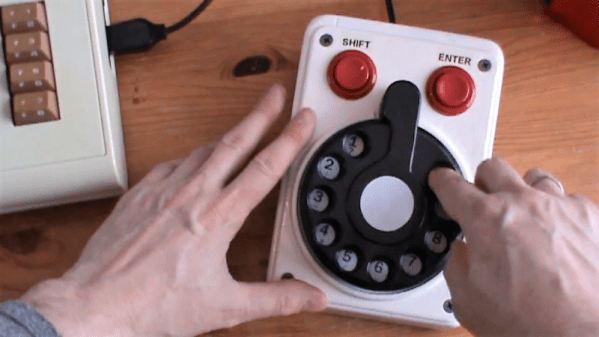
Right up front, let us stipulate that we are not making fun of this project. Even its maker admits that it has no practical purpose. But this 3D-printed Commodore-style rotary dial keypad fails to be practical on so many levels that it’s worth celebrating.

And indeed, celebrating deprecated technology appears to be what [Jan Derogee] had in mind with this build. Rotary dials were not long ago the only way to place a call, and the last time we checked, pulse dialing was still supported by some telephone central office switchgear. Which brings us to the first failure: with millions of rotary dial phones available, why build one from scratch? [Jan] chalks it up to respect for the old tech, but in any case, the 3D-printed dial is a pretty good replica of the real thing. Granted, no real dial used a servo motor to return the dial to the resting state, but the 3D-printed springs [Jan] tried all returned the dial instantly, instead of the stately spin back that resulted in 10 pulses per second. And why this has been done up VIC-20 style and used as a keypad for Commodore computers? Beats us. It had to be used for something. That the software for the C-64  generates DTMF tones corresponding to the number dialed only adds to the wonderful weirdness of this. Check out the video below.

We’ll hand it to [Jan], he has a unique way of looking at the world, especially when it comes to clocks. We really enjoyed his persistence of phosphorescence clock, and his screw-driven linear clock turns the standard timekeeping UI on its head.

Continue reading “3D-Printed Rotary Dial Keypad Is Wonderfully Useless”

It’s Raining Brand-new Commodore 64s

There’s never been a better time to build your own Commodore 64, apparently. Within a day of each other, we got tipped off on three (3!) separate C64 builds from two different hackers.

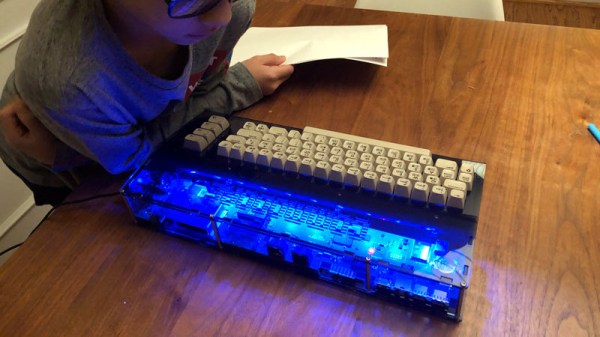
This has been made possible by a series of disparate projects that have individually recreated a piece of the full machine. Replacement motherboards exist, like the Ultimate 64 and the C64 Reloaded Mk2. New cases can be had courtesy of Pixelwizard. Even new keyboard bases can be had thanks to the Mechboard 64 project.

[Eric Hill] took all these parts and built his own C64 from scratch. And not content with one, he repeated the process and built another.

These two machines serve as demos for the two different motherboard options. Taken together, they serve to demonstrate how many of the vintage Commodore components have been remanufactured by the fan community: with the exception of the keycaps and possibly some of the silicon, all the parts in both machines are new.

Did we just say “keycaps?” This became the pet project of [Perifractic], who discovered that certain Lego Technic pieces had the same cross-shaped slot as the original Commodore 64 keys. After some experimentation, a full set of Lego keycaps was produced. (YouTube, embedded below.) Far from a thrown-together set of random pieces, the sets are available for order with printed tiles with recreation graphics. And this lets you build a C64 using precisely zero parts that came out of a Commodore factory. It’s a testament to the popularity of the world’s best selling computer that it is now once again possible to build one with brand new parts.

If you want to replicate this feat, [Perifractic]’s website is set up to make ordering everything you need easy. Things have certainly come a long way from the first reproduction cases launched on Kickstarter a few years ago.

[Thanks to Keith O for the tip!]

Continue reading “It’s Raining Brand-new Commodore 64s”

The 8-Bit Guy Builds A 16-Bit Computer

One of the better retro historians out there on YouTube is the 8-Bit Guy, and after years of wanting to do something like this, it’s finally happening. The 8-Bit Guy is building his dream computer, heavily inspired by the Commodore 64.

Before we go into what this computer will do and what capabilities it will have, it’s important to note the 8-Bit Guy is actually doing a bit of market and user research before dedicating a year or more to this project. He’s asked other famous retrocomputing YouTubers for their input on what their ‘dream’ retrocomputer should do, and they’ve come up with a basic list of requirements. The Dream Computer will be like working on a 1957 Chevy, in that all the registers are immediately available for peeking and poking. The computer will be completely comprehensible, in so far that one person can completely understand everything, from the individual logic gates inside the CPU to the architecture of the kernel. It’ll run BASIC.

In the age of the Raspberry Pi, one might ask, ‘why not go with a Raspberry Pi?’. To the 8-Bit Guy, the Pi is just a Linux computer. Other retrocomputing projects of a similar scope to this dream computer also fail: The Mega65, a project to resurrect the Commodore 65, will be too expensive. The BASIC Engine fails because it only does composite out, and it runs on an ESP anyway, so you’re shielded from the real hardware. The same problem exists with the Maximite in that the hardware is one layer of abstraction away from the interface. The C256 Foenix is probably the closest to meeting the design goals, but it’s far too expensive, and even without the MIDI ports, SID chips, and other interesting hardware, it would still be above the desired price point.

The ‘requirement’ for this dream computer is to use only modern parts, have VGA or HDMI video out, a real CPU, preferably a 6502, use no FPGA or microcontrollers, and can run Commodore Basic. Also, this computer would cost about $50, with $100 as the absolute, maximum limit (implying a BOM cost of around $15-$25). This is absolutely, completely, astonishingly impossible. I would be deceiving you if I did not mention the impossibility of this project happening with the stated goals. This project will not meet the goal of selling for less than one hundred dollars.

That said, there’s no harm in trying, so The 8-Bit Guy is currently working with a few dev boards, specifically one designed around the 65816 CPU. The 65816 is an interesting chip, in that it is a 6502 until you flip a bit in a register. It has a larger address space than the 6502, and everything from the World of Commodore should be (relatively) easily ported to the 65816. Why was this CPU never used in Commodore hardware? Because a Western Design Center sales guy told a Commodore engineer that Apple was using it in their next computer (the Apple IIgs). The option of Commodore ever using the ‘816 died then and there.

If you’d like to help out on this computer, there is a Facebook group for organizing the build. This Facebook group is a closed group, meaning you need a Facebook account to login. Unfortunate, but we’re looking forward to a year of updates around this dream computer. Building a computer that meets the specs is impossible, but we’re more than eager to see the community try.

Continue reading “The 8-Bit Guy Builds A 16-Bit Computer”