Raspberry Pi Serves Up 24 Hour Simpsons Channel

Commercial-free video on demand was every couch potato’s dream for decades, and now we’ve got it. But nostalgia has a funny way of making some folks miss the old days, even if we know it’s technically be a step backwards. Wanting to recreate the TV watching experience circa 1998, [probnot] has come up with a way to run his very own television channel.

With the Raspberry Pi and a digital modulator, he’s got the only house on the block that’s wired to show The Simpsons all day. He has absolutely no control over which episode plays next, he can’t pause it, and its in presented in standard definition (a nightmare for anyone who grew up in the Netflix era) but a familiar viewing experience for the rest of us.

Where we’re going, we don’t need HDMI.

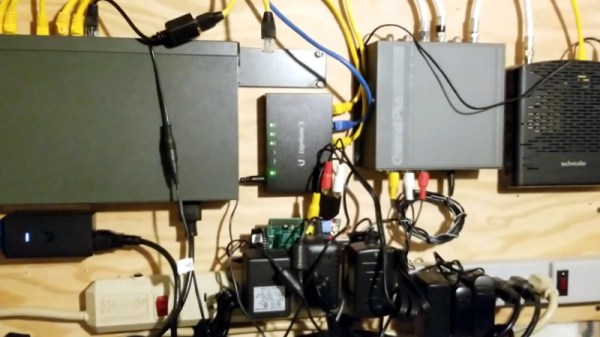
The key to this project is the Channel Plus Model 3025 modulator. It takes the feed from the antenna and mixes in two composite video sources on user-defined channels. All [probnot] had to do was find a channel that wouldn’t interfere with any of the over-the-air stations. The modulator has been spliced into the house’s coax wiring, so any TV connected to the wall can get in on the action. There’s no special setup required: when he wants to watch The Simpsons he just tunes the nearest TV to the appropriate channel.

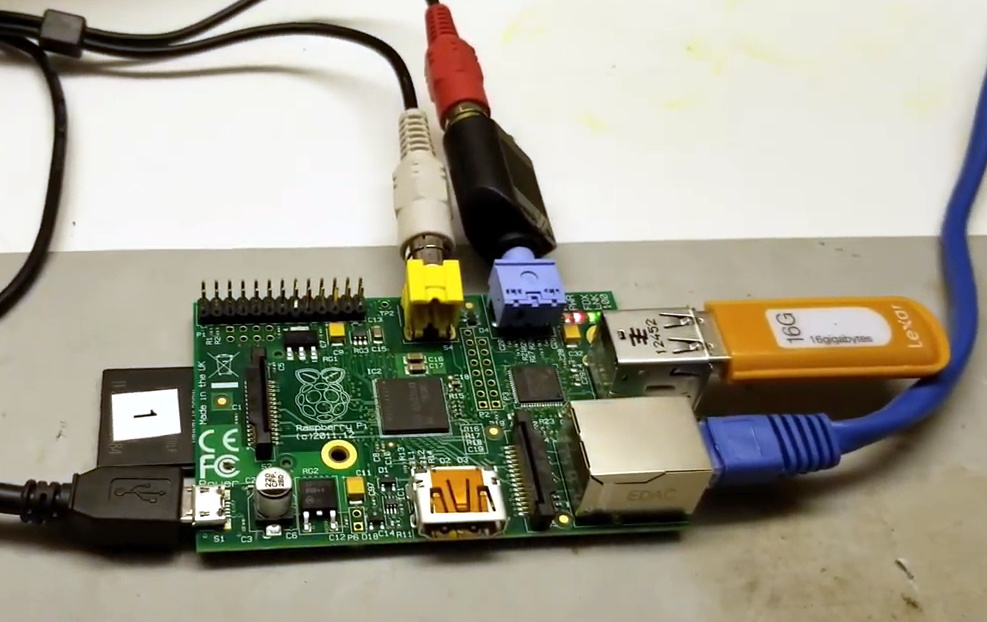
Providing the video for the modulator is a Raspberry Pi, specifically, the original model that featured composite video output. While the first generation Pi is a bit long in the tooth these days, playing standard definition video is certainly within its capabilities. With a USB flash drive filled with a few hundred episodes and a bit of scripting it’s able to deliver a never-ending stream direct from Springfield. There’s still that second channel available on the modulator as well, which we’re thinking could be perfect for Seinfeld or maybe The X-Files.

Interestingly, this isn’t the first time we’ve seen a Raspberry Pi used to provide a never-ending stream of The Simpsons. But compared to previous attempts which had to be directly connected to the TV, we like the idea of using the modulator and creating a more authentic experience.

Continue reading “Raspberry Pi Serves Up 24 Hour Simpsons Channel”

Unique Flat-Screen Display Put To Use In CRT Game Boy

The cathode-ray tube ruled the display world from the earliest days of TV until only comparatively recently, when flat-screen technology began to take over. CRTs just kept getting bigger over that time until they reached a limit beyond which the tubes got just too bulky to be practical.

But there was action at the low end of the CRT market, too. Tiny CRTs popped up in all sorts of products, from camcorders to the famous Sony Watchman. One nifty CRT from this group, a flat(tish) tube from a video intercom system, ended up in [bitluni]’s lab, where he’s in the process of turning it into a retro Game Boy clone with a CRT display. The display, which once showed the video from a door-mounted camera, was a gift from a viewer. Date codes on the display show it’s a surprisingly recent device; were monochrome TFT displays that hard to come by in 2007? Regardless, it’s a neat design, with the electron gun shooting upward toward a curved phosphor screen. With a little Google-assisted reverse engineering, [Bitluni] was able to track done the video connections needed to use his retro game console, which uses an ESP32 that outputs composite video. He harvested the intercom speaker for game audio, added a temporary Nintendo gamepad, and soon he was playing Tetris in glorious monochrome on the flat screen.

The video below is only the first in a series where the prototype will be stuffed into one nice tidy package. It certainly still needs some tweaking, but it’s off to a great start. We can’t wait to see the finished product.

Continue reading “Unique Flat-Screen Display Put To Use In CRT Game Boy”

ESP8266 Home Computer Hides Unexpected Gems

With a BASIC interpreter and free run throughout their hardware, home computers like the ZX Spectrum and Commodore 64 used to be a pervasive way to light that hacker fire. With the advent of cheap single board computers like the Raspberry Pi, devices purpose built to emulate these classic systems have become fairly commonplace. [uli] built a device in this vein called the BASIC Engine which is driven by a microcontroller and a handful of hardware peripherals. Like other examples it can be attached to a keyboard, programmed in a BASIC, play video and sound, etc. But digging into the BASIC Engine reveals that it’s similarity to other devices is only skin deep.

The current version of the BASIC Engine (“rev2”) lives in a Raspberry Pi 3 case for convenience. It has RCA connectors for NTSC or PAL video output and mono audio, plus a bank of headers to tap into GPIOs, connectors for a keyboard, and more. [uli] wanted to aim for extreme low cost so a relatively beefy board like a Raspberry Pi didn’t fit the bill, and we expect it was an enjoyable challenge. Instead its interpreter runs atop an ESP8266 but with the networking stack removed. [uli] was disheartened by how bloated even a “Hello world” program was and ripped it out, discovering that hidden beneath was a very powerful and disproportionately inexpensive general purpose microcontroller. The video is driven by a VS23S010, sold as a 1 Mbit parallel SRAM with a neat trick; it also includes a composite video controller!

The real treat here is [uli]’s history writeup of how the BASIC Engine came to be. We’d recommend brewing a cup of coffee and sitting down for a full read-through. The first version was inspired by the PlayPower project, which was repurposing clones of Nintendo’s Famicom (NES to Americans) game console to make low cost home computers, complete with keyboard and gamepad input. [uli] started out by building a custom cartridge for a particular Famicom clone that ran a BASIC interpreter but after showing it to disinterested adults the project was left fallow. Years later, [uli] was encouraged to pick up the project again, leading down a twisted rabbit hole to where we are today.

If you want to build a BASIC Engine for yourself, Gerbers and build instructions are available on the pages linked above.

Thanks for the tip [antibyte]!

Convert A Curbside CRT TV Into An Arcade Monitor

While an old CRT TV may work well enough on a MAME cabinet project, the real arcade purists are quick to point out that a proper arcade monitor and a TV aren’t the same thing. A real arcade board uses RGB to connect to the monitor, that is, direct control over the red, green, and blue signals. Conversely video over coax or composite, what most people associate with old CRT TVs, combine all the video information down into an analog signal. Put simply, RGB allows for a much cleaner image than composite.

Many in the arcade restoration scene say that trying to convert a bog standard CRT TV into a RGB monitor isn’t possible, but [Arcade Jason] had his doubts. Over on his YouTube channel, he’s recently posted a tutorial on how to go from a trashed CRT TV to a monitor worthy of proper arcade gaming with relatively little work. As real arcade monitors are becoming increasingly rare, these kind of modifications are likely to get more common as coin-op gamers look to keep the old ways alive.

Now obviously every TV is going to do be different inside. All CRT TVs contain high voltages, and on some the circuit boards aren’t even mains-isolated, so take care if you try this. [Jason] certainly doesn’t claim that the method he demonstrates will work on whatever old TV you happen to have kicking around. But the general idea and some of the techniques he shows off are applicable to most modern TVs, and can help you tailor the method to your particular piece of gear. It all starts with a wet finger. Seriously.

[Jason] demonstrates a rather unique way of determining which pins on the TV’s control chip are responsible for the individual color signals by wetting his finger and sliding it over the pins. When a change in color is seen on the displayed image, you know you’re getting close. We can’t say it’s the most scientific or even the safest method, but it worked for him.

He then follows up with a jumper wire and resistor to find the precise pins which are responsible for each color, and solders up his actual RGB connection for the arcade board. In addition to the three color wires, a sync signal is also needed. This is the same sync signal used in composite video, so all that’s needed is to solder to the pad for the original composite video jack. Add a ground signal, and you’ve got yourself a proper RGB monitor.

Interestingly, this one has come full circle, as [Jason] says his attempt was inspired by an old post on Hackaday. It’s the Circle of Hacker Life.

[Thanks to Seebach for the tip]

Continue reading “Convert A Curbside CRT TV Into An Arcade Monitor”

Pocket-Sized Workstation Sports Pi Zero, Pop-Up Screen

Many of us could use a general-purpose portable workstation, something small enough to pocket but still be ready for a quick troubleshooting session. Terminal apps on a smartphone will usually do the job fine, but they lack the panache of this pocketable pop-top Raspberry Pi workstation.

It doesn’t appear that [Michael Horne] has a specific mission in mind for his tiny Linux machine, but that’s OK — we respect art for art’s sake. The star of the show is the case itself, a unit intended for dashboard use with a mobile DVD player or backup camera. The screen is a 4.3″ TFT with a relatively low-resolution, so [Michael] wasn’t expecting too much from it. And he faced some challenges, like dealing with the different voltage needs for the display and the Raspberry Pi Zero W he intended to stuff into the base. Luckily, the display regulates the 12-volt supply internally to 3.3-volts, so he just tapped into the 3.3-volt pin on the Pi and powered everything from a USB charger. The display also has some smarts built in, blanking until composite video is applied, which caused a bit of confusion at first. A few case mods to bring connectors out, a wireless keyboard, and he had a nice little machine for whatever.

No interest in a GUI machine? Need a text-only serial terminal? We’ve seen that before too. And here’s one with a nice slide-out keyboard built in.

Continue reading “Pocket-Sized Workstation Sports Pi Zero, Pop-Up Screen”

Software Defined Television On An ESP32

Composite video from a single-board computer? Big deal — every generation of Raspberry Pi has had some way of getting composite signals out and onto the retro monitor of your choice. But composite video from an ESP32? That’s a thing now too.

There are some limitations, of course, not least of which is finding a monitor that can accept a composite input, but since [bitluni]’s hack uses zero additional components, we can overlook those. It really is as simple as hooking the monitor up to pin 25 and ground because, like his recent ESP32 AM radio station, the magic is entirely in software. For video, [bitluni] again uses his I²S tweaks to push a lot of data into the DAC really fast, reproducing the sync and image signals in the 0-1 volt range of the PAL composite standard. His code also supports the NTSC standard, but alas because of frequency limitations in the hardware it’s monochrome only for both standards, at least for now. He’s also got a neat trick to improve performance by running the video signal generation and the 3D-rendering on separate cores in the ESP32. Check out the results in the video below.

It looks like the ESP32 is getting to be one of those “Is there anything it can’t do?” systems. Aside from radio and video, we’ve seen audio playback, vector graphics, and even a Basic interpreter easter egg.

Continue reading “Software Defined Television On An ESP32”

Discrete Pong Project Goes Big, Adds A Player

Some projects just take on a life of their own. What started as a pleasant diversion or a simple challenge becomes an obsession, and the next thing you know you’ve built a two-player color Pong game with audio completely from discrete components.

If this one seems familiar, it’s because we were dazzled by its first incarnation last year. As impressive as version 1.0 was, all the more so since it was built using the Manhattan method and seemingly over the course of a weekend, it did have its limitations. [GK] has been refining his design ever since and keeping accurate track of the process, to the tune of 22 pages on the EEVblog forum. We haven’t pored through it all yet, but the state of the project now is certainly worth a look. The original X-Y output to an oscilloscope was swapped out to composite video for a monitor, in both mono and color. This version also allows two people to play head-to-head instead of just battling the machine. It looks like [GK] had to add a couple of blocks worth of real estate to his Manhattan board to accommodate the changes, and he tidied the wiring significantly while he was at it.

It’s a project that keeps on giving, so feast your eyes and learn. We suspect [GK] doesn’t have any plans to finish this soon, but if he does, we can’t wait to see what’s next.

Thanks to [David Gustafik] for reminding us to check back on this one.