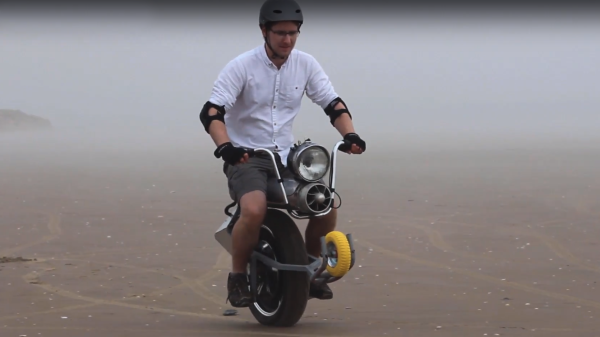
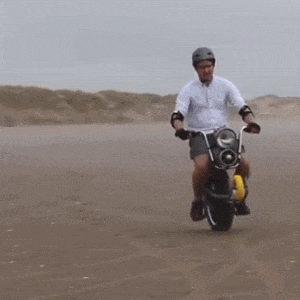
VGA Without A Microcontroller

One of the most challenging projects you could ever do with an 8-bit microcontroller is generating VGA signals. Sending pixels to a screen requires a lot of bandwidth, and despite thousands of hackers working for decades, generating VGA on an 8-bit microcontroller is rarely as good as a low-end video card from twenty years ago.

Instead of futzing around with microcontrollers, [Marcel] had a better idea: why not skip the microcontroller entirely? He’s generating VGA frames from standard logic chips and big ‘ol EEPROMs. It works, and it looks good, too.

VGA signals are just lines and frames, with RGB pixel values stuffed in between horizontal sync pulses, and frames stuffed between vertical sync pulses. If you already know what you want to display, all you have to do is pump the right bits out through a VGA connector fast enough. [Marcel] is doing this by saving images on two parallel EEPROMs, sending the output through a buffer, through a simple resistor DAC, and out through a VGA connector. The timing is handled by a few 74-series four-bit counters, and the clock is a standard 25.175 MHz crystal.

There’s not much to this build, and the entire circuit was assembled on a breadboard. Still, with the clever application of Python to generate the contents of the ROM, [Marcel] was able to build something that displays eight separate images without using a microcontroller.


MIDI DAC For Vintage Synth Hacks

A lot of classic synthesizers rely on analog control voltages to vary parameters; this is a problem for the modern musician who may want to integrate such hardware with a MIDI setup. For just this problem, [little-scale] has built a MIDI-controllable DAC for generating control voltages.

It’s a simple enough build – a Teensy 2 is used to speak USB MIDI to a laptop. This allows the DAC to be used with just about any modern MIDI capable software. The Teensy then controls a Microchip MCP4922 over SPI to generate the requisite control voltages. [little-scale]’s video covers the basic assembly of the hardware on a breadboard, and goes on to demonstrate its use with a performance using the MIDI DAC to control a Moog Mother 32 synth. [little-scale] has also made the code available, making it easy to spin up your own.

We can see this project being indispensable to electronic musicians working with banks of modular synths, making it much easier to tie them in with automation in their DAW of choice. This isn’t the first MIDI interfacing hack we’ve seen either – check out this setup to interface an iPad to guitar pedals.

Continue reading “MIDI DAC For Vintage Synth Hacks”

An Eye-Catching Raspberry Pi Smart Speaker

[curcuz]’s BoomBeastic mini is a Raspberry Pi based smart connected speaker. But don’t dis it as just another media center kind of project. His blog post is more of a How-To guide on setting up container software, enabling OTA updates and such, and can be a good learning project for some. Besides, the design is quite elegant and nice.

boombeastic_02The hardware is simple. There’s the Raspberry-Pi — he’s got instructions on making it work with the Pi2, Pi2+, Pi3 or the Pi0. Since the Pi’s have limited audio capabilities, he’s using a DAC, the Adafruit I2S 3W Class D Amplifier Breakout for the MAX98357A, to drive the Speaker. The I2S used by that part is Inter-IC Sound — a 3 wire peer to peer audio bus — and not to be confused with I2C. For some basic visual feedback, he’s added an 8×8 LED matrix with I2C interface. A Speaker rounds out the BoM. The enclosure is inspired by the Pimoroni PiBow which is a stack of laser cut MDF sheets. The case design went through four iterations, but the final result looks very polished.

On the software side, the project uses Mopidy — a Python application that runs in a terminal or in the background on devices that have network connectivity and audio output. Out of the box, it is an MPD and HTTP server. Additional front-ends for controlling Mopidy can be installed from extensions, enabling Spotify, Soundcloud and Google Music support, for example. To allow over-the-air programming, [curcuz] is using resin.io which helps streamline management of devices that are hard to reach physically. The whole thing is containerized using Docker. Additional instructions on setting up all of the software and libraries are posted on his blog post, and the code is hosted on GitHub.

There’s a couple of “To-Do’s” on his list which would make this even more interesting. Synced audio being one: in a multi-device environment, have the possibility to sync them and reproduce the same audio. The other would be to add an Emoji and Equalizer display mode for the LED matrix. Let [curcuz] know if you have any suggestions.

Continue reading “An Eye-Catching Raspberry Pi Smart Speaker”

Hybrid Raspberry Pi + PIC32 = Oscilloscope And Function Generator

The PicBerry is a student final project by [Advitya], [Jeff], and [Danna] that takes a hybrid approach to creating a portable (and affordable) combination digital oscilloscope and function generator. It’s based on the Raspberry Pi, features an intuitive Python GUI, and can generate and measure simultaneously.

But wait! The Raspberry Pi is a capable little Linux machine, but meeting real-time deadlines isn’t its strong suit. That’s where the hybrid approach comes in. The Pi takes care of the user interface and other goodies, and a PIC32 over SPI is used for 1 MHz sampling and running a DAC at 500 kHz. The idea of combining them into PicBerry is to get the best of both worlds, with the Pi and PIC32 each doing what they are best at. The readings are sent in batches from the PIC32 to the Pi, where the plot is updated every 30 ms so that user does not perceive any visible lag.

The project documentation notes that improvements can be made, the speeds are a far cry from regular bench equipment, and the software lacks some typical features such as triggering, but overall not bad at all for under $50 of parts. In fact, there are hardly any components at all beyond the Raspberry Pi, the PIC32, and a MCP4822 digital-to-analog converter. A short demo video is embedded below.

Continue reading “Hybrid Raspberry Pi + PIC32 = Oscilloscope And Function Generator”

Fun Audio Waveform Generator Is More Than The Sum Of Its Parts

[Joekutz] wanted to re-build an audio-rate function generator project that he found over on Instructables. By itself, the project is very simple: it’s an 8-bit resistor-ladder DAC, a nice enclosure, and the rest is firmware.

[Joekutz] decided this wasn’t enough. He needed an LCD display, a speaker, and one-hertz precision. The LCD display alone is an insane hack. He reverse-engineers a calculator simply to use the display. But instead of mapping each key on the calculator and typing each number in directly, he only taps the four 1, +, =, and clear keys. He can then enter arbitrary numbers by typing in the right number of ones and adding them up. 345 = 111 + 111 + 111 + 11 + 1. In his video, embedded below, he describes this as a “rather stupid” idea. We think it’s hilarious.

Continue reading “Fun Audio Waveform Generator Is More Than The Sum Of Its Parts”

4-Bit Audio Output Via Voltage Reference

[Bruce Land] switched his microprocessor programming class over from Atmel parts to Microchip’s PIC32 series, and that means that he’s got a slightly different set of peripherals to play with. One thing that both chips lack, however is a digital-to-analog converter (DAC). Or do they? (Dun-dun-dun-duuuuhnnnn!)

The PIC part has a programmable, sixteen-level voltage reference. And what is a Vref if not a calibrated DAC? With that in mind, [Bruce] took to documenting its performance and starting to push it far beyond the manufacturer’s intentions. Turns out that the Vref has around 200 kHz of bandwidth. (Who would update a voltage reference 200,000 times per second?)

Anyway, [Bruce] being [Bruce], he noticed that the bits weren’t changing very often in anything more than the least significant bit: audio waveforms, sampled fast enough, are fairly continuous. This suggests using a differential PCM encoding, which knocks the bitrate down by 50% and saves a lot on storage. (Links to all the code for this experiment is inline with his writeup.)

The audio hacks that come out of [Bruce]’s Cornell ECE classes are always a treat. From the lock that you have to sing to open, to chiptunes programmed into an FPGA, there’s something for music fans of all inclinations.

Hacklet 116 – Audio Projects

If the first circuit a hacker builds is an LED blinker, the second one has to be a noisemaker of some sort. From simple buzzers to the fabled Atari punk console, and guitar effects to digitizing circuits, hackers, makers and engineers have been building incredible audio projects for decades. This week the Hacklet covers some of the best audio projects on Hackaday.io!

vumeterWe start with [K.C. Lee] and Automatic audio source switching. Two audio sources, one amplifier and speaker system; this is the problem [K.C. Lee] is facing. He listens to audio from his computer and TV, but doesn’t need to have both connected at the same time. Currently he’s using a DPDT switch to change inputs. Rather than manually flip the switch, [K.C. Lee] created this project to automatically swap sources for him. He’s using an STM32F030F4 ARM processor as the brains of the operation. The ADCs on the microcontroller monitor both sources and pick the currently active one. With all that processing power, and a Nokia LCD as an output, it would be a crime to not add some cool features. The source switcher also displays a spectrum analyzer, a VU meter, date, and time. It even will attenuate loud sources like webpages that start blasting audio.


muzzNext up is [Adam Vadala-Roth] with Audio Blox: Experiments in Analog Audio Design. [Adam] has 32 projects and counting up on Hackaday.io. His interests cover everything from LEDs to 3D printing to solar to hydroponics. Audio Blox is a project he uses as his engineer’s notebook for analog audio projects. It is a great way to view a hacker figuring out what works and what doesn’t. His current project is a 4 board modular version of the Big Muff Pi guitar pedal. He’s broken this classic guitar effect down to an input board, a clipping board, a tone control, and an output stage. His PCB layouts, schematics, and explanations are always a treat to view and read!

pauldioNext we have [Paul Stoffregen] with Teensy Audio Library. For those not in the know, [Paul] is the creator of the Teensy family of boards, which started as an Arduino on steroids, and has morphed into something even more powerful. This project documents the audio library [Paul] created for the Freescale/NXP ARM processor which powers the Teensy 3.1. Multiple audio files playing at once, delays, and effects, are just a few things this library can do. If you’re new to the audio library, definitely check out [Paul’s] companion project
Microcontroller Audio Workshop & HaD Supercon 2015. This project is an online version of the workshop [Paul] ran at the 2015 Hackaday Supercon in San Francisco.

drdacFinally we have [drewrisinger] with DrDAC USB Audio DAC. DrDac is a high quality DAC board which provides a USB powered audio output for any PC. Computers these days are built down to a price. This means that lower quality audio components are often used. Couple this with the fact that computers are an electrically noisy place, and you get less than stellar audio. Good enough for the masses, but not quite up to par if you want to listen to studio quality audio. DrDAC houses a PCM2706 audio DAC and quality support components in a 3D printed case. DrDAC was inspired by [cobaltmute’s] pupDAC.

If you want to see more audio projects and hacks, check out our new audio projects list. See a project I might have missed? Don’t be shy, just drop me a message on Hackaday.io. That’s it for this week’s Hacklet, As always, see you next week. Same hack time, same hack channel, bringing you the best of Hackaday.io!