Jet Engine Tachometer Turned Into Unique CPU Utilization Meter

When you’ve got a piece of interesting old aviation hardware on your desk, what do you do with it? If you’re not willing to relegate it to paperweight status, your only real choice is to tear it down to see what makes it tick. And if you’re lucky, you’ll be able to put it to work based on what you learned.

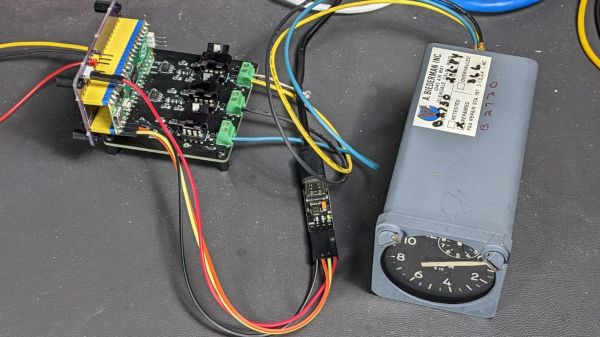
That’s what happened when [Glen Akins] came across a tachometer for a jet airplane, which he promptly turned into a unique CPU utilization gauge for his computer. Much of the write-up is concerned with probing the instrument’s innards to learn its secrets, although it was clear from the outset that his tachometer, from Kollsman Instruments, was electrically driven. [Glen]’s investigation revealed a 3-phase synchronous motor inside the tach. The motor drives a permanent magnet, which spins inside a copper cup attached to the needle on the tach’s face. Eddy currents induced in the cup by the spinning magnet create a torque that turns the needle against the force of a hairspring. Pretty simple — but how to put the instrument to work?

[Glen]’s solution was to build what amounts to a variable frequency drive (VFD). His power supply is based on techniques he used to explore aircraft synchros, which we covered a while back. The drive uses a trio of MCP4802 8-bit DACs to generate three phase-shifted sine waves via direct digital synthesis with an RP2040. The 3-phase signal drives the motor and spins the dial, with 84-Hz corresponding to full-scale deflection.

The video below shows the resulting CPU utilization gauge — which just queries for the current load level and sends it to the RP2040 over serial — in action. It’s not exactly responsive to rapid changes, but that’s to be expected from a mechanical system. And compared to exploring such a nice instrument, it really doesn’t matter.

Continue reading “Jet Engine Tachometer Turned Into Unique CPU Utilization Meter”

Boat Anchor Twins Get A Little Digital Help Staying On Frequency

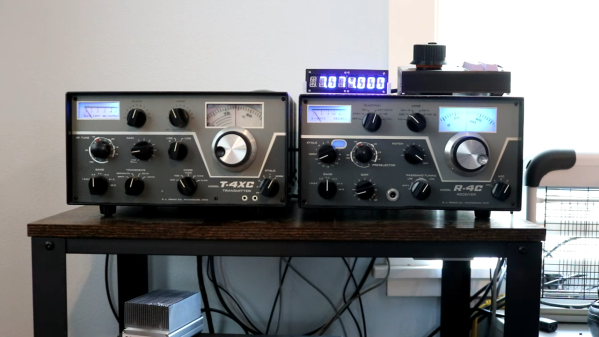
In the ham radio trade, gear such as the old Drake units [Dr. Scott M. Baker] has in his radio shack are often referred to as “boat anchors.” It refers to big, heavy radios that were perhaps a bit overengineered compared to the state of the art at the time they were designed, and it’s actually a shame that the name has taken on something of a pejorative connotation, since some of this gear is rock solid half a century or more after it was built.

But older gear is often harder to use, at least compared to the newer radios with microcontrollers and more stable oscillators inside. To make his 1970s-era Drake “Twins” setup of separate but linked receiver and transmitter a little more fun to use, [Scott] came up with this neat Raspberry Pi-based DDS-VFO project to keep his boat anchors afloat. Compared to the original mechanically tuned variable frequency oscillator in the Drake receiver, the direct-digital synthesis method promises more stability, meaning less knob-nudging to stay on frequency.

The hardware used for the DDS-VFO is actually pretty simple — just a Raspberry Pi Zero W driving an AD9850-based signal-generator module. Sending the signal to the Twins was another matter. That was done by tapping into the injection cable linking both units, which meant a few circuit complications to deal with signal attenuation. [Scott] also added amenities like a digital frequency display, optical encoder with crank-style knob to change frequency, and a host of Cherry MX keyswitches for quick access to different features.

From the look of the video below, the Twins are now rock-solid and a lot easier to use. This project is loosely based on a recent panadapter project [Scott] undertook for the receiver side of the Twins.

Continue reading “Boat Anchor Twins Get A Little Digital Help Staying On Frequency”

Tiny Function Generator On The ATtiny85, Complete With OLED

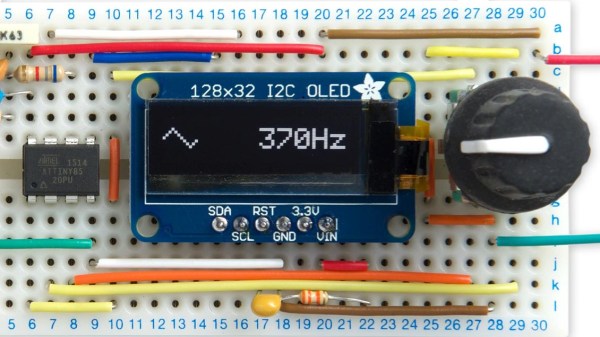
It’s easy to have a soft spot for “mini” yet perfectly functional versions of electronic workbench tools, like [David Johnson-Davies]’s Tiny Function Generator which uses an ATtiny85 to generate different waveforms at up to 5 kHz. It’s complete with a small OLED display to show the waveform and frequency selected. One of the reasons projects like this are great is not only because they tend to show off some software, but because they are great examples of the kind of fantastic possibilities that are open to anyone who wants to develop an idea. For example, it wasn’t all that long ago that OLEDs were exotic beasts. Today, they’re available off the shelf with simple interfaces and sample code.

The Tiny Function Generator uses a method called DDS (Direct Digital Synthesis) on an ATtiny85 microcontroller, which [David] wrote up in an earlier post of his about waveform generation on an ATtiny85. With a few extra components like a rotary encoder and OLED display, the Tiny Function Generator fits on a small breadboard. He goes into detail regarding the waveform generation as well as making big text on the small OLED and reading the rotary encoder reliably. His schematic and source code are both available from his site.

Small but functional microcontroller-based electronic equipment are nifty projects, and other examples include the xprotolab and the AVR-based Transistor Tester (which as a project has evolved into a general purpose part identifier.)

A Slew Of Open-Source Synthesizers

Hackaday reader [Jan Ostman] has been making microcontroller-based DIY synthesizers for quite a while now. Recently, he’s opened up the source for a lot of them so that you can play along at home. All of these virtual-analog synths and soundmakers can be realized on an Arduino or AVR ATmega328 if you happen to have one lying around.

Extra parts like a keyboard, some pushbuttons, or some potentiometer knobs to twiddle won’t hurt if you’d like to make something more permanent or more obviously playable, like [Jan] does. On the other hand, if you’d just like to get your feet wet, I’ve tweaked his code to be more immediately plug-and-play. The code is straightforward enough that it’s a good learning platform. So let’s take a quick tour through three drum machines and a string synth, each of which you can build on a breadboard in just a few minutes.

To install on an Arduino UNO, fetch the zip file from this GitHub repository, and move each subfolder to your Arduino sketch directory. You’re ready to play along.

Continue reading “A Slew Of Open-Source Synthesizers”

Embed With Elliot: Audio Playback With Direct Digital Synthesis

Direct-digital synthesis (DDS) is a sample-playback technique that is useful for adding a little bit of audio to your projects without additional hardware. Want your robot to say ouch when it bumps into a wall? Or to play a flute solo? Of course, you could just buy a cheap WAV playback shield or module and write all of the samples to an SD card. Then you wouldn’t have to know anything about how microcontrollers can produce pitched audio, and could just skip the rest of this column and get on with your life.

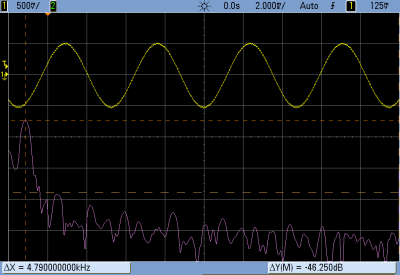
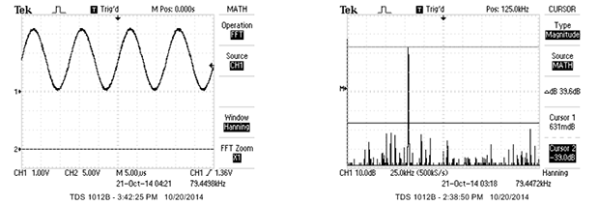
Harmonic distortion down ~45db on an Arduino
~45db signal to noise ratio from an Arduino

But that’s not the way we roll. We’re going to embed the audio data in the code, and play it back with absolutely minimal additional hardware. And we’ll also gain control of the process. If you want to play your samples faster or slower, or add a tremolo effect, you’re going to want to take things into your own hands. We’re going to show you how to take a single sample of data and play it back at any pitch you’d like. DDS, oversimplified, is a way to make these modifications in pitch possible even though you’re using a fixed-frequency clock.

The same techniques used here can turn your microcontroller into a cheap and cheerful function generator that’s good for under a hundred kilohertz using PWM, and much faster with a better analog output. Hackaday’s own [Bil Herd] has a nice video post about the hardware side of digital signal generation that makes a great companion to this one if you’d like to go that route. But we’ll be focusing here on audio, because it’s easier, hands-on, and fun.

Continue reading “Embed With Elliot: Audio Playback With Direct Digital Synthesis”

Direct Digital Synthesis (DDS)

Direct Digital Synthesis (DDS) Explained By [Bil Herd]

One of the acronyms you may hear thrown around is DDS which stands for Direct Digital Synthesis. DDS can be as simple as taking a digital value — a collection of ones and zeroes — and processing it through a Digital to Analog Converter (DAC) circuit. For example, if the digital source is the output of a counter that counts up to a maximum value and resets then the output of the DAC would be a ramp (analog signal) that increases in voltage until it resets back to its starting voltage.

This concept can be very useful for creating signals for use in a project or as a poor-man’s version of a signal or function generator. With this in mind I set out here to demonstrate some basic waveforms using programmable logic for flexibility, and a small collection of resistors to act as a cheap DAC. In the end I will also demonstrate an off-the-shelf and inexpensive DDS chip that can be used with any of the popular micro-controller boards available that support SPI serial communication.

All of the topics covered in the video are also discussed further after the break.

Continue reading “Direct Digital Synthesis (DDS) Explained By [Bil Herd]”

Function Generator With Zero CPU Cycles

No one is sitting around their workbench trying to come up with the next great oscilloscope or multimeter, but function generators still remain one of the pieces of test equipment anyone – even someone with an Arduino starter pack – can build at home. Most of these function generators aren’t very good; you’re lucky if you can get a sine wave above the audio spectrum. [Bruce Land] had the idea to play around with DMA channels on a PIC32 and ended up with a function generator that uses zero CPU cycles. It’s perfect for a homebrew function generator build, or even a very cool audio synthesizer.

The main obstacles to generating a good sine wave at high frequencies are a high sample rate and an accurate DAC. For homebrew function generators, it’s usually the sample rate that’s terrible; it’s hard pushing bits out a port that fast. By using the DMA channel on a PIC32, [Bruce] can shove arbitrary waveforms out of the chip without using any CPU cycles. By writing a sine wave, or any other wave for that matter, to memory, the PIC32 will just spit them out and leave the CPU to do more important work.

[Bruce] was able to generate a great-looking sine wave up to 200 kHz, and the highest amplitude of the harmonics was about 40db below the fundamental up to 100 kHz. That’s a spectacular sine wave, and the perfect basis for a DIY function generator build.