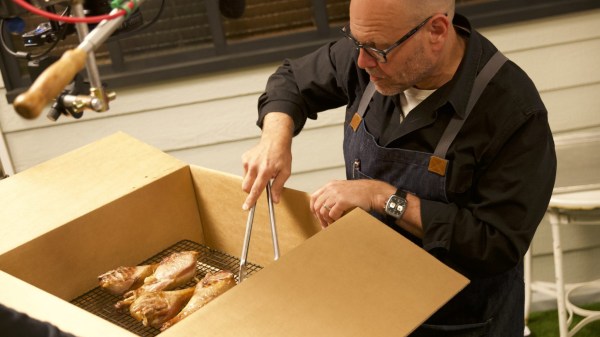
You Can Turn Soft Drink Bottles Into Handy Solar Lamps

Solar lights are a popular garden decoration. Of course, they’re available cheaply from most hardware and garden stores, but if you’re more of the DIY type, you might like to build your own. [opengreenenergy] has done just that, using recycled materials for a cheap and simple design.

The design was inspired by the Moser bottle, which is a water-filled bottle used to diffuse sunlight into a room during the day. Instead of sunlight, however, this design uses an LED to provide the light, for decorating a garden or for use when out camping or traveling.

In this design, a solar panel is used to charge a lithium-polymer battery during the day using a LP4060B5F charge controller IC. It’s paired with a AP6685 battery protection IC to ensure the battery is not overly discharged or otherwise damaged in use. When the solar panel stops putting out power when it gets dark, the LED is automatically switched on. It can be set to a low or high brightness to provide more runtime or more light as needed.

All the circuitry is wrapped up in a neat 3D-printed case that allows the hardware to be screwed directly on top of a regular soft drink bottle. Paired with some water in the bottle, and perhaps a little bleach to stave off algal growth, the result is a handy, portable light that also has enough mass to avoid it being blown over easily.

It’s interesting to compare the design to commercial versions that aim to pare costs down to a minimum. Video after the break.

Continue reading “You Can Turn Soft Drink Bottles Into Handy Solar Lamps”

Remote MQTT Temperature Sensor Shows How It’s Done

First of all, there are definitely simpler ways to monitor remote temperatures, but [Mike]’s remote MQTT temperature sensor and display project is useful in a few ways. Not only does it lay out how to roll such a system from scratch, but it also showcases system features like solar power.

After all, if one simply wants to monitor temperature that’s easily done, but once one wishes to log those temperatures and use them to trigger other things, then rolling one’s own solution starts to get more attractive. That’s where using someone else’s project as a design reference can come in handy.

[Mike’s] solution uses two Wemos D1 boards: one with a DS18B20 temperature sensor for outdoors, and one with a small OLED screen for an interior display. The external sensor relies on a rechargeable 18650 cell and a solar panel for a hassle-free power supply, and the internal sensor (of which there can be many) has a cute enclosure and is powered by USB. On the back end, a Raspberry Pi running an MQTT gateway and Node Red takes care of the operational side of things. The whole system has been happily running for over two years.

What is MQTT? It is essentially a messaging protocol, and takes care of the whole business of reliably communicating data back and forth between IoT devices. It scales very well and doesn’t need to be hard or intimidating; our own [Elliot Williams] can tell you all about implementing it.

How Small Is Too Small?

Not a rhetorical question! This week we consider the most micro microcontroller: the HC32L110. It’s the new title holder of the smallest ARM Cortex M0+ part. But could you actually use it?

MCU is the black thing that’s smaller than the capacitor.

I remember way back, when I first learned to solder surface-mount components. It was fiddly at first, but nowadays I don’t use through-hole components unless someone’s twisting my arm. And I still do my soldering myself — down to 0603 really isn’t all that bad with an iron, and below that, there’s always the heat plate. My heat plate has also gotten me through the two times I’ve actually needed to put down a ball-grid-array part. It wasn’t as bad as I had feared, honestly.

So maybe it’s time for me to take the BGA plunge and design a board or two just to get more familiar with the tech. I probably won’t dive straight into the deep end, like the featured chip here with 0.35 mm ball pitch, but rather stick with something that the cheap PCB services can easily handle. My experience tells me that the best way to learn something is just to test it out.

Now, off to go part shopping in the middle of a chip crisis! Wish me luck.

3D Printed Climbing Holds, Now With Texture

Technology enables all kinds of possibilities to mold our environments in the way we best see fit. Plenty of ski resorts use snowmaking to extend their seasons, there are wave pools for surfing hundreds of miles away from oceans, and if you don’t live near any mountains you can build your own climbing wall as well. For the latter, many have turned to 3D printers to create more rock-like climbing grips but plastic doesn’t tend to behave the same as rock unless you do what [Giles Barton-Owen] did and incorporate salt into the prints.

For small manufacturers, typically the way that the rock texture is mimicked is by somehow incorporating sand, permanently, into the grip itself. This works well enough but is often too rough on climbers’ hands or otherwise doesn’t faithfully replicate a rock climbing experience. For these grips, instead of including sand, salt crystals of a particular size were added to a resin that was formed over the 3D printed grip. Once the resin cures substantially, the water-soluble salt can be washed away leaving a perfect texture to grab onto with chalked hands.

While this might not be a scalable method for large-scale climbing grip manufacturers, [Giles] hopes this method will help smaller operations or even DIY climbers to build more realistic grips without having to break the bank. In fact, he has already found some success at his local climbing gym using these grips. The method may be more difficult to scale for larger manufacturers but for anyone who wants to try it out themselves, all that’s needed for this build is a 3D printer, salt, and time.

Continue reading “3D Printed Climbing Holds, Now With Texture”

Against The Cloud

One of our writers is working on an article about hosting your own (project) website on your own iron, instead of doing it the modern, cloudy-servicey way. Already, this has caused quite a bit of hubbub in the Hackaday Headquarters. Who would run their own server in 2022, and why?

The arguments against DIY are all strong. If you just want to spin up a static website, you can do it for free in a bazillion different places. GitHub’s Pages is super convenient, and your content is version controlled as a side benefit. If you want an IoT-type data-logging and presentation service, there are tons of those as well — I don’t have a favorite. If you want e-mail, well, I don’t have to tell you that a large American search monopoly offers free accounts, for the low price of slurping up all of your behavioral data. Whatever your need, chances are very good that there’s a service for you out there somewhere in the cloud.

And that’s awesome if you only want the service provided. But what if you want to play around? Or learn how it all works under the hood? This is Hackaday!

For instance, you could run your own mail server just for your friends and family. The aforementioned search monopolist will probably flag all of your e-mail as spam, partly because they don’t trust small e-mail providers, and partly because that’s the “m” in monopoly. But if you can get folks to whitelist the addresses, you’ll be in business. And then you open up a world of fun and foolery. You can write hooks to automatically handle mail, or you can create an infinite number of mail accounts, even on the fly as per Spamgourmet, the most awesome anti-spam tool of the last 30 years. Or you can invent your own. Run a mailing list for your relatives. Or do something stupid.

I used to run a service where, when a particular account received an e-mail, the attached photo was pushed up to a website with the subject line as the caption. Instant photo-blog, of the strangest and least secure sort. Getting it running was a few lines of Bash scripting, and an afternoon of fun. Is there a service that does this, already existing in the cloud? Probably. One that allows you a little privacy and doesn’t track your every move? Maybe. But even if there is, would I have learned about sendmail by using this service? Nope!

I hear you saying “security” under your breath, and you’re right. This system was secured by lock made of purest obscurity. But still, in seven years of running the service, nobody guessed the magic e-mail address, not once. Knowledge of the e-mail address was essentially a password, but if I needed extra security I probably could have implemented it in a few lines of Bash anyway. The webpage itself was static HTML, so good luck with that, Hackerman! (The site’s been down for a while now, so you missed your chance.)

If you just want a service, you can be served. But if you want to be a server, a first-class Internet citizen, with your own cloud in the sky, nothing’s stopping you either. And in contrast to using someone else’s computers, running your own is an invitation to play. It’s a big, Internet-connected sandbox. There are an infinity of funny ideas out there that you can implement on your own box, and a lot to learn. If you hack on someone else’s box, it’s a crime. If you hack on your own, it’s a pleasure.

I know it’s anachronistic, but give it a try. (PDF, obscenity, uncorrected typos.) Be your own cloud.

Simple Dev Board Module Socket

When you’re building a quick prototype or a one-off project it’s nice to be able to securely mount the various modules and development boards. Sometimes these boards have mounting holes, but often they don’t. As an example from the latter category, digital music instrument maker and performer [DIYDSP] shows us how to build a simple socket to mount an STM32 Nucleo-32 module.

The socket is built on a standard pad-per-hole piece of vector board cut to the desired size. Pairs of female pin header strips are soldered down to the board. The inner pair of headers is for the module, the outer pair is for your interconnections. The headers are connected up with short solder bridges, and [DIYDSP] recommends you extend the outer pair several pins longer than necessary. These extras can be used for additional power or ground points, or on some boards they could connect to the debug header pins. He prefers to use female sockets because that lessens the odds that an accidentally bent pin will short something out.

Final step is to drill your mounting holes in the desired location, and no more development boards free-floating and held up only by wires. Do you have any tips for mounting these kinds of modules, either individually as shown here or onto PCBs? Let us know in the comments.

Continue reading “Simple Dev Board Module Socket”

One Tool Twists Wires, And Skewers Shish Kebabs

Twisting stranded wire with your fingers in preparation for tinning and/or soldering is almost a reflex for folks making electronic assemblies. But what if the wires are too close to get your fingers around, or you have the fingers of a sumo wresters? Well [DIYDSP] has a solution for you (see video below the break) that’s easy to make from a shish kebab skewer that’s probably rolling around your kitchen drawer. The reason that [DIYDSP] wanted to twist such closely spaced wires was to solder a length of 0.1 in O.C. stranded ribbon cable directly onto a PCB pin header pattern.

The method is very simple. Drill a long hole in the factory-cut flat end, followed by using a countersink bit to give a conical taper to guide the wires in. [DIYDSP] found that a 1/16 inch (1.6 mm) drill bit was a bit too large to grip the types of wires he was using, and finally settled on a 0.6 mm bit. If you are using larger wires, you should experiment to get the right size, or just build a handful of these of differing diameters since they’re so easy to make — just mark them clearly so you don’t accidentally grill shish kebabs with them on the BBQ.

The resulting tool is not unlike the business end of a hand-held wire-wrap tool, but works different principle and is a fraction of the cost. If you do any amount of interconnect wiring with stranded wires, then you should check out this video and whip up a couple of these to throw in your tool box.

Continue reading “One Tool Twists Wires, And Skewers Shish Kebabs”