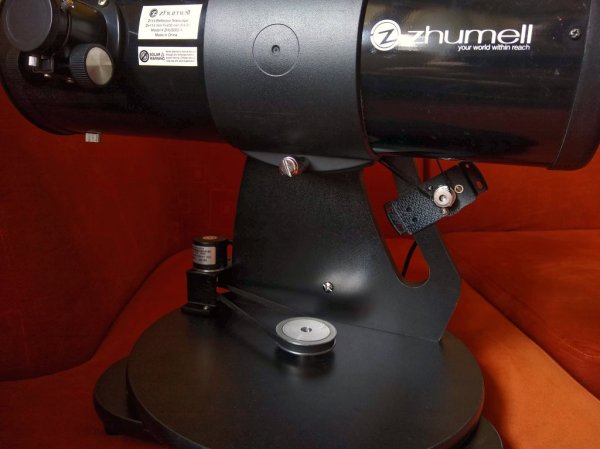
Fully assembled DobsonianDSC.

Find Your Way In The Starry Skies With DobsonianDSC

An obvious problem with the use of a telescope is getting the former to point at the proper part of the sky which you intend to observe, or vice versa when you spot something interesting and wish to record the exact location. While all of this can be done manually with some trouble, there’s a lot to be said for automating this process. Unfortunately these Digital Setting Circles (DSC) features are not cheap even as add-on, which is why [Vladimir Atehortúa] created DobsonianDSC as a low-cost DIY solution.

As the name suggests, this project is based around a Dobsonian-style telescope: Newtonian tube with simple altazimuth base. Aside from the mechanical construction, this system uses an ESP32 as its controller along with two rotary encoders, with the simple circuit detailed in a build guide. The firmware for the ESP32 is written in the Arduino C dialect, and a guide for flashing the ESP32 with the Arduino IDE and connecting it to the WLAN is provided as well.

After setup, the resulting telescope system can be used either via WiFi or Bluetooth from existing apps such as SkySafari that support the ‘Basic Encoding System’. An initial calibration is required, but after that you should have a telescope that works in concert with SkySafari or similar to automate this tedious part of astronomy away.

Obviously this is not a ready-to-install system, as every telescope is shaped and sized differently, but inspiration for mounting solutions is provided as well.

Cheap DIY Mic Sounds (And Looks) Damn Good

As any musician, podcaster, or youtuber will be quick to tell you, there’s no substitute for a good microphone. They’ll also be quick to tell you all about their favorite microphone, why it’s better than all the others, and how much it cost (oh, and how round it sounds, whatever that means). But what if you could build your own that sounds as good, if not better, and do it for only $30?

That’s what [Matt] from DIY Perks set out to discover when he built his DIY USB-C Microphone. He was able to source the same microphone capsule that can be found in his high-end, $600 CAD E100S, and built a simple pre-amplifier that bumps its quiet output up to line-level. He even connected it to the mic module with some custom cable made from two tiny enameled wires that won’t transmit bumps and vibrations, wrapped inside desoldering braiding which acts as a shield. He fed the output from the pre-amp into a cheap USB audio interface and voilà! — top-notch sound for next to nothing. Make sure you check out the video below to hear a comparison between the mic and its professional counterparts.

Of course, sounding good isn’t quite enough. [Matt] wasn’t satisfied until the piece looked the part as well, which is why he encased the mic module in custom-bent brass mesh shielding and tubing (which also helps to reduce electrical interference). The brass cage sits suspended via rubber o-rings on a beautiful bent brass mount, which sits atop an articulated brass arm of [Matt]’s own design. Finally, the arm is mounted to a wood and brass enclosure that also serves to house the electronics.

And, in true open-source fashion, the video description is full of links to parts, schematics, and templates in case you want to build one of these beauties for yourself. Between this fantastic build and this other, super-overkill scratch-built USB microphone we featured earlier in the year, there has never been a better time to make yourself a mic you won’t have to trade your car for.

Thanks to [RichV] and [BaldPower] for the tip!

Continue reading “Cheap DIY Mic Sounds (And Looks) Damn Good”

Ford Maverick Welcomes DIY Spirit

We’ve featured a lot of car hacks on these pages, most would void the warranty and none of it with explicit factory support. Against that background, Ford’s upcoming Maverick is unique: a major manufacturer has invited owners to unleash their do-it-yourself spirit. It is one of several aspects that led [Jason Torchinsky] of Jalopnik to proclaim The 2022 Ford Maverick Is An Honest, Cheap, Multitool Of A Vehicle And I’m All For It.

There are two primary parts to Ford’s DIY invitation. Inside the cabin are several locations for a dovetail mount called “Ford Integrated Tether System” (FITS). Naturally Ford will be selling their own FITS accessories, but they also expect people to create and 3D-print designs addressing needs unmet by factory kits. CAD files for FITS dimensions are promised, but any maker experienced with a caliper should have little trouble.

Another part of Ford’s DIY invitation is in the cargo area, whose sides were stamped with slots for lumber beams supporting projects like a ~$45 bike rack. There are also threaded bolt holes already in the bed, no drilling or tapping into sheet metal necessary. Behind a few small plastic doors are wires to supply 12 V DC power without the risk of splicing into factory harnesses.

There will always be wild car hacks like turning a sedan into a pickup truck. But it’s great to lower the barrier of entry for milder hacks with these small and very welcome features. QR codes on a sticker takes us to Ford’s collection of video instructions to get things started. Naturally if this idea takes off other people will post many more on their own YouTube channels. We like where Ford wants to go with this, and we would love to see such DIY-friendliness spread across the auto industry. A few Ford videos explaining design intent in this area after the break.

[Title image: Ford Motor Company]

Continue reading “Ford Maverick Welcomes DIY Spirit”

Embrace The New, But Don’t Forget The Old

We were trading stories of our first self-made PCBs in the secret underground Hackaday bunker, and a couple of the boards looked really good for first efforts. Of course there were mistakes and sub-optimal routing, but who among us never connects up the wrong signals or uses a bad footprint? What lead me to have a hacker “kids these days have it so easy” moment was that all of the boards were, of course, professionally fabbed with nice silkscreens. They all looked great.

What a glorious time to be starting down the hardware path! When I made my first PCB, the options were basically laying down tape, pulling out the etch resist pen, or paying a bazillion inflation-adjusted dollars for a rapid prototype board. This meant that the aspiring hacker also had to have a steady hand and be at least casually acquainted with a little chemistry. The ability to just send your files out to a PCB house means that the barrier to stepping up your hardware game from plug-them-together modules is lower than it’s ever been.

But if scratching or etching your own PCB out of copper plate is very hands-on, very DIY, and very low-tech, it’s also very fast in comparison to even the most rushed service. Last weekend, I needed a breakout board for some eight-pin SOIC H-bridge chips for a turtle robot project with my son. Everything was hand-soldered and hot-glued in a Saturday afternoon and evening, so there was no time for a PCB order. A perfect opportunity for the Old Ways™.

We broke out a Sharpie, traced out where the SOIC pins would land, connected up the grounds, brought the signals out to friendly pads, and then covered the rest of the board in islands of copper just in case we’d need any prototyping space later. Of course, some of the ink lines touched each other where they shouldn’t, but before the copper meets the etchant it’s easy enough to scrape the spaces clear with a pin. The results? My boards look like they were chiseled out by a caveman, but they worked. And more importantly, we got it done within the attention span of a second grader without firing up a computer.

So revel in your cheap offshore PCB factories, hackers of today! It’s a miracle that even four-layer boards come back within a week without breaking the bank. But I encourage you all to try it out by hand as well. For large enough packages and one-offs, full DIY absolutely has the speed advantage, but there’s also a certain wabi sabi to the hand-drawn board. Like brush strokes in residual copper.

Beginning The Machine Shop Journey With A DIY CNC

Building a good quality machine shop may seem to present a chicken-and-egg problem, at least for anyone not willing to mortgage their home for the money needed to buy all of these tools new. Namely, that building good tools often requires good tools. To help solve this problem, [Ryan] designed and built this CNC machine which can be built with nothing other than common tools, hardware store supplies, and some readily available parts from the internet.

Since it’s being built from consumer-grade material, [Ryan] has the design philosophy of “buying precision” which means that most of the parts needed for this build are precise enough for their purpose without needing to be worked in any way before incorporation into the mill. For example, he uses a granite plate because it’s hard, flat, heavy, and sturdy enough at the time of purchase to be placed into the machine right away. Similarly, his linear guides do not need to be modified before being put to work with a high degree of precision and minimal calibration. From there, he applies the KISS principle and uses the simplest parts available. With this design process he is able to “bootstrap” a high quality mill for around $1500 USD without needing any extra tools than the ones you likely already have.

The RIG-CNC as it is known has also been made completely open source which further cements its bootstrapability, and there is a lot more detail on the project page and in the video linked below. This project is unique not simply for the mill build from common parts and tools, but because this design philosophy is so robust. Good design goes a lot farther in our builds than a lot of us might realize, and good design often results in more maintainable, hackable things that work for more uses than the original creators may have even thought about.

Continue reading “Beginning The Machine Shop Journey With A DIY CNC”

DIY Camera Dolly Costs More Time Than Money

A camera dolly can be fantastic filmmaking tool, and [Cornelius] was determined to create his own version: the “Dope” DIY Dolly. The result not only upped his production quality, but was also entirely in line with his DIY approach to filmmaking in general.

A basic dolly design is straightforward enough: a flat platform with wheels, and some aluminum tubing upon which to roll. But while dolly assemblies are easy to purchase or rent, [Cornelius] found that his DIY version — which used easily sourced parts and about 80 hours worth of 3D printing — provided perfectly acceptable results, while opening the door to remixing and sharing with like-minded filmmakers.

Interested? Download the STL files to get started on your own version. As for the track, smooth metal pipe is best, but sometimes track made from PVC can do the job. [Cornelius] has a few additional STL files for those planning to make a base from 1″ PVC pipe, and those are on a separate download link near the bottom of the project page (here’s that link again.) Watch the Dope Dolly in action in the brief video embedded below.

On the other hand, if you prefer your DIY camera equipment to be on the smaller and more complicated end of the spectrum, be sure to check out this multi-axis camera slider.

Continue reading “DIY Camera Dolly Costs More Time Than Money”

USB Power Bank’s Auto-Off Becomes Useful Feature In Garage Door Remote

For devices that are destined for momentary and infrequent use as well as battery power, some kind of power saving is pretty much a required feature. For example, when [PJ Allen] turned two ESP8266-based NodeMCU development boards into a replacement wireless remote garage door opener, a handy USB power bank ended up serving as a bit of a cheat when migrating the remote away from the workbench. Instead of moving the board from USB to battery power and implementing some kind of sleep mode or auto-off, [PJ Allen] simply plugged in a USB power bank and let it do all the work.

This is how the feature works: some USB power banks turn themselves off unless they detect a meaningful current draw. That means that if the power bank is charging a phone, it stays on, but if it’s only lighting up a few LEDs, it’ll turn itself off. This feature can be a frustrating one, but [PJ Allen] realized that it could actually be useful for a device like his garage door remote. Turning on the power bank delivers 5 V to the NodeMCU board and allows it to work, but after about fifteen seconds, the power bank turns itself off. Sure, strapping a power bank to the remote makes the whole thing bigger than it needs to be, but it’s a pretty clever use of the minimum load as an effortless auto-off feature.

The NodeMCU boards in [PJ Allen]’s DIY remote use ESP-NOW for their wireless communications, a nifty connectionless protocol from Espressif that we’ve seen used in other projects as well, such as this ESP32-based walkie-talkie.