Flashlight shining through gold leaf on glass

Shining Through: Germanium And Gold Leaf Transparency

Germanium. It might sound like just another periodic table entry (number 32, to be exact), but in the world of infrared light, it’s anything but ordinary. A recent video by [The Action Lab] dives into the fascinating property of germanium being transparent to infrared light. This might sound like sci-fi jargon, but it’s a real phenomenon that can be easily demonstrated with nothing more than a flashlight and a germanium coin. If you want to see how that looks, watch the video on how it’s done.

The fun doesn’t stop at germanium. In experiments, thin layers of gold—yes, the real deal—allowed visible light to shine through, provided the metal was reduced to a thickness of 100 nanometers (or: gold leaf). These hacks reveal something incredible: light interacts with materials in ways we don’t normally observe.

For instance, infrared light, with its lower energy, can pass through germanium, while visible light cannot. And while solid gold might seem impenetrable, its ultra-thin form becomes translucent, demonstrating the delicate dance of electromagnetic waves and electrons.

The implications of these discoveries aren’t just academic. From infrared cameras to optics used in space exploration, understanding these interactions has unlocked breakthroughs in technology. Has this article inspired you to craft something new? Or have you explored an effect similar to this? Let us know in the comments!

We usually take our germanium in the form of a diode. Or, maybe, a transistor.

Continue reading “Shining Through: Germanium And Gold Leaf Transparency”

Restoring A Vintage CGA Card With Homebrew HASL

Right off the bat, we’ll stipulate that what [Adrian] is doing in the video below isn’t actual hot air solder leveling. But we thought the results of his card-edge connector restoration on a CGA video card from the early 80s was pretty slick, and worth keeping in mind for other applications.

The back story is that [Adrian], of “Digital Basement” YouTube fame, came across an original IBM video card from the early days of the IBM-PC. The card was unceremoniously dumped, probably due to the badly corroded pins on the card-edge bus connector. The damage appeared to be related to a leaking battery — the corrosion had that sickly look that seems to only come from the guts of batteries — leading him to try cleaning the formerly gold-plated pins. He chose naval jelly rust remover for the job; for those unfamiliar with this product, it’s mostly phosphoric acid mixed with thickeners and is used as a rust remover.

The naval jelly certainly did the trick, but left the gold-plated pins a little worse for the wear. Getting them back to their previous state wasn’t on the table, but protecting them with a thin layer of solder was easy enough. [Adrian] used liquid rosin flux and a generous layer of 60:40 solder, which was followed by removing the excess with desoldering braid. That worked great and got the pins on both sides of the board into good shape.

[Adrian] also mentioned a friend who recommended using toilet paper to wick up excess solder, but sadly he didn’t demonstrate that method. Sounds a little sketchy, but maybe we’ll give it a try. As for making this more HASL-like, maybe heating up the excess solder with an iron and blasting the excess off with some compressed air would be worth a try.

Continue reading “Restoring A Vintage CGA Card With Homebrew HASL”

Nanotechnology In Ancient Rome? There Is Evidence

Anything related to nanotechnology feels fairly modern, doesn’t it? Although Richard Feynman planted the seeds of the idea in 1959, the word itself didn’t really get formed until the 70s or 80s, depending on who you ask. But there is evidence that nanotechnology could have existed as far back as the 4th century in ancient Rome.

That evidence lies in this, the Lycurgus cup. It’s an example of dichroic glass — that is, glass that takes on a different color depending on the light source. In this case, the opaque green of front lighting gives way to glowing red when light is shining through it. The mythology that explains the scene varies a bit, but the main character is King Lycurgus, king of Edoni in Thrace.

So how does it work? The glass contains extremely small quantities of colloidal gold and silver — nanoparticles of gold to produce the red, and silver particles to make the milky green. The composition of the Lycurgus cup was puzzling until the 1990s, when small pieces of the same type of glass were discovered in ancient Roman ruins and analyzed. The particles in the Lycurgus cup are thought to be the size of one thousandth of a grain of table salt — substantial enough to reflect light without blocking it.

The question is, how much did the Romans know about what they were doing? Did they really have the means to grind these particles into dust and purposely infuse them, or could this dichroic glass have been produced purely by accident? Be sure to check out the videos after the break that discuss this fascinating piece of drinkware.

Continue reading “Nanotechnology In Ancient Rome? There Is Evidence”

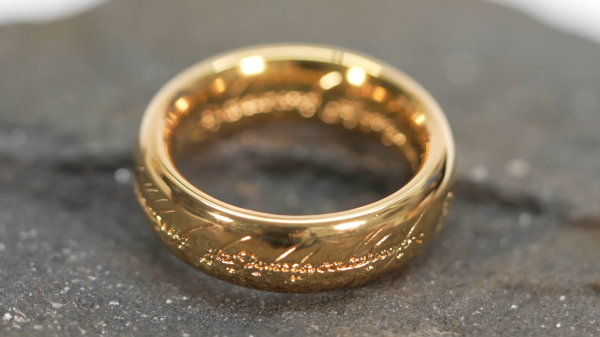
Making The One Ring By Electroplating Gold On A 3D Print

Electroplating is a great way to add strength or shine to a 3D print. However, we don’t see too many people trying it with gold. [HEN3DRIK] isn’t afraid to experiment, though, and pulled off some amazing, high-quality jewelry-grade plating!

The design for the project was the so-called Ring of Power from Lord of the Rings. The print was created on a resin printer at a high quality level, washed thoroughly to remove any remaining resin, and then cured. The print was then post-processed with sandpaper to make it as smooth as possible. Conductive paint was then applied, ready to take on the plating layers. [HEN3DRIK] first started by plating copper to build up a tough base layer, then nickel to prevent mixing between the copper and gold. The gold is then finally plated on top. Plating the copper is done with the ring constantly rotating to get as even a coat as possible. In contrast, the gold plating is done with a brush to avoid wasting the highly-expensive plating solution.

The final result is a gleaming gold ring that probably feels strangely light in the hand. The technique is time consuming, thanks to the need to plate multiple layers, but the results are to die for. We’ve seen [HEN3DRIK]’s fine work before, too. Video after the break.

Continue reading “Making The One Ring By Electroplating Gold On A 3D Print”

Scavenging CDs For Flexible Parts

CDs are becoming largely obsolete now, thanks to the speed of the internet and the reliability and low costs of other storage media. To help keep all of this plastic out of the landfills, many have been attempting to find uses for these old discs. One of the more intriguing methods of reprurposing CDs was recently published in Nature, which details a process to harvest and produce flexible biosensors from them.

The process involves exposing the CD to acetone for 90 seconds to loosen the material, then transferring the reflective layer to a plastic tape. From there, various cutting tools can be used to create the correct pattern for the substrate of the biosensor. This has been shown to be a much more cost-effective method to produce this type of material when compared to modern production methods, and can also be performed with readily available parts and supplies as well.

The only downside to this method is that it was only tested out on CDs which used gold as the conducting layer. The much more common aluminum discs were not tested, but it could be possible with some additional research. So, if you have a bunch of CD-Rs laying around, you’re going to need to find something else to do with those instead.

Thanks to [shinwachi] for the tip!

PCB Finishes Hack Chat

Join us on Wednesday, March 11 at noon Pacific for the PCB Finishes Hack Chat with Mark Hughes and Elijah Gracia!

There’s no way to overestimate the degree to which the invention of the printed circuit board revolutionized electronics. What was once the work of craftspeople weaving circuits together with discrete components, terminal strips, and wiring harnesses could now be accomplished with dedicated machines, making circuit construction an almost human-free process. And it was all made possible by figuring out how to make copper foil stick to a flat board, and how to remove some of it while leaving the rest behind.

​Once those traces are formed, however, there’s more work to be done. Bare copper is famously reactive stuff, and oxides soon form that will make the traces difficult to solder later. There are hundreds of different ways to prevent this, and PCB surface finishing has become almost an art form itself. Depending on the requirements for the circuit, traces can be coated with tin, lead, gold, nickel, or any combination of the above, using processes ranging from electroplating to immersion in chemical baths. And the traces aren’t the only finishes; solder resist and silkscreening are both important to the usability and durability of the finished board.

For this Hack Chat, we’ll be talking to Elijah Gracia and Mark Hughes from Royal Circuit Solutions. They’re both intimately familiar with the full range of PCB coatings and treatments, and they’ll help us make sense of the alphabet soup​: HASL, OSP, ENIG, IAg, LPI, and the rest. We’ll learn what the different finishes do, which to choose under what circumstances, and perhaps even learn a bit about how to make our homebrew boards look a little more professional and perform a bit better.

join-hack-chatOur Hack Chats are live community events in the Hackaday.io Hack Chat group messaging. This week we’ll be sitting down on Wednesday, March 11 at 12:00 PM Pacific time. If time zones have got you down, we have a handy time zone converter.

Click that speech bubble to the right, and you’ll be taken directly to the Hack Chat group on Hackaday.io. You don’t have to wait until Wednesday; join whenever you want and you can see what the community is talking about.

Creating A Custom Engagement Ring With 3D-Printing

Even if you’re pretty sure what the answer will be, a marriage proposal is attended by a great deal of stress to make the event as memorable and romantic as possible. You’ve got a lot of details to look after, not least of which is the ring. So why not take some of the pressure off and just 3D-print the thing?

No, a cheesy PLA ring is probably not going to cut it with even the most understanding of fiancees, and that’s not at all what [Justin Lam] did with this DIY engagement ring. He took an engineer’s approach to the problem – gathering specs, making iterative design changes in Fusion 360, and having a prototype ring SLA printed by a friend. That allowed him to tweak the design before sending it off to Shapeways for production. We were surprised to learn that jewelry printing is a big deal, and Shapeways uses a lost-wax process for it. First a high-resolution wax SLA printer is used to make a detailed positive, which is then used to make a plaster mold. The mold is fired to melt the wax, and molten gold is poured in to make the rough casting, which is cleaned and polished before shipping.

Once he had the ring, [Justin] watched a few jewelry-making videos to learn how to set the family heirloom stone into the bezel setting; we admit we cringed a bit when he said he used the blade shaft of a screwdriver to crimp the edge of the bezel to the stone. But it came out great, even if it needed a bit of resizing. The details of the proposal are left to the romantically inclined, but TL;DR – she said yes.

Congratulations to the happy couple, and to [Justin] for pulling off a beautiful build. Most of our jewelry hacks are of the blinkenlight variety rather than fine jewelry, although we have featured a machinist’s take on the subject before.