Finding The Sun And Moon The New Old-Fashioned Way

The ability to build a robot to take care of a tedious task for you is power indeed. For a few centuries, the task of helping determine one’s location fell to the sextant. Now, you can offload that task to this auto-sextant, courtesy of [Raz85].

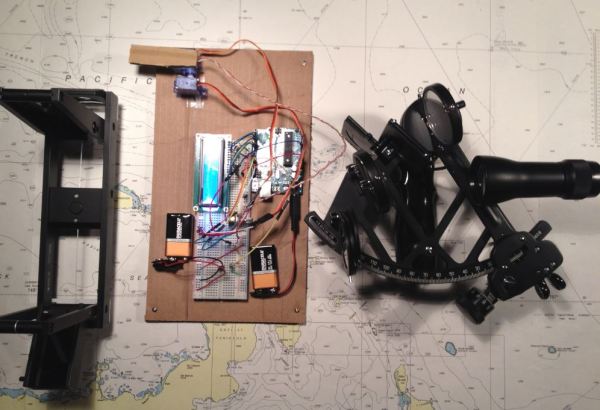
To be clear, this robo-sextant doesn’t give you your exact location, but it does find and display the bearing and altitude of the most luminous object around and display them on the LCD — so, the sun and moon. A pair of cheap servos handle the horizontal and vertical movement, an Arduino Uno acts as the brains and nervous system, and a photoresistor acts as the all-seeing eye. Clever use of some cardboard allow [Raz85] to keep the photoresistor isolated from most all light except what the sextant is currently pointed at. Servos have a limited field of movement, so you might need to adjust [Raz85]’s code accordingly if you’re rebuilding this one yourself.

After taking three minutes to make its rounds of the sky, the Uno records the servos’ positions when fixed on the sun or moon, translating that data into usable coordinates. Don’t forget the best part, it runs on batteries making it convenient for all your wave-faring excursions!

Continue reading “Finding The Sun And Moon The New Old-Fashioned Way”

A Table From Beyond Infinity

Infinity mirrors are some far-out table mods and make a great centerpiece. Instructables user [bongoboy23] took a couple steps beyond infinity when designing this incredible table tailor-made for our modern age.

Poplar and pine wood make up the framing, and red oak — stained and engraved — make for a chic exterior. Programmed with Arduino and run on a Teensy 3.1, the tabletop has 960 LEDs in forty sections. There are, four USB ports hidden behind sliding panels, as well as a two-port AC outlet and an inductive charging pad and circuit.  A hidden Adafruit TFT touchscreen display allows the user to control the table’s functions. Control is limited to changing lighting functions, but Pac-Man, Snake, and text features are still to come!

Weighing in at $850, it’s not a cheap build, but it looks amazing.

Continue reading “A Table From Beyond Infinity”

A Handy Tutorial For Voice-Command Awesomeness

When somebody can’t find a guide on how to accomplish a particular task, we here at Hackaday admire those individuals who take it upon themselves to write one for the benefit of others. Instructables user [PatrickD126] couldn’t find a write-up on how to connect Amazon’s Alexa service, and Echo to his Raspberry Pi home security system, so his handy tutorial should get you up to speed for your own projects.

[PatrickD126] shows how loading some software onto the Raspberry Pi is readily accomplished along with enabling Alexa to communicate more directly with the Pi. From there, it’s a matter of configuring your Amazon Web Services account with your preferred voice commands, as well as which GPIO pins you’d like to access. Done! [PatrickD126] notes that the instructions in the guide only result in a temporary solution, but suggests alternatives that would allow your project to operate long-term.

Continue reading “A Handy Tutorial For Voice-Command Awesomeness”

Vibrating Distance Torch Illuminates The Dark Without Light

If you’ve ever had to move around in a dark room before, you know how frustrating it can be. This is especially true if you are in an unfamiliar place. [Brian] has attempted to help solve this problem by building a vibrating distance sensor that is intuitive to use.

The main circuit is rather simple. An Arduino is hooked up to both an ultrasonic distance sensor and a vibrating motor. The distance sensor uses sound to determine the distance of an object by calculating how long it takes for an emitted sound to return to the sensor. The sensor uses sounds that are above the range of human hearing, so no one in the vicinity will hear it. The Arduino then vibrates a motor quickly if the object is very close, or slowly if it is far away. The whole circuit is powered by a 9V battery.

The real trick to this project is that the entire thing is housed inside of an old flashlight. [Brian] used OpenSCAD to design a custom plastic mount. This mount replaces the flashlight lens and allows the ultrasonic sensor to be secured to the front of the flashlight. The flashlight housing makes the device very intuitive to use. You simply point the flashlight in front of you and press the button. Instead of shining a bright light, the flashlight vibrates to let you know if the way ahead is clear. This way the user can more easily navigate around in the dark without the risk of being seen or waking up people in the area.

This reminds us of project Tacit, which used two of these ultrasonic sensors mounted on a fingerless glove.

Kitchen Timer

A Kitchen Timer Fit For MacGyver

Here’s a project that you don’t want to bring into an airport, ship through the mail, or probably even remove from your home. [ProjectGeek] has built himself a simple kitchen timer masquerading as a bomb. The build is actually pretty simple, but the end result is something that would look at home in a Hollywood action flick.

The timer circuit is built from four simple components. An 8051 microcontroller board is used as the primary controller and timer. The code is available on GitHub. This board is attached to a another board containing four momentary push buttons. These are used to program the timer and to stop the buzzing. Another board containing four 7-segment displays is used to show the remaining time on the timer. A simple piezo buzzer is used to actually alert you when the timer has run out. All of these components are connected with colorful jumper wires.

The physical part of this build is made from easily available components. Old newspapers are rolled up to form the “explosive” sticks. These are then covered in plain brown paper ordinarily used to cover text books. The rolls are bundled together and fixed with electrical tape. The electronics can then be attached to the base with some hot glue or double-sided tape.

LeanPipe

Building Things With Lean Pipe

Sometimes you just want to build something quickly and easily. Maybe you just need a basic structure for your actual project, or perhaps you want to be able to easily modify the design. Maybe you don’t have access to many fancy tools to build a solid, lightweight structure. Another possibility is that you want to be able to break down your structure and move it at a later date. In cases like these, you might want to consider using lean pipe.

Lean pipe is kind of like K’NEX for adults. It’s made up of metal pipe and specialized fittings. If you’ve ever worked with PVC pipe before then this may sound familiar. The difference is lean pipe is stronger and designed specifically for building sturdy structures. The fixtures designed for use with lean pipe are much easier to work with than PVC pipe. With PVC pipe, it seems like you never have the exact right fitting and you have to build your own adapters, quickly increasing the cost of the design.

A typical lean pipe fitting will either slide over the end of a section of pipe, or wrap around it somewhere in the middle. An adjustment screw can then be tightened to clamp the fitting in place around the sections of pipe. The video below does a good job demonstrating the different possibilities with fittings. The primary issue with this material is that you might not be able to find it at your local hardware store. Luckily, a quick Internet search will turn up a number of online purchasing options.

So what can you build with this stuff? Cody has been building himself computer desks with an industrial look. He first starts out with the frame design. This is the part that’s made from the lean pipe. Once the frame is completed he just needs to work on the wood surfaces. All he really needs to do is cut the wood to shape and then finish it to look nice. It then lays in place and can be bolted down for extra security. Continue reading “Building Things With Lean Pipe”

NES Controller

Turning A Classic NES Controller Into A Bluetooth Controller

[Pietronet] is like many of us in that he enjoys playing some classic console video games from time to time. He usually plays them on his PC using a Wiimote as a controller. The Wiimote has most of the classic buttons in a comfortable configuration. Plus, it’s got Bluetooth built-in, which makes it easy to pair up to your PC. [Pietronet] decided to take it a step further, though. He managed to cram all of the guts from a Wiimote inside of the original NES controller for a more authentic feel.

The first step was to crack open the Wiimote and locate pads for each button. Once they were located, [Pietronet] used a Dremel to cut the board into a smaller size. He cut off part of the circuit board that contained the directional pad as well as the connector for the nunchuck. Next he had to solder very thin wires to each of the button pads he located earlier.

The original NES controller has a very limited number of buttons, and [Pietronet] wanted to modify the original controller as little as possible. Therefore, he attached a magnetic reed switch to the Wiimote’s sync button. This way if he ever needs to sync the Wiimote to a new console, he can do it by holding a magnet in the right place. This is a function that isn’t often used, so the inconvenience should be negligible.

The next step was to connect the buttons from the original NES controller up to the wires that were added to the Wiimote. [Pietronet] left the original circuit board mostly intact. He did have to cut a small chunk of it away in order to make room for two AAA batteries, but this didn’t affect the functionality of the controller.

The inside of the NES controller had to be cleaned out of various standoffs and plastic bits to make room for all of the extra components. The Wiimote has an LED to indicate that the controller is connected properly. [Pietronet] soldered a red SMD LED in its place on the end of two thin wires. This LED was then placed on the bottom left side of the directional pad. It’s visible through a translucent filter. This allows [Pietronet] to see when the NES controller is synced up properly.

The case fits back together and everything is held in place. The result is what looks and feels like a classic NES controller, only this one has Bluetooth connectivity and a vibration motor. Check out the video demonstration below to get an idea of what it looks like in use. Continue reading “Turning A Classic NES Controller Into A Bluetooth Controller”