We’re all used to touch pads on our laptops, and to touch screens. It’s an expectation now that a new device with a screen will be touch-enabled.
For very large surfaces though, touch is still something of an expensive luxury. If you’re a hardware hacker, unless you are lucky enough to score an exceptional cast-off, the occasional glimpse of a Microsoft PixelSense or an interactive whiteboard in a well-equipped educational establishment will be the best you’re likely to get.
[Adellar Irankunda] may have the answer for your large touch board needs if you aren’t well-heeled, he’s made one using the interesting approach of surrounding the touch area with an array of infra-red LEDs and photo transistors. By studying the illumination of the phototransistors by different LEDs in the array, he can calculate the position of anything such as a pointing finger that enters the space. It’s an old technique that you might have found on some of the earlier touch screen CRT monitors.
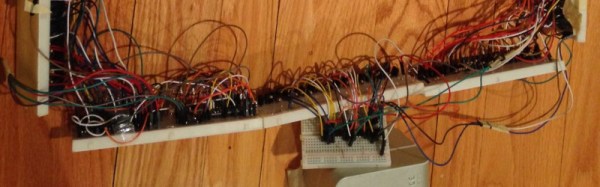
His hardware is built on twelve breadboards mounted in a square, upon which sit 144 LED/phototransistor pairs managed through a pile of 4051 CMOS multiplexers by a brace of Arduino Nanos. If you fancy one yourself he’s provided all the code, though the complex array of breadboards to assemble are probably not for the faint-hearted. You can see it in action in a video we’ve posted below the break.