DIY Night Vision, Where Four Is Better Than Two

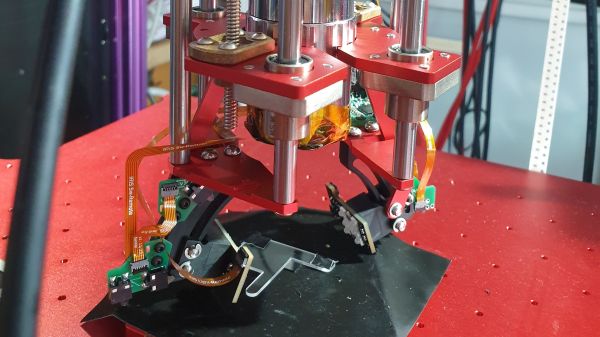
Night vision projects are great, and the hardware available to hobbyists just gets better and better. [Just Call Me Koko] shows off just such a build using four low-light, IR-sensitive cameras, four displays, and four lenses in 3D printed enclosures mounted to a helmet. Why four? Well, mounting two cameras and displays per eye is the easiest way to yield a wider field of view, and for bonus points, it sure looks extra weird.

At its heart, each of the four segments is the same. A Foxeer Night Cat 3 camera is mounted at the front, its output is connected directly to a 2″ diagonal NTSC/PAL display, and at the rear is a DCX (double convex) lens 38 mm in diameter with a 50 mm focal length. Add a printed enclosure, and the result is a monocular night vision display. Do it three more times and arrange them around one’s eyeballs, and one can make a night vision system with a panoramic view that probably takes only a little getting used to.

How well does it work? [Just Call Me Koko] does some walking around and also tries some target practice while wearing them, and concludes that while they don’t have nearly the clarity of the real deal (the 320×240 resolution displays limit the details one can perceive), they do work fairly well for what they are. Also, the cost of parts is a small fraction of the cost of the real thing, making it a pretty enjoyable project in the end.

The kind of hardware available to hobbyists today is what makes this kind of night vision project accessible, but there’s always the good old high-voltage analog method.

Continue reading “DIY Night Vision, Where Four Is Better Than Two”

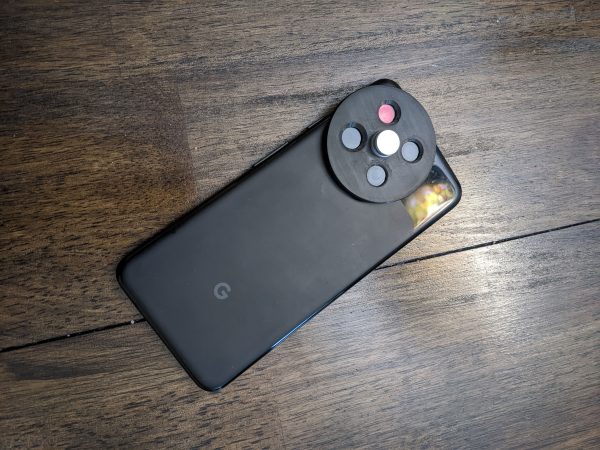
A Google Pixel 3a with a filter wheel attached to its camera

Hackaday Prize 2022: Multispectral Smartphone Camera Reveals Paintings’ Inner Secrets

Multispectral imaging, or photography using wavelengths other than those in ordinary visible light, has various applications ranging from earth observation to forgery detection in art. For example, titanium white and lead white, two pigments used in different historical eras, look identical in visible light but have distinct signatures in the UV range. Similarly, IR imaging can reveal a painting’s inner layers if the pigments used are transparent to IR.

Equipment for such a niche use is naturally quite pricey, so [Sean Billups] decided to transform an older model smartphone into a handheld multispectral camera, which can help him analyze works of art without breaking the bank. It uses the smartphone’s camera together with a filter wheel attachment that enables it to capture different spectral ranges. [Sean] chose to use a Google Pixel 3a, mainly because it’s cheaply available, but also because it has a good image sensor and camera software. Modifying the camera to enable IR and UV imaging turned out to be a bit of a challenge, however.

Image sensors are naturally sensitive to IR and UV, so cameras typically include a filter to block anything but visible light. To remove this filter from the Pixel’s camera [Sean] had to heat the camera module to soften the adhesive, carefully remove the lens, then glue a piece of plastic to the filter and pull it out once the glue had set. Perfecting this process took a bit of trial and error, but once he managed to effect a clear separation between camera and filter it was simply a matter of reattaching the lens, assembling the phone and mounting the filter wheel on its back.

The 3D-printed filter wheel has slots for four different filters, which can enable a variety of IR, UV and polarized-light imaging modes. In the video embedded below [Sean] shows how the IR reflectography mode can help to reveal the underdrawing in an oil painting. The system is designed to be extendable, and [Sean] has already been looking at adding features like IR and UV LEDs, magnifying lenses and even additional sensors like spectrometers.

We’ve seen a handful of multispectral imaging projects before; this drone-mounted system was a contestant for the 2015 Hackaday Prize, while this project contains an excellent primer on UV imaging.

Continue reading “Hackaday Prize 2022: Multispectral Smartphone Camera Reveals Paintings’ Inner Secrets”

Inside An EBay Marking Laser

When it comes to trolling eBay for cool stuff, some people have all the luck. Whereas all we ever seem to come across is counterfeit chips and obviously broken gear listed as, “good condition, powers on”, [Les Wright] actually managed to get more than he bargained for with one of his recent eBay purchases.

In his video teardown and tour of an industrial marking laser, [Les] suggests that he was really just in it for the optics — which is not a surprise, given his interest in optics in general and lasers in particular. The 20-W CO2 laser once etched barcodes and the like into products on assembly lines, but with a 2009 date code of its own, it was a safe bet that it was pitched due to a burned-out laser tube. But there were still high-quality IR optics and a precision X-Y galvanometer assembly to be harvested, so [Les] pressed on.

The laser itself ended up being built around a Synrad RF-stimulated CO2 tube. By a happy accident, [Les] found that the laser actually still works, at least most of the time. There appears to be an intermittent problem with the RF driver, but the laser works long enough to release the magic smoke from anything combustible that gets in its way. The galvos work too — [Les] was able to drive them with a Teensy and a couple of open-source libraries.

Galvos, lenses worth more than $800, and a working laser tube — not a bad haul. We’ll be following along to see what [Les] makes of this booty. Continue reading “Inside An EBay Marking Laser”

IBM PCjr Types Again, Thanks To KeybJr

Most of us think of keyboards — even vintage ones — as being fairly standardized and interchangeable, but that isn’t the case for the IBM PCjr. Its keyboard was quite unlike most others of its time, which means that a PCjr without an original keyboard is pretty much a dust collector. That’s what led [Jozef Bogin] to create the KeybJr, a piece of hardware that allows one to use any AT, XT, or PS/2 keyboard with the IBM PCjr.

The PCjr’s oddball keyboard can be a bit of a hassle for vintage computing enthusiasts.

What was strange about the PCjr’s keyboard? From the outside it looked pretty normal, but it definitely had its own thing going on. For one, the PCjr keyboard operated over a completely different protocol than the other keyboards of the time. In addition, its connection to the host was either by IR, or via its own wired cable adapter.

The KeybJr solves this by using an Arduino-based board to turn inputs from other keyboards of the time into something the PCjr expects. These signals are sent out and received either over infrared, or by the PCjr’s “K” port for a wired keyboard link.

Why bother with the IR functionality? Well, the connector and pins on the PCjr are not very rugged, and sometimes they are damaged. In those cases, it is nice to have the option of using a normal (for the time) keyboard over the IR link. Vintage hardware is not always in perfect shape, after all. That’s why things like ATX power supply adapters for the PCjr exist.

Want to give it a shot? There is a GitHub repository for the KeybJr, and you can see it in action in a brief video, embedded below.

Continue reading “IBM PCjr Types Again, Thanks To KeybJr”

IR Remote Transforms To RF

Most consumer remote controls operate using infrared light. This works well assuming the piece of equipment has a line of sight to the remote. But if you have, say a receiver in a cabinet or closet, the IR remote signal can’t reach the sensor. Some equipment has remote receivers that you can leave poking out, but it is still not very handy. That’s why some equipment now uses RF remotes. [Xtropie] used a pair of inexpensive 433 MHz RF modules to convert an IR system to RF. You can see a short video about the project below.

We might have been tempted to simply put an IR LED on the receiver so it could feed IR into the device sensor, but [Xtropie] took a different approach. He found the IR sensor and tied the RF receiver directly into its output. It seems to work, but we probably would have removed the IR sensor to make sure there were no conflicts.

Continue reading “IR Remote Transforms To RF”

IR Translator Makes Truly Universal Remote

Universal remotes are a handy tool to have around if you have many devices that would all otherwise have their own remote controls. Merging them all into a single device leads to less clutter and less frustration, but they are often not truly “universal” as some of them may not support every infrared device that has ever been built. If you’re in a situation like that it’s possible to build a truly universal remote instead, provided you have a microcontroller and a few infrared LEDs on hand.

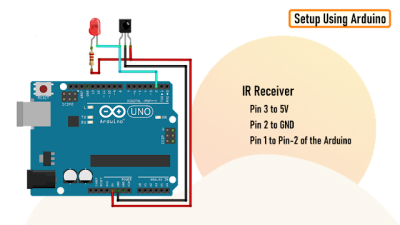
This was the situation that [Matt] found himself in when his Amazon Fire TV equipment control feature didn’t support his model of speakers. To get around this he programmed an Arduino to essentially translate the IR codes from the remote and output a compatible set of codes to the speakers.This requires both an IR photodiode and an IR LED but little else other than the codes for the remote and the equipment in question. With that all set up and programmed into the Aruino, [Matt]’s remote is one step closer to being truly “universal”.

While [Matt] was able to make use of existing codes in the Arduino library, it is also possible to capture the codes required manually by pointing a remote at a photodiode and programming a microcontroller to capture the codes that you need. [Matt] used a Raspberry Pi to do this when debugging this project, but we’ve also seen this method used with a similar build which uses an ESP8266 to control an air conditioner via its infrared remote control capabilities.

Continue reading “IR Translator Makes Truly Universal Remote”

Invisible 3D Printed Codes Make Objects Interactive

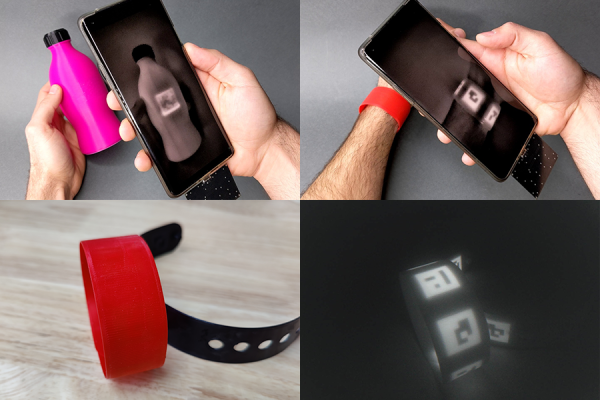
An interesting research project out of MIT shows that it’s possible to embed machine-readable labels into 3D printed objects using nothing more than an FDM printer and filament that is transparent to IR. The method is being called InfraredTags; by embedding something like a QR code or ArUco markers into an object’s structure, that label can be detected by a camera and interactive possibilities open up.

One simple proof of concept is a wireless router with its SSID embedded into the side of the device, and the password embedded into a different code on the bottom to ensure that physical access is required to obtain the password. Mundane objects can have metadata embedded into them, or provide markers for augmented reality functionality, like tracking the object in 3D.

How are the codes actually embedded? The process is straightforward with the right tools. The team used a specialty filament from vendor 3dk.berlin that looks nearly opaque in the visible spectrum, but transmits roughly 45% in IR.  The machine-readable label gets embedded within the walls of a printed object either by using a combination of IR PLA and air gaps to represent the geometry of the code, or by making a multi-material print using IR PLA and regular (non-IR transmitting) PLA. Both provide enough contrast for an IR-sensitive camera to detect the label, although the multi-material version works a little better overall. Sadly, the average mobile phone camera by itself isn’t sufficiently IR-sensitive to passively read these embedded tags, so the research used easily available cameras with no IR-blocking filters, like the Raspberry Pi NoIR.

The PDF has deeper details of the implementation for those of you who want to know more, and you can see a demonstration of a few different applications in the video, embedded below. Determining the provenance of 3D printed objects is a topic of some debate in the industry, and it’s not hard to see how technology like this could be used to covertly identify objects without compromising their appearance.

Continue reading “Invisible 3D Printed Codes Make Objects Interactive”