Ball Nut Modification Charts A Middle Course Between Building And Buying

A lot of the projects we feature here on Hackaday engender the classic “build versus buy” argument. We’ve always been puzzled by that; if anyone can appreciate the sheer joy of making something rather than buying it, it should be our readers. But there’s something to be said for buying the stuff you can buy and concentrating your effort on the bespoke aspects of the project. It’s perhaps not as exciting, but needs must, oftentimes.

Let’s not forget there’s a third way though, which [Andy] explores with this ball nut modification project. Keen-eyed readers will recall [Andy]’s recent scratch-built ball screw build, in service of some top-secret, hush-hush project related to world domination and total subjugation of humanity. His homebrew efforts in this regard were a great lesson in how to machine a complex mechanism to work in a constrained space. Still, it left folks wondering why he’d go to all the trouble when he could have just trimmed an off-the-shelf part down to size. So, he decided to give that a try.

Continue reading “Ball Nut Modification Charts A Middle Course Between Building And Buying”

Rolling Your Own Ball Screws

We’ve got mixed feelings about a new video from [AndysMachines] that details how he makes custom ball screws. On the one hand, there’s almost zero chance that we’ll ever have an opportunity to put this information to practical use. But on the other hand, the video gives a fantastic look at the inner workings and design considerations for ball screws, which is worth the price of admission alone

The story behind these ball screws is that [Andy] is apparently in cahoots with SkyNet and is building a T-800 Terminator of his own. Whatever, we don’t judge, but the build requires a short-throw linear drive mechanism that can be back-driven, specs that argue for a ball screw. [Andy] goes through the challenges of building such a thing, which mainly involve creating threads with a deep profile and wide pitch. The screw itself wasn’t too hard to cut, although there were some interesting practical details in the thread profile that we’d never heard of before.

The mating nut was another. Rather than try to cut deep internal threads, [Andy] took a sort of “open-face sandwich” approach, creating half-nuts in a single piece of brass using a CNC machine and a ball-nose mill. The threads were completed by cutting the two halves apart and bolting them together — very clever! [Andy] also showed how the balls recirculate in the nut through channels cut into one of the half-nuts.

Whether the results were worth the effort is up to [Andy], but we were just glad to be along for the ride. And if you want a little more detail on lead screws and ball screws, we’ve got just the article for that.

Continue reading “Rolling Your Own Ball Screws”

Battery Bot Makes Sure Cordless Tool Packs Are Always Topped Up

There was a time not that long ago when every tool was cordless. But now, cordless power tools have proliferated to the point where the mere thought of using a plain old wrist-twisting screwdriver is enough to trigger a bout of sympathetic repetitive injury. And the only thing worse than that is to discover that the batteries for your tools are all dead.

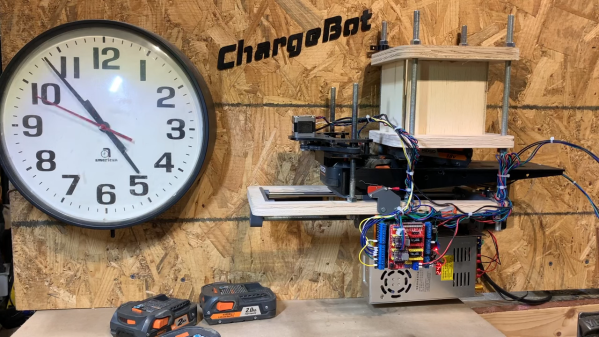
As [Lance] from the “Sparks and Code” channel freely admits, the fact that his impressive collection of batteries is always dead is entirely his fault, and that’s what inspired his automatic battery charging robot. The design is pretty clever; depleted batteries go into a hopper, under which is a 3D-printed sled. Batteries drop down into the sled, which runs the battery out from under the hopper to the charging station, which is just the guts of an old manual charger attached to a lead screw to adjust the height of the charging terminals for different size batteries. When the battery is charged, the sled pushes it a little further into an outfeed hopper before going back to get another battery from the infeed side.

Of course, that all vastly understates the amount of work [Lance] had to put into this. He suffered through a lot of “integration hell” problems, like getting the charger properly connected to the Arduino running the automation. But with a lot of tweaking, he can now just dump in a bunch of depleted packs and let the battery bot handle everything. The video after the break shows all the gory details.

Of course, there’s another completely different and much simpler solution to the dead battery problem.

Continue reading “Battery Bot Makes Sure Cordless Tool Packs Are Always Topped Up”

Rock-A-Bye Baby, On The Mechatronic Crib Shaker

While an engineering mindset is a valuable tool most of the time, there are some situations where it just seems to be a bad fit. Solving problems within the family unit would seem to be one such area, but then again, this self-rocking mechatronic crib seems to be just the cure for sleepytime woes.

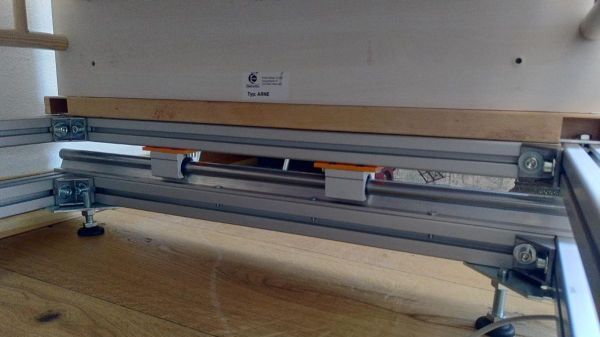
From the look of [Peter]’s creation, this has less of a rocking motion and more of a gentle back-and-forth swaying. Its purpose is plainly evident to anyone who has ever had to rock a child to sleep: putting a little gentle motion into the mix can help settle down a restless infant pretty quickly. Keeping the right rhythm can be a problem, though, as can endurance when a particularly truculent toddler is fighting the urge to sleep. [Peter]’s solution is a frame of aluminum extrusion with some nice linear bearings oriented across the short axis of the crib, which sits atop the whole thing.

A recirculating ball lead screw — nothing but the best for [Junior] — and a stepper drive the crib back and forth. [Peter] took care to mechanically isolate the drivetrain from the bed, and with the selection of the drive electronics and power supply, to make sure that noise would be minimal. Although thinking about it, we’ve been lulled to sleep by the whining steppers of our 3D printer more than once. Or perhaps it was the fumes.

Hats off to [Peter] for a setup that’s sure to win back a little of the new parent’s most precious and elusive commodity: sleep.

Improving Cheap Ball Screws

Most 3D printers use leadscrews for at least one axis. These are simple devices that are essentially a steel screw thread and a brass nut that travels on it. However, for maximum precision, you’d like to use a ball screw. These are usually very expensive but have many advantages over a leadscrew. [MirageC] found cheaper ball screws but, since they were inexpensive, they had certain limitations. He designed a simple device that improves the performance of these cheap ball screws.

Superficially, a ball screw looks like a leadscrew with an odd-looking thread. However, the nut is very different. Inside the nut are ball bearings that fit in the grooves and allows the nut to spin around with much less friction. A special path collects the ball bearings and recirculates them to the other side of the nut. In general, ball screws are very durable, can handle higher loads and higher speeds, and require less maintenance. Unlike leadscrews, they are more expensive and are usually quite rigid. They are also a bit noisier, though.

Ball screws are rated C0 to C10 precision where C10 is the least accurate and the price goes up — way up — with accuracy. [MirageC] shows how cheaper ball screws can be rolled instead of precision ground. These screws are cheaper and harder, but exhibit more runout than a precision screw.

This runout caused wobble during 3D printing that was immediately obvious on the prints. Using a machinist’s dial gauge, [MirageC] found the screws were not straight at all and that even a relatively poor C7 ball screw would be more precise.

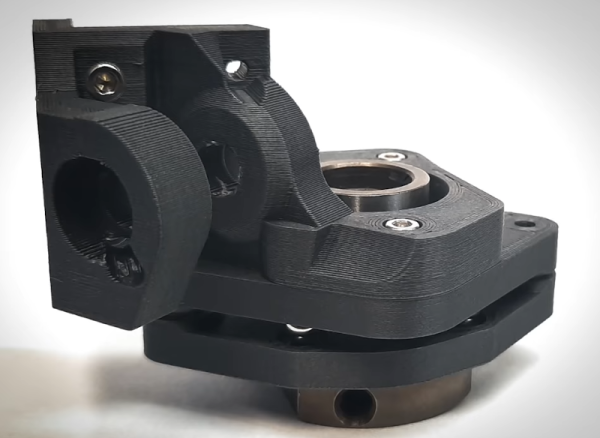
The solution? A clever arrangement of 3D printed parts. ball bearings, and magnets. The device allows the nut to move laterally without transmitting it to the print bed. It is a clever design and seems to work well.

Continue reading “Improving Cheap Ball Screws”

Vertical Mill Completes Scrapyard Lathe Build

One thing’s for sure: after seeing [Roland Van Roy] build a vertical mill from industrial scrap, we’ve got to find a better quality industrial scrapyard to hang around.

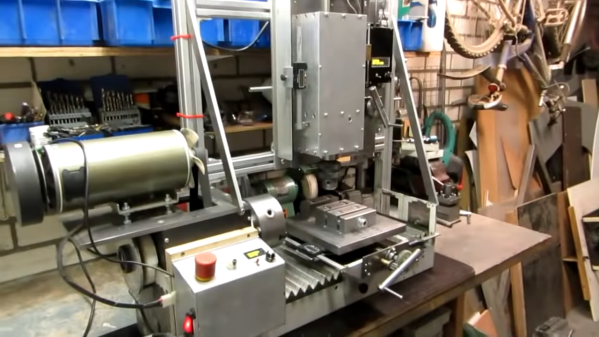
The story of this build started, as many good shop stories do, at the lathe, which in this case was also a scrapyard build that we somehow managed to miss when it first posted. This lathe is decidedly different from the common “Gingery method” we’ve seen a few times, which relies on aluminum castings. Instead, [Roland] built his machine from plate stock, linear slides, and various cast-off bits of industrial machines.

To make his lathe yet more useful, [Roland] undertook this build, which consists of a gantry mounted over the bed of the lathe. The carriage translates left and right along the bed while the spindle, whose axis lines up perfectly with the center axis of the lathe, moves up and down. [Roland] added a platform and a clever vise to the lathe carriage; the lathe tool post and the tailstock are removed to make room for these mods, but can be added back quickly when needed. Digital calipers stand in for digital read-outs (DROs), with custom software running on a Picaxe and a homebrew controller taking care of spindle speed control.

[Roland] reports that the machine, weighing in at about 100 kg, exhibits a fair amount of vibration, which limits him to lighter cuts and softer materials. But it’s still an impressive build, and what really grabbed us was the wealth of tips and tricks we picked up. [Roland] used a ton of interesting methods to make sure everything stayed neat and square, such as the special jig he built for drilling holes in the T-slot extrusions to the use of cyanoacrylate glue for temporary fixturing.

Continue reading “Vertical Mill Completes Scrapyard Lathe Build”

Over-Engineered Bottle Opener Takes The Drudgery Out Of Drinking

Some projects take but a single glance for you to know what inspired them in the first place. For this over-engineered robotic bottle opener, the obvious influence was a combination of abundant free time and beer. Plenty of beer.

Of course there are many ways to pop the top on a tall cold one, depending on the occasion. [Matt McCoy] and his cohorts selected the “high-impulse” method, which when not performed by a robot is often accomplished by resting the edge of the cap on a countertop and slapping the bottle down with the palm of one’s hand. This magnificently pointless machine does the same thing, except with style.

The bottle is placed in a cradle which grips it, gently but firmly, and presents it to the opening mechanism in a wholly unnecessary motion-control ballet. Once in place, a lead screw moves a carriage down, simultaneously storing potential energy in a bundle of elastic surgical tubing while tripping a pawl on the edge of the cap. A lever trips at the bottom of the carriage’s travel, sending the pawl flying upward to liberate the libation, giving the robot a well-deserved and sudsy showers. Behold the wonderful interplay of 190 custom parts — and beer — in the video below.

Hats off to [Matt] et al for their tireless efforts on behalf of beleaguered beer-openers everywhere. This seems like the perfect accessory to go along with a game of mind-controlled beer pong.

Continue reading “Over-Engineered Bottle Opener Takes The Drudgery Out Of Drinking”