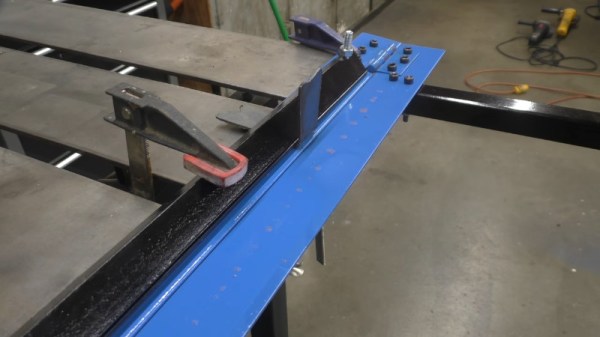
The project came about simply because [Bob] needed to bend 42″ sections of flashing, and couldn’t find a decent deal on a sheet metal brake above 36″ wide. The build starts with some angle iron and simple hinges, bolted together to form a basic brake design. With some rectangular hollow section bolted on for handles, the brake is then clamped to the bench and is ready for action.
It’s a build that any experienced hacker could whip up in an afternoon and be pumping out basic sheet metal parts by sundown, and requires no welding to boot. To learn more about bending sheet metal, check out our primer on the subject. Video after the break.
When you grow up with something as the constant backdrop to your life, it’s easy to forget as an adult that not everyone else shares your instinctive knowledge of the subject. My dad is a blacksmith, he’s now retired, but as I was growing up his very active forge was in a workshop next to our house. This is the second part of a series based upon that experience, exploring blacksmithing for people who have maybe always fancied a go at the anvil but have little idea where to start.
The Most Obvious Blacksmithing Tool: The Anvil
Having considered the hearth in our previous outing, it’s time to turn our attention to what is the signature piece of blacksmithing equipment: the anvil. This has the function of providing a high-mass hardened working surface against which metal can be forged, and it has a distinctive shape with various parts for particular metalworking tasks. There are many minor and major variations of anvil design depending upon where in the world your anvil hails from, but since my experience comes from the English counties, the anvil I will be describing is the pattern you’ll find in the British Isles.
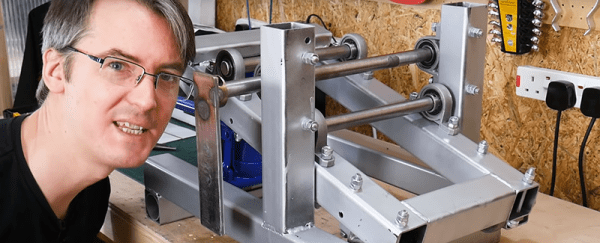
Metal fabrication is a useful skill to have. There’s plenty you can achieve in your workshop at home, given the right tools. There’s lathes for turning, mills for milling, and bandsaws and dropsaws for chopping it all to pieces. But what do you do if you need to make hoops and bends and round sections? You build a metal roller, of course – and that’s precisely what [James Bruton] did.
The main body of the tool is built out of box section, chosen largely as it’s what [James] had lying around. Bearings are of the familiar pillow block variety, with 20 mm bright steel serving as the rollers due to its better tolerance than mild steel stock. Set screws hold the shafts in place to avoid everything sliding around the place. A 10-ton bottle jack then provides the force to gently bend the workpiece as it passes through the rollers.
Initial tests were positive, with the roller producing smooth curves in 4 mm thick steel bar. There were some issues with runout, which were easily fixed with some attention to the parallelism of the shafts. It’s a tidy build, and can serve as a basis for further upgrades in future if necessary.
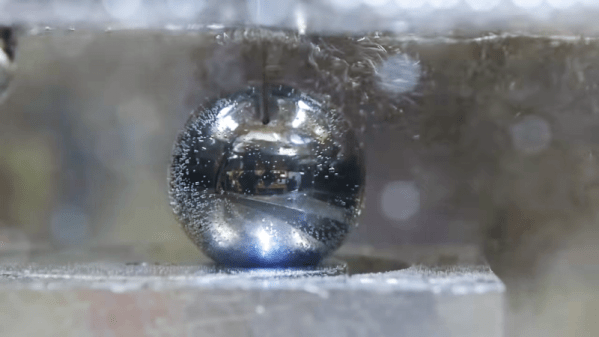
Drilling holes is easy; humans have been doing it in one form or another for almost 40,000 years. Drilling really tiny holes in hard materials is more challenging, but still doable. Drilling deep, straight holes in hard materials is another thing altogether.
Luckily, these days we have electric discharge machining (EDM), a technique that opens up all kinds of possibilities. And just as luckily, [Ben Krasnow] got his hands on some EDM gear to try out, with fascinating results. As [Ben] explains, at its heart EDM is just the use of a small arc to ablate metal from a surface. The arc is precisely controlled, both its frequency via an arc controller, and its location using CNC motion control. The arc controller has always been the sticking point for home EDM, but the one [Ben] tried out, a BaxEDM BX17, is squarely aimed at the small shop market. The whole test platform that [Ben] built has a decidedly home-brew look to it, with a CNC gantry rigged up to a water tank, an EDM drill head spinning the drill rods slowly, and an airless paint gun providing high-pressure process fluid. The video below shows that it works remarkably well nonetheless.
While we’re certainly keen to see [Ben]’s promised videos on EDM milling and cutting, we doubt we’ll line up to shell out €2,950 for the arc controller he used. If you have more courage than money, this mains-powered EDM might be a better fit.
Blacksmiths were the high technologists of fabrication up until the industrial revolution gained momentum. At its core, this is the art and science of making any needed tool or mechanism out of metal. Are you using the correct metal? Is the tool strong where it needs to be? And how can you finish a project quickly, efficiently, and beautifully? These are lessons Blacksmiths feel in their bones and it’s well worth exploring the field yourself to appreciate the knowledge base that exists at any well-used forge.
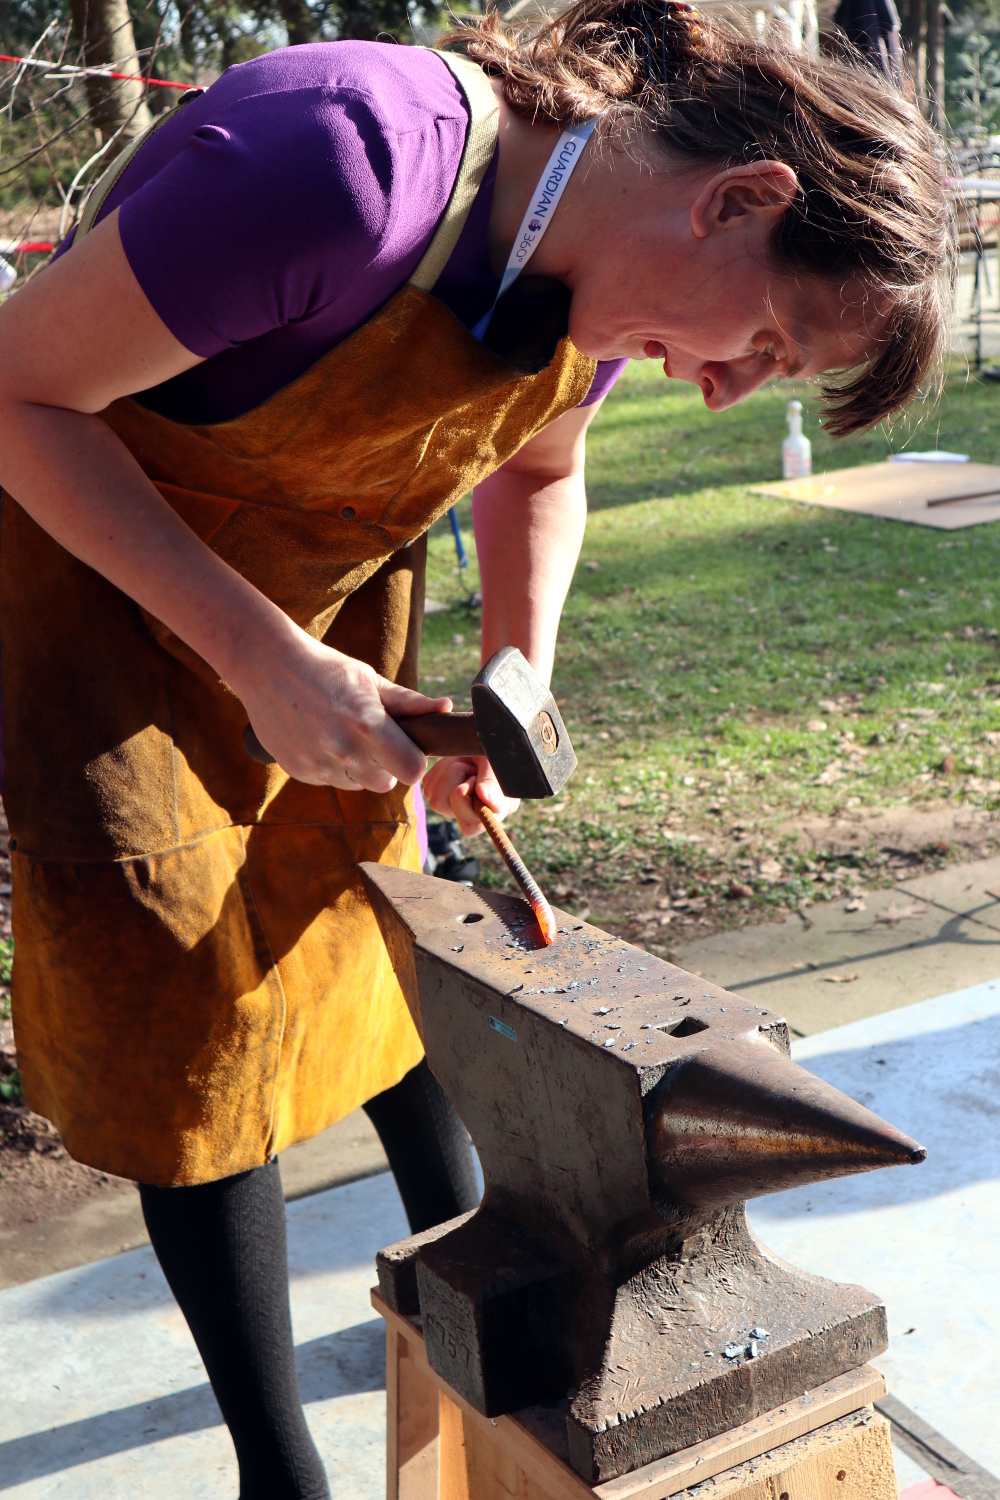
I had an unexpected experience a few days ago at the Hacker Hotel weekend hacker camp in the Netherlands. At the side of the hotel our friends at RevSpace in The Hague had set up a portable forge. There was the evocative coal fire smell of burning coke from the hearth, an anvil, and the sound of hammering. This is intensely familiar to me, because I grew up around it. He may be retired now, but my dad is a blacksmith whose work lay mostly in high-end architectural ironwork.
Working the RevSpace forge at Hacker Hotel, in not the most appropriate clothing for the job.
The trouble is, despite all that upbringing, I don’t consider myself to be a blacksmith. Sure, I am very familiar with forge work and can bash metal with the best of them, but I know blacksmiths. I can’t do everything my dad could, and there are people we’d encounter who are artists with metal. They can bend and shape it to their will in the way I can mould words or casually solder a tiny surface-mount component, and produce beautiful things in doing so. My enthusiastic metal-bashing may bear the mark of some experience at the anvil but I am not one of them.
It was a bit of a surprise then to see the RevSpace forge, and I found myself borrowing a blacksmith’s apron to protect my smart officewear and grabbing a bit of rebar. I set to and made a pretty simple standard of the dilletante blacksmith, a poker with a ring on one end. Hammer one end of the rebar down to a point, square off the other end for just over 3 times the diameter of the ring, then bend a right angle and form the ring on the pointy end of the anvil. Ten minutes or so of fun in the Dutch sunshine. Working a forge unexpectedly brought with it a bit of a revelation. I may not be a smith of a high standard, but I have a set of skills by virtue of my upbringing that I had to some extent ignored.
Where others might have put effort into learning them, they’re things I just know. It had perhaps never occurred to me that maybe all my friends in this community didn’t learn how to do this by hanging round the forge next to the house they grew up in. If I have this knowledge merely by virtue of my upbringing, perhaps I should share some of it in a series of articles for those in our community who’ve always fancied a go at a forge but have no idea where to start.
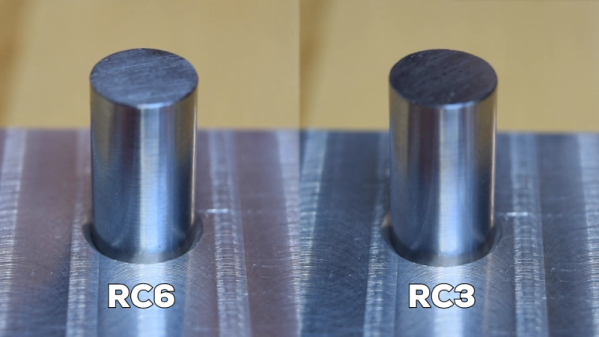
When designing parts on a screen, it’s very easy to type in a bunch of nice round numbers and watch everything slot together in perfect harmony. Unfortunately, the real world is not so kind. A 10mm shaft will not readily fit in a 10mm hole, and producing parts to perfect dimensions simply isn’t possible. This is where fits and tolerances come in, and [tarkka] have created a practical demonstration of this on Youtube.
Tighter tolerances require more care and thus increase production costs significantly.
Hole and shaft tolerances are important to ensure parts mate correctly and as intended. If a shaft is to fit into a hole easily and the dimensions aren’t critical, a clearance fit is called for. If assembly should be easy but the part is required to locate accurately, a running fit is called for. Alternatively, if the parts are intended to be pressed together permanently, an interference or force fit should be used.
The video covers the basics of fits and tolerances in an easy to understand way, with visual examples. The fits discussed are based in Imperial measurements, but the metric standard of hole and shaft tolerances (ISO 286-2) is also noted.
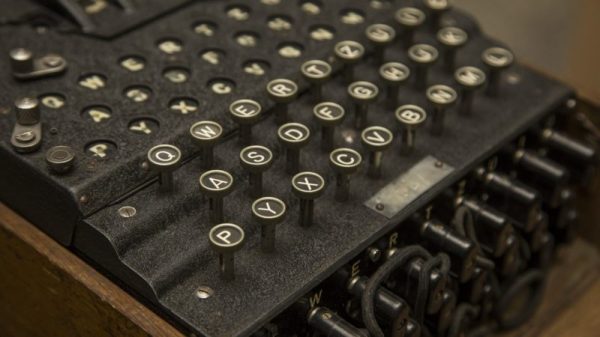
So, a little hard to choose a topic, but we asked Simon to talk a bit about his recent Enigma watches. He has managed to put an electronic emulation of the Enigma cypher machine from World War II into both a wristwatch and, more recently, a pocket watch. They’re both gorgeous builds that required a raft of skills to complete. We’ll start there and see where the conversation takes us!
Please join us for this Hack Chat, where we’ll discuss:
Where the fascination with Enigma came from;
Tools, techniques, and shop setup;
Melding multiple, disparate skill sets; and
What sorts of new projects might we see soon?
You are, of course, encouraged to add your own questions to the discussion. You can do that by leaving a comment on the All Things Enigma Hack Chat and we’ll put that in the queue for the Hack Chat discussion.
Click that speech bubble to the right, and you’ll be taken directly to the Hack Chat group on Hackaday.io. You don’t have to wait until Wednesday; join whenever you want and you can see what the community is talking about.