Clever Gas Mixer Gets Just The Right Blend For Homebrew Laser Tubes

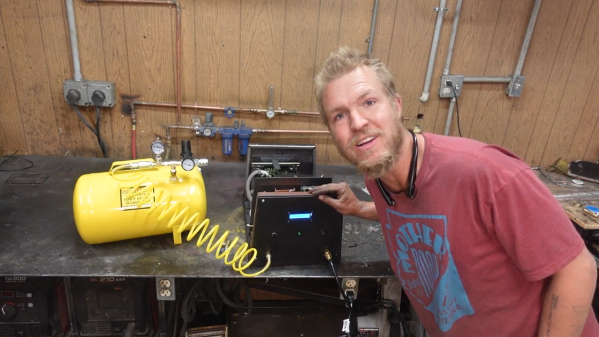
[Lucas] over at Cranktown City on YouTube has been very busy lately, but despite current appearances, his latest project is not a welder. Rather, he built a very clever gas mixer for filling his homemade CO2 laser tubes, which only looks like a welding machine. (Video, embedded below.)

We’ve been following [Lucas] on his journey to build a laser cutter from scratch — really from scratch, as he built his own laser tube rather than rely on something off-the-shelf. Getting the right mix of gas to fill the tube has been a bit of a pain, though, since he was using a party balloon to collect carbon dioxide, helium, and nitrogen at measuring the diameter of the ballon after each addition to determine the volumetric ratio of each. His attempt at automating the process centers around a so-called AirShim, which is basically a flat inflatable bag made of sturdy material that’s used by contractors to pry, wedge, lift, and shim using air pressure.

[Lucas]’ first idea was to measure the volume of gas in the bag using displacement of water and some photosensors, but that proved both impractical and unnecessary. It turned out to be far easier to sense when the bag is filled with a simple microswitch; each filling yields a fixed volume of gas, making it easy to figure out how much of each gas has been dispensed. An Arduino controls the pump, which is a reclaimed fridge compressor, monitors the limit switch and controls the solenoid valves, and calculates the volume of gas dispensed.

Judging by the video below, the mixer works pretty well, and we’re impressed by its simplicity. We’d never seriously thought about building our own laser tube before, but seeing [Lucas] have at it makes it seem quite approachable. We’re looking forward to watching his laser project come together.

Continue reading “Clever Gas Mixer Gets Just The Right Blend For Homebrew Laser Tubes”

A Superheterodyne Receiver With A 74xx Twist

In a world with software-defined radios and single-chip receivers, a superheterodyne shortwave radio might not exactly score high on the pizzazz scale. After all, people have been mixing, filtering, and demodulating RF signals for more than a century now, and the circuits that do the job best are pretty well characterized. But building the same receiver using none of the traditional superhet trappings? Now that’s something new.

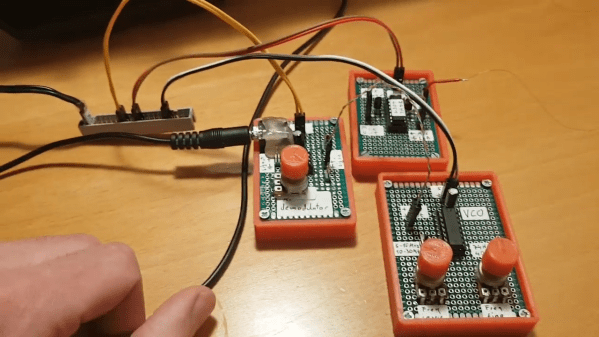
In what [Micha] half-jokingly calls a “74xx-Defined Radio”, easily obtained discrete logic chips, along with some op-amps and a handful of simple components, take the place of the tuned LC circuits and ganged variable capacitors that grace a typical superhet receiver. [Micha] started by building an RF mixer out of a 74HC4051 analog multiplexer, which with the help of a 2N3904 phase splitter forms a switching mixer. The local oscillator relies on the voltage-controlled oscillator (VCO) in a 74HC4046 PLL, a chip that we’ve seen before in [Elliot Williams]’ excellent “Logic Noise” series. The IF filter is a simple op-amp bandpass filter; the demodulator features an op-amp too, set up as an active half-wave rectifier. No coils to wind, no capacitors to tune, no diodes with mysterious properties — and judging by the video below, it works pretty well.

It may not be the most conventional way to tune in the shortwave bands, but we always love the results of projects that are artificially constrained like this one. Hats off to [Micha] for the interesting trip down the design road less travelled.

Continue reading “A Superheterodyne Receiver With A 74xx Twist”

Extensive Modification Of DSLR Includes High Quality Audio

Modern DSLR cameras are incredible pieces of technology that can take excellent high-quality photos as well as record video and audio. However, as they become jacks of all trades they risk being masters of none, and the audio quality in modern DSLRs certainly reflects that old cliche. To get true high-quality audio while recording with a camera like this Canon 80d, you’ll either need a secondary audio recording device or you’ll need to interface one directly into the camera itself.

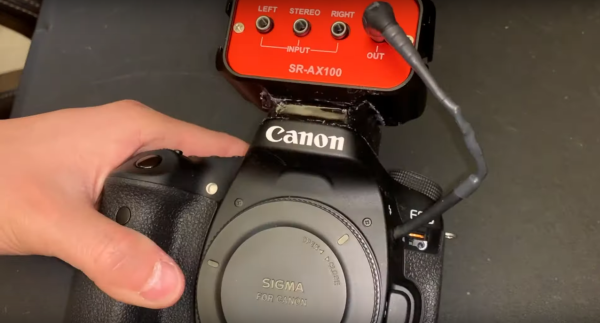
This build from [Tony] aka [Carnivore] goes into the inner workings of the camera to add an audio mixer to the camera’s audio input, allowing for multiple audio streams to be recorded at once. First, he removed the plastic around the microphone port and attached a wire to it that extends out of the camera to a 1/8″ plug. While he had the case open he also wired a second shutter, added a record button to a custom location on the front of the camera, and bypassed a switch which prevents the camera from operating if the battery door isn’t closed.

With those modifications in place, he removed the internal flash from the camera before closing the body. A custom 3D printed mount was placed in the vacant space which now houses the audio mixer, a SR-AX100 from Saramonic. This plugs in to the new microphone wire from earlier in the build, allowing the camera to have an expanded capacity for recording audio.

While [Tony] has a fairly unique use case for all of these modifications to an already $1000 camera, getting into the inner workings of DSLRs isn’t something to shy away from if you need something similar done. We’ve even seen modifications to cameras like these to allow for watercooling during video recording.

Continue reading “Extensive Modification Of DSLR Includes High Quality Audio”

He’s The Operator Of His Pocket Arduino

The band Kraftwerk hit the music scene with its unique electronic sound in the 70s in Germany, opening the door for the electronic music revolution of the following decade. If you’re not familiar with the band, they often had songs with a technology theme as well, and thanks to modern microcontroller technology it’s possible to replicate the Kraftwerk sound with microcontrollers as [Steven] aka [Marquis de Geek] demonstrates in his melodic build.

While the music is played on a Stylophone and a Korg synthesizer, it is fed through five separate Arduinos, four of which have various synths and looping samplers installed on them (and presumably represent each of the four members of Kraftwerk). Samplers like this allow pieces of music to be repeated continuously once recorded, which means that [Steven] can play entire songs on his own. The fifth Arduino functions as a controller, handling MIDI and pattern sequencing over I2C, and everything is finally channeled through a homemade mixer.

[Marquis] also dressed in Kraftwerk-appropriate attire for the video demonstration below, which really sells the tribute to the famous and groundbreaking band. While it’s a great build in its own right and is a great recreation of the Kraftwerk sound, we can think of one more way to really put this project over the top — a Kraftwerk-inspired LED tie.

Continue reading “He’s The Operator Of His Pocket Arduino”

Food Dispenser Shakes And Rattles

[Elite Worm] follows a strict diet that involves regularly mixing dry ingredients in varying proportions. The task grew tedious, and thus automation became a tantalising prospect. Enter the DIY shaking food dispenser.

The machine has a simple touch screen interface, with an Atmega328P running the show behind the scenes. The user can store a series of profiles, which each correspond to a different mixture of four base ingredients. Dealing with dry ingredients like oats, chia, and flax, shaking is often necessary to get things moving. To achieve this, the rig packs a hefty DC motor up top, which turns an eccentric shaft, shaking the whole rig. Each ingredient hopper has a servo-controlled nozzle, so ingredients can be dispensed in turn, with a load cell in the base measuring the weight delivered.

It’s a neat system, though [Elite Worm] notes that the device shakes just a little too much, and suspects it won’t hold up in the long term. We suspect a less violent, higher frequency vibration might be less hard on the components, but we’re sure there’ll be some quality engineering going into the next build. We’ve seen [Elite Worm]’s work here before, too. Video after the break.

Continue reading “Food Dispenser Shakes And Rattles”

A 3D Printed Paint Mixer

To get the perfect mix for your paint, you need a good shake that is as random as possible. [Mark Rhodes] wanted to automate the process of mixing paint, so he built a 3D printed shaker to thoroughly shake small paint bottles. Using only a single motor, it shakes the bottle along three axes of rotation and one axis of translation.

A cylindrical container is attached to a U-shaped bracket on each end, which in turn is attached to a rotating shaft. Only one of these shafts are powered, the other is effectively an idler. When turned on, it rotates the cylinder partially around the pitch and yaw axis, 360 degrees around the roll axis, and reciprocates it back and forth. The design appears to be based on an industrial mixer known as a “Turbula“. Another interesting feature is how it holds the paint bottle in the cylinder. Several bands are stretched along the inside of the cylinder, and by rotating one of the rings at the end, it creates an hourglass-shaped web that can tightly hold the paint bottle.

The mechanism is mounted on a 3d printed frame that can be quickly clamped to a table. The Twitter post embedded below is a preview for a video [Mark] is working for his Youtube channel, along with which he will also release the 3D files.

Mixing machines come in all shapes and sizes, and we’ve seen a number of 3D printed versions, including a static mixer and a magnetic stirrer.

Continue reading “A 3D Printed Paint Mixer”

Weird World Of Microwaves Hack Chat

Join us on Wednesday, December 18 at noon Pacific for the Weird World of Microwaves Hack Chat with Shahriar Shahramian! We’ve been following him on The Signal Path for years and are excited to pick his brain on what is often considered one of the dark arts of electronics.

No matter how much you learn about electronics, there always seems to be another door to open. You think you know a thing or two once you learn about basic circuits, and then you discover RF circuits. Things start to get a little strange there, and stranger still as the wavelengths decrease and you start getting into the microwave bands. That’s where you see feed lines become waveguides, PCB traces act as components, and antennas that look more like musical instruments.

Shahriar is no stranger to this land. He’s been studying millimeter-wave systems for decades, and his day job is researching millimeter-wave ASICs for Nokia Bell Labs in New Jersey, the birthplace of the transistor. In his spare time, Shahriar runs The Signal Path, a popular blog and YouTube channel where he dives tear-downs, explanations, and repairs of incredibly sophisticated and often outrageously expensive equipment.

We’ll be sitting down with Shahriar this week for the last Hack Chat of 2019 with a peek inside his weird, wonderful world of microwaves. Join us with your questions about RF systems, microwaves in the communication industry, and perhaps even how he manages to find the gear featured on his channel.

join-hack-chatOur Hack Chats are live community events in the Hackaday.io Hack Chat group messaging. This week we’ll be sitting down on Wednesday, December 18 at 12:00 PM Pacific time. If time zones have got you down, we have a handy time zone converter.

Click that speech bubble to the right, and you’ll be taken directly to the Hack Chat group on Hackaday.io. You don’t have to wait until Wednesday; join whenever you want and you can see what the community is talking about.