Four years ago when the idea of a pandemic was something which only worried a few epidemiologists, a group of British hardware hackers and robotic combat enthusiasts came up with an idea. They would take inspiration from the American Power Racing Series to create their own small electric racing formula. Hacky Racers became a rougher version of its transatlantic cousin racing on mixed surfaces rather than tarmac, and as an inaugural meeting that first group of racers convened on a cider farm in Somerset to give it a try. Last weekend they were back at the same farm after four years of Hacky Racer development with racing having been interrupted by the pandemic, and Hackaday came along once more to see how the cars had evolved. Continue reading “How Far Can You Push A £500 Small Electric Car; Four Years Of The Hacky Racer”
motor214 Articles
Balancing A Motor With An Oscilloscope
With all things in life, one must seek to achieve balance. That may sound a little like New Age woo-woo, but if you think it’s not literally true, just try tolerating a washing machine with a single comforter on spin cycle, or driving a few miles on unbalanced tires.
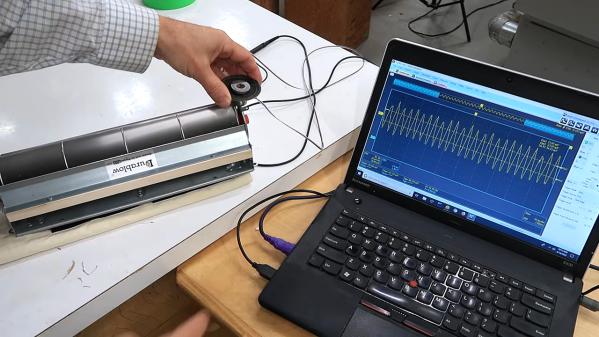
Anything that rotates can quickly spin itself into shrapnel if it’s not properly balanced, and the DIY power tools in [Matthias Wandel]’s shop are no exception. Recent upgrades to his jointer have left the tool a bit noisy, so he’s exploring machine vibrations with this simple but clever setup. Using nothing but a cheap loudspeaker and an oscilloscope, [Matthias] was able to characterize vibrations in a small squirrel-cage blower — he wisely chose to start small to validate his method before diving into the potentially dangerous jointer. There was quite a lot to be learned from the complex waveforms coming back from the transducer, analysis of which was greatly helped by the scope’s spectrum analyzer function. The video below shows the process of probing various parts of the blower, differentiating spectral peaks due to electrical noise rather than vibration, and actually using the setup to dynamically balance the fan.
We’d rate this as yet another handy shop tip from [Matthias], and we’ll be looking out for the analysis of his jointer. Want to do the same but you don’t have an oscilloscope? No problem — an earbud and Audacity might be all you need.
Hoverbike Turns Hoverboard Into Ebike
Hoverboards were a popular trend with the youths and in-crowd a few years ago, and now that the fad has largely died out there are plenty of them sitting unused in closets and basements around the world. That only means opportunities to put the parts from these unique transportation devices into other builds. A more practical method of transportation is a bicycle, and this build scavenges most of the parts from a hoverboard to turn a regular bicycle into a zippy ebike.
This bike build starts with a mountain bike frame and the parts from the hoverboard are added to it piece by piece. The two motors are mounted to the frame and drive the front chain ring of the bike, allowing it to still take advantage of the bike’s geared drivetrain. Battery packs from two hoverboards were combined into a single battery which give the bike a modest 6-10 km of range depending on use. But the real gem of this build is taking the gyroscopic controller board from the hoverboards and converting it, with the help of an Arduino Due, to an ebike controller.
Eventually a battery pack will be added to give the bike a more comfortable range, but for now we appreciate the ingenuity that it took to adapt the controller from the hoverboard into an ebike controller complete with throttle and pedal assist. For other household objects turned into ebikes, be sure to check out one of our favorites based on a washing machine motor: the Spin Cycle.
Bike On Over To The Campground
Like many of us, [Paul] enjoys occasionally hitching up his tow-behind camper and heading out to the wilderness to get away from it all at his favorite campsite. Unlike the vast majority of those who share his passion for the outdoors, though, [Paul] is hitching his camper up to a bicycle. Both the camper and the bike are custom built from the ground up, and this video shows us a little more details on [Paul]’s preferred mode of transportation.
While he is known for building custom vehicles of one sort or another, this latest one is a more traditional bicycle frame that he has modified only slightly to fit a recumbent-style seat and a small gas-powered motor. Even though the motor is decades old, it started right up and gives the power needed to pull the custom camper. [Paul] builds one-person campers like this out of corrugated plastic for durability and light weight, and this one is specifically designed for his size and sleeping style. It includes everything needed for a night under the stars, too, including a stove, storage compartments, and a few windows.
With the bike and camper combined weighing in at just over 200 pounds, the motor can be used as a pedal-assist device thanks to the clever engineering behind a front-wheel-drive pedal system on this bike. With all of that custom fabrication, [Paul] is free to head out to the wilderness without all the encumbrances (and high price) of traditional motor vehicle-based camping. For those curious about some of [Paul]’s other vehicle creations, take a look at this tiny speedboat for one.
Prototype Robot For Omniwheel Bicycle
For all its ability to advance modern society in basically every appreciable way, science still has yet to explain some seemingly basic concepts. One thing that still has a few holes in our understanding is the method by which a bicycle works. Surely, we know enough to build functional bicycles, but like gravity’s inclusion into the standard model we have yet to figure out a set of equations that govern all bicycles in the universe. To push our understanding of bicycles further, however, some are performing experiments like this self-balancing omniwheel bicycle robot.
Functional steering is important to get the bicycle going in the right direction, but it’s also critical for keeping the bike upright. This is where [James Bruton] is putting the omniwheel to the test. By placing it at the front of the bike, oriented perpendicularly to the direction of travel, he can both steer the bicycle robot and keep it balanced. This does take the computational efforts of an Arduino Mega paired with an inertial measurement unit but at the end [James] has a functional bicycle robot that he can use to experiment with the effects of different steering methods on bicycles.
While he doesn’t have a working omniwheel bicycle for a human yet, we at least hope that the build is an important step on the way to [James] or anyone else building a real bike with an omniwheel at the front. Hopefully this becomes a reality soon, but in the meantime we’ll have to be content with bicycles with normal wheels that can balance and drive themselves.
Monowheel Mayhem: When Good Gyroscopic Precession Goes Bad
Since the dawn of the age of the automobile, motorheads have been obsessed with using as few wheels as possible. Not satisfied with the prospect of being incompletely maimed by a motorcycle, the monocycle was born. Gracing the covers of Popular magazines and other periodicals, these futuristic wheels of doom have transfixed hackers of all kinds. [James Bruton] is one such hacker, and in the video below the break you can see his second iteration of a 3d printed monowheel.
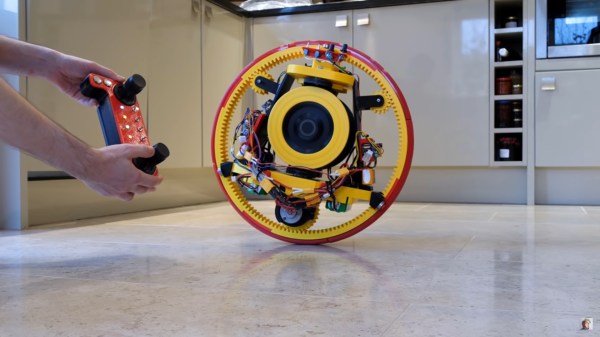
[James]’ wonderful monowheel is beautifully engineered. Bearing surfaces, gears, idlers, motors, and yes, twin gyroscopes are all contained within the circumference of the tire. The gyroscopes are actuated by a rather large servo, and are tied together by a gear that keeps their positions in sync. Their job is to keep the monowheel balanced at all times.
But as [James] discovered, the chief difficulty of only having one wheel isn’t lateral balancing. Ask any monocyclist and they’ll assure you that it’s possible. The real trick is balancing the machine fore and aft. Unlike a two wheeled velocipede, the monowheel has nothing to exert torque against save for a bit of gravity.
As [James] found out the hard way, it was within this fore-aft balancing act that the gyroscopic precession reared its ugly head. The concept is explained well in the video. We won’t spoil the surprise ending because the explanation and conclusion are quite good so make sure to watch to the end!
If you’d like to look at [James]’ first version, we covered it here. And if you’re the daredevil type, perhaps we can interest in you in a two stroke human sized monowheel that will probably end in an ER visit. At least they wore a helmet. Thanks to [Baldpower] for the tip!
Continue reading “Monowheel Mayhem: When Good Gyroscopic Precession Goes Bad”
Keynote Video: Jeremy Fielding Wants To Help You Get Moving
For many DIY hardware projects, the most movement it’s likely to see is when we pick the assembled unit up off the workbench and carry it to wherever it’s destined to spend the rest of its functional life. From weather sensors to smart mirrors, there’s a huge array of devices that don’t need to move one millimeter to function. But eventually, you’re likely to run into a project that’s a bit more dynamic. Maybe you’d like to motorize your window shades, or go all out and build a remote controlled rover. With these more active designs comes a whole slew of new problems you may never have encountered before.
Luckily for us, folks like Jeremy Fielding are out there and willing to share their knowledge. In his fascinating presentation for the 2021 Hackaday Remoticon, Building Hardware that Moves: the Fundamentals that Everyone Should Know, he took viewers on a whirlwind tour of what he’s learned about designing and building complex machines from his years of professional experience. Whether its a relatively simple articulated workbench for the shop, a gargantuan earthmoving machine, or a high-dexterity robotic arm, each project he’s worked on has presented unique challenges that needed to be solved.

A lot of the projects that Jeremy has worked on are on a much larger scale than what your average hobbyist is ever going to run into. When there’s an arrow pointing out the tiny human in a picture of you and the machine you’re currently working on, you know things are getting serious. But as anyone who’s watched his YouTube videos knows, he’s got a real knack for taking these high-level concepts and distilling them into something more digestible for the home gamer.
Continue reading “Keynote Video: Jeremy Fielding Wants To Help You Get Moving”


