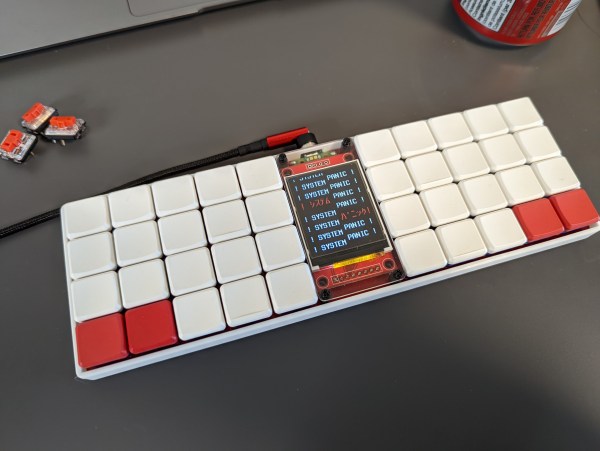
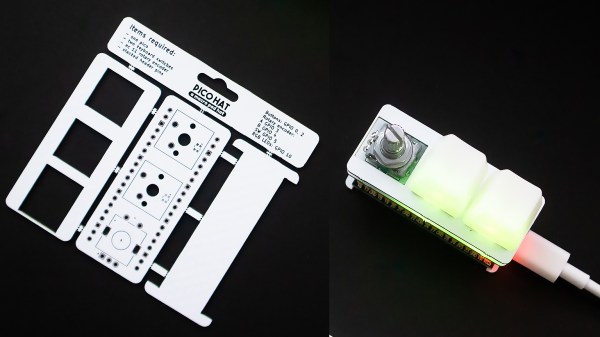
One Shot IR Helper Is A Great Beginner Project

Sometimes you need a little utility device to do a very simple job, and do it well.This one-shot IR helper from [Gregory Sanders] is just that. 

[Gregory] had a TV that didn’t support automatically turning on when the power was applied. This is frustrating when you like to leave devices switched hard off when not in use to save on standby energy draw. Thus, there needed to be a way to send the screen an on signal when his multi-monitor setup was powered on.

A simple circuit paired with a Pi Pico was pressed into service. The Pico flashes an IR LED, squirting out the requisite code to tell the TCL branded TV to switch on. [Gregory] figured out the codes by using an Arduino to read the output of the TV’s remote with an IR sensor. The hook here is the code is written in MicroPython, using IR libraries from [Peter Hinch].

Now, when [Gregory] powers up his rig, the IR sender will trigger the TV to switch on. It’s a little frustrating that the auto-on function wasn’t available in the factory, but regardless, now everything’s working as it should. If you want to do this in reverse, consider building a TV-B-Gone or a silencer for the boomboxes used by dancing grandmas!

Raspberry Pi Pico Replaces PlayStation Memory Card

It’s almost hard to believe these days, what with modern game consoles packing terabytes of internal storage, but there was a time when the totality of your gaming career would be stored on an external memory card that held just a few megabytes of save data. Of course, before that you had to write down a sequence of random letters and numbers to pick up where you left off, but that’s a story for another day.

While the memory card concept might be quaint to the modern gamer, its modular nature does provide the hacker with some interesting avenues to explore. For example, take a look at the very impressive PicoMemcard project from [Daniele Giuliani]. Hardware wise, it doesn’t get much simpler than this. You just take the PCB from a cheap (or dead) PlayStation memory card, and solder seven jumpers to the edge connector contacts so you can plug them into the Pico. Then you’ve just got to upload the firmware to the Pico, and you’re done. Continue reading “Raspberry Pi Pico Replaces PlayStation Memory Card”

DIY Keyboard Can’t Get Much Smaller

The PiPi Mherkin really, really can’t get much smaller. The diminutive keyboard design mounts directly to the Pi Pico responsible for driving it, has a similar footprint, and is only about 9 mm thick. It can’t get much smaller since it’s already about as small as the Pi Pico itself.

Running on the Pi Pico is the PRK firmware, a keyboard framework that makes the device appear as a USB peripheral, checking the “just works” box nicely. The buttons here look a little sunken, but the switches used are available in taller formats, so it’s just a matter of preference.

We have to admit the thing has a very clean look, but at such a small size we agree it is perhaps more of a compact macropad than an actual, functional keyboard. Still, it might find a place in the right project. Design files are online, if you’re interested.

If you like small, compact keyboards but would prefer normal-sized keys, check out the PiPi Mherkin’s big brother, the PiPi Gherkin which gets clever with dual-function tap/hold keys to provide full functionality from only 30 keys, with minimal hassle.

Keyboards are important, after all, and deserve serious attention, as our own [Kristina Panos] knows perfectly well.

A Pi Pico connected to a MYIR Z-turn board with a set of jumper wires

Need A JTAG Adapter? Use Your Pico!

JTAG is a powerful interface for low-level debugging and introspection of all kinds of devices — CPUs, FPGAs, MCUs and a whole lot of complex purpose-built chips like RF front-ends. JTAG adapters can be quite obscure, or cost a pretty penny, which is why we’re glad to see that [Adam Taylor] from [ADIUVO] made a tutorial on using your Pi Pico board as a JTAG adapter. This relies on a project called XVC-Pico by [Dhiru Kholia], and doesn’t require anything other than a Pi Pico board itself — the XVC-Pico provides both a RP2040 firmware implementing the XVC (Xilinx Virtual Cable) specification and a daemon that connects to the Pico board and interfaces to tools like Vivado.

First part of the write-up is dedicated to compiling the Pico firmware using a Linux VM. There’s a pre-built .uf2 binary available in the GitHub repo, however, so you don’t have to do that. Then, he compiles and runs a daemon on the PC where the Pico is connected, connects to that daemon through Vivado, and shows successful single-stepping through code on a MYIR Z-turn board with a Xilinx XC7Z020. It’s worth remembering that, if your FPGA’s (or any other target’s) JTAG logic levels are 1.8V or 2.5V-based, you will need a level shifter between it and the Pi Pico, which is a board firmly in the 3.3V realm.

You just cannot beat the $3 price and the ease of setup. Pi Pico is shaping up to be more and more of a hardware multi-tool. Just a month ago, we covered how the Pico can work as a logic analyzer. A lot of that, we have the PIO peripherals to thank for — an assembly of state machines that even let you “bitbang” high-speed interfaces like DVI. If you’re interested in how PIO functions, there are some good write-ups around here. Lacking a Pi Pico, you can use this board’s bigger sister to interface with JTAG, too.

Screenshot of Pulseview showing capture and decode of some digital channels

Need A Logic Analyzer? Use Your Pico!

There’s a slew of hardware hacker problems that a logic analyzer is in a perfect position to solve. Whether you’re trying to understand why an SPI LCD screen doesn’t initialize, what’s up with your I2C bus, or determine the speed of an UART connection, you’ll really want to have a logic analyzer on hand. People have been using a Pi Pico as a logic analyzer in a pinch, and now [pico-coder] has shared a sigrok driver that adds proper support for a Pico to beloved tools like Pulseview.

The specs offered are impressive. Compared to the $10 “Saleae” clone analyzers we are so used to, this thing boasts 21 digital channels with up to 120 MHz capture speed, 3 ADC channels at up to 500 KHz, and hardware-based triggers. The GitHub repository linked above stores the driver files out-of-tree, but provides build instructions together with an easily flash-able uf2 firmware. It’s likely that you’ll soon see this driver in a stock Pulseview installation, however, given the submitter-friendly attitude we’ve witnessed on the sigrok mailing list. However, if you need a logic analyzer ASAP, you should follow the caringly offered quickstart guide.

We’ve covered Pulseview being used in combination with cheap accessible analyzers before — a must-watch if you need to get yourself up to speed on the value they provide to a hobbyist. If an oscilloscope is what you need and a smartphone is what you have, perhaps you’ll enjoy the Scoppy firmware for the Pico.

We thank [mip] for sharing this with us!

Breakbeats Courtesy Of The RP2040

While one often listens to songs or albums in full, sometimes you just want to lay down a simple beat. [todbot]’s latest project promises to do just that.

The build relies on a Raspberry Pi Pico or any other RP2040-based microcontroller board, and is programmed in CircuitPython. The PWM feature is used for audio output, and it’s loaded with different WAV samples of the classic “Amen” break.

Each measure, a random new sample is chosen and played, changing the beat. Even better, all the samples can loop, and they come in varying lengths, allowing them to overlap and lay over each other to add further depth to the mix. It’s a cinch to setup, as CircuitPython has an AudioMixer object built in.

Those wishing to tinker for themselves can find all the code and samples on Github. A build like this one is a great way to start learning about working with audio and music, after all. We’ve seen [todbot]’s work here before, too. Video after the break.

Continue reading “Breakbeats Courtesy Of The RP2040”

Digital Rain Animation Crammed Into Pi Pico

With a new Matrix movie now in cinemas, we’ve all been reminded of those screensavers that were just the coolest thing ever when the original film dropped in 1999. [en0b] decided to recreate the classic “digital rain” effect on the Raspberry Pi Pico, using up all the little microcontroller’s storage in the process.

Rather than rely on existing graphics libraries, [en0b] set about using a high-quality GIF for the animation. The original file was 8 MB, which was far too big to fit on the Pico. After some finagling in an image editor and with the help of a custom Python script, however, [en0b] managed to fit the 127-frame animation at 240 x 135 resolution into the 2 MB Flash onboard the chip. With the microcontroller hooked up to the 1.14″ IPS “Pico Display” from Pimoroni, the final looks great and faithfully recreates the aesthetic seen in the film.

[en0b]’s technique could reliably be used for displaying any GIF that you can cut down to 14 to 16 colors without losing too much quality. It’s not the world’s highest-end graphics format, but it does the job for little animations like these.

We’ve seen similar builds before too, using more heavy-duty hardware to build a magic 8-ball in much the same way. Meanwhile, if you’ve got your own neat little GIF hacks or Pico projects, don’t hesitate to send them in!