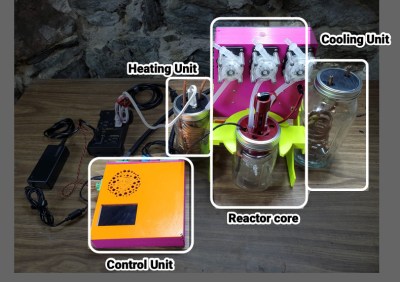
MicroLab reactor setup

Little Pharma On The Prairie

Let’s get the obvious out of the way first — in his DEFCON 32 presentation, [Dr. Mixæl Laufer] shared quite a bit of information on how individuals can make and distribute various controlled substances. This cuts out pharmaceutical makers, who have a history of price-gouging and discontinuing recipes that hurt their bottom line. We predict that the comment section will be incendiary, so if your best argument is, “People are going to make bad drugs, so no one should get to have this,” please disconnect your keyboard now. You would not like the responses anyway.

Let’s talk about the device instead of policy because this is an article about an incredible machine that a team of hackers made on their own time and dime. The reactor is a motorized mixing vessel made from a couple of nested Mason jars, surrounded by a water layer fed by hot and cold reservoirs and cycled with water pumps. Your ingredients come from three syringes and three stepper-motor pumps for accurate control. The brains reside inside a printable case with a touchscreen for programming, interaction, and alerts.

It costs around $300 USD to build a MicroLab, and to keep it as accessible as possible, it can be assembled without soldering. Most of the cost goes to a Raspberry Pi and three peristaltic pumps, but if you shop around for the rest of the parts, you can deflate that price tag significantly. The steps are logical, broken up like book chapters, and have many clear pictures and diagrams. If you want to get fancy, there is room to improvise and personalize. We saw many opportunities where someone could swap out components, like power supplies, for something they had lying in a bin or forego the 3D printing for laser-cut boards. The printed pump holders spell “HACK” when you disassemble them, but we would have gone with extruded aluminum to save on filament.

Several times [⁨Mixæl] brings up the point that you do not have to be a chemist to operate this any more than you have to be a mechanic to drive a car. Some of us learned about SMILES (Simplified Molecular Input Line Entry System) from this video, and with that elementary level of chemistry, we feel confident that we could follow a recipe, but maybe for something simple first. We would love to see a starter recipe that combines three sodas at precise ratios to form a color that matches a color swatch, so we know the machine is working correctly; a “calibration cocktail,” if you will.

If you want something else to tickle your chemistry itch, check out our Big Chemistry series or learn how big labs do automated chemistry.

Continue reading “Little Pharma On The Prairie”

Print Chess Pieces, Then Defeat The Chess-Playing Printer

Chess is undoubtedly a game of the mind. Sadly, some of the nuances are lost when you play on a computer screen. When a game is tactile, it carries a different gravity. Look at a poker player shuffling chips, and you’ll see that when a physical object is on the line, you play for keeps. [Matou], who is no stranger to 3D printing, wanted that tactility, but he didn’t stop at 3D printed pieces. He made parts to transform his Creality Ender 3 Pro into a chess-playing robot.

To convert his printer, [Matou] designed a kit that fits over the print head to turn a hotend into a cool gripper. The extruder motor now pulls a string to close the claw, which is a darn clever way to repurpose the mechanism. A webcam watches the action, while machine vision determines what the player is doing, then queries a chess AI, and sends the next move to OctoPrint on a connected RasPi. If two people had similar setups, it should be no trouble to play tactile chess from opposite ends of the globe.

Physical chess pieces and computers have mixed for a while and probably claimed equal time for design and gameplay. There are a couple of approaches to automating movement from lifting like [Matou], or you can keep them in contact with the board and move them from below.

Continue reading “Print Chess Pieces, Then Defeat The Chess-Playing Printer”

Into The Belly Of The Beast With Placemon

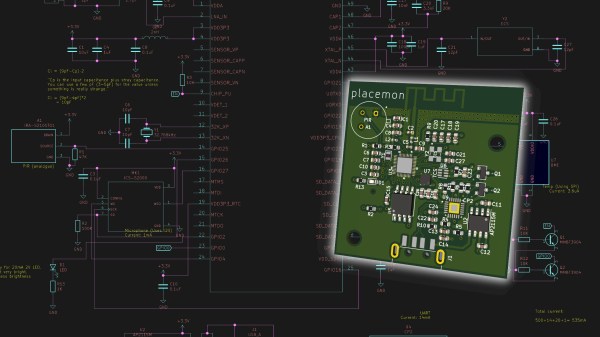
No, no, at first we thought it was a Pokemon too, but Placemon monitors your place, your home, your domicile. Instead of a purpose-built device, like a CO detector or a burglar alarm, this is a generalized monitor that streams data to a central processor where machine learning algorithms notify you if something is awry. In a way, it is like a guard dog who texts you if your place is unusually cold, on fire, unlawfully occupied, or underwater.

[anfractuosity] is trying to make a hacker-friendly version based on inspiration from a scientific paper about general-purpose sensing, which will have less expensive components but will lose accuracy. For example, the article suggests thermopile arrays, like low-resolution heat-vision, but Placemon will have a thermometer, which seems like a prudent starting place.

The PCB is ready to start collecting sound, temperature, humidity, barometric pressure, illumination, and passive IR then report that telemetry via an onboard ESP32 using Wifi. A box utilizing Tensorflow receives the data from any number of locations and is training to recognize a few everyday household events’ sensor signatures. Training starts with events that are easy to repeat, like kitchen sounds and appliance operations. From there, [anfractuosity] hopes that he will be versed enough to teach it new sounds, so if a pet gets added to the mix, it doesn’t assume there is an avalanche every time Fluffy needs to go to the bathroom.

We have another outstanding example of sensing household events without directly interfacing with an appliance, and bringing a sensor suite to your car might be up your alley.

Pegleg: Raspberry Pi Implanted Below The Skin (Not Coming To A Store Near You)

Earlier this month, a group of biohackers installed two Rasberry Pis in their legs. While that sounds like the bleeding edge, those computers were already v2 of a project called PegLeg. I was fortunate enough to see both versions in the flesh, so to speak. The first version was scarily large — a mainboard donated by a wifi router roughly the size of an Altoids tin. It’s a reminder that the line between technology’s cutting edge and bleeding edge is moving ever onward and this one was firmly on the bleeding edge.

How does that line end up moving? Sometimes it’s just a matter of what intelligent people can accomplish in a long week. Back in May, during a three-day biohacker convention called Grindfest, someone said something along the lines of, “Wouldn’t it be cool if…” Anyone who has spent an hour in a maker space or hacker convention knows how those conversations go. Rather than ending with a laugh, things progressed at a fever pitch.
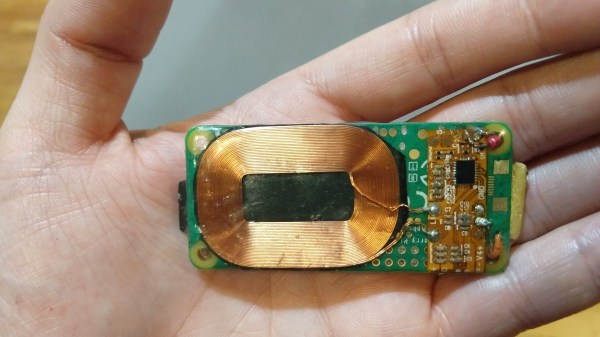
The router shed all non-vital components. USB ports: ground off. Plastic case: recycled. Battery: repurposed. Amazon’s fastest delivery brought a Qi wireless coil to power the implant from outside the body and the smallest USB stick with 64 GB on the silicon. The only recipient of PegLeg version 1.0 was [Lepht Anonym], who uses the pronoun ‘it’. [Lepht] has a well-earned reputation among biohackers who focus on technological implants who often use the term “grinder,” not to be confused with the dating app or power tool.

Continue reading “Pegleg: Raspberry Pi Implanted Below The Skin (Not Coming To A Store Near You)”

A SuperCap UPS

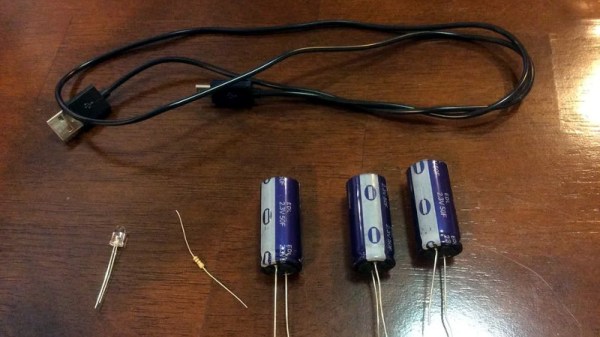
If you treat your Pi as a wearable or a tablet, you will already have a battery. If you treat your Pi as a desktop you will already have a plug-in power supply, but how about if you live where mains power is unreliable? Like [jwhart1], you may consider building an uninterruptible power supply into a USB cable. UPSs became a staple of office workers when one-too-many IT headaches were traced back to power outages. The idea is that a battery will keep your computer running while the power gets its legs back. In the case of a commercial UPS, most generate an AC waveform which your computer’s power supply converts it back to DC, but if you can create the right DC voltage right to the board, you skip the inverting and converting steps.

Cheap batteries develop a memory if they’re drained often, but if you have enough space consider supercapacitors which can take that abuse. They have a lower energy density rating than lithium batteries, but that should not be an issue for short power losses. According to [jwhart1], this quick-and-dirty approach will power a full-sized Pi, keyboard, and mouse for over a minute. If power is restored, you get to keep on trucking. If your power doesn’t come back, you have time to save your work and shut down. Spending an afternoon on a power cable could save a weekend’s worth of work, not a bad time-gamble.

We see what a supercap UPS looks like, but what about one built into a lightbulb or a feature-rich programmable UPS?

Raspberry Pi 4 Benchmarks: Processor And Network Performance Makes It A Real Desktop Contender

The new Raspberry Pi 4 is out, and slowly they’re working their way from Microcenters and Amazon distribution sites to desktops and workbenches around the world. Before you whip out a fancy new USB C cable and plug those Pis in, it’s worthwhile to know what you’re getting into. The newest Raspberry Pi is blazing fast. Not only that, but because of the new System on Chip, it’s now a viable platform for a cheap homebrew NAS, a streaming server, or anything else that requires a massive amount of bandwidth. This is the Pi of the future.

The Raspberry Pi 4 features a BCM2711B0 System on Chip, a quad-core Cortex-A72 processor clocked at up to 1.5GHz, with up to 4GB of RAM (with hints about an upcoming 8GB version). The previous incarnation of the Pi, the Model 3 B+, used a BCM2837B0 SoC, a quad-core Cortex-A53 clocked at 1.4GHz. Compared to the 3 B+, the Pi 4 isn’t using an ‘efficient’ core, we’re deep into ‘performance’ territory with a larger cache. But what do these figures mean in real-world terms? That’s what we’re here to find out.

Continue reading “Raspberry Pi 4 Benchmarks: Processor And Network Performance Makes It A Real Desktop Contender”

Raspberry Pi 4 Just Released: Faster CPU, More Memory, Dual HDMI Ports

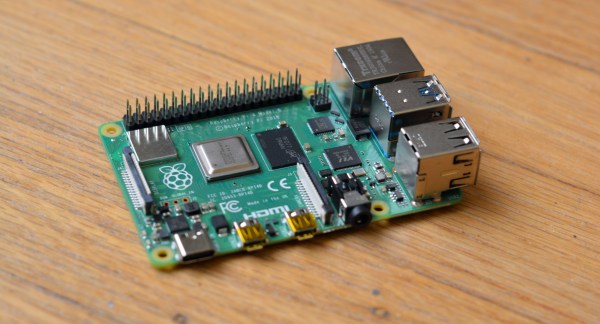
The Raspberry Pi 4 was just released. This is the newest version of the Raspberry Pi and offers a better CPU and more memory than the Raspberry Pi 3, dual HDMI outputs, better USB and Ethernet performance, and will remain in production until January, 2026.

There are three varieties of the Raspberry Pi 4 — one with 1GB of RAM, one with 2GB, and one with 4GB of RAM — available for $35, $45, and $55, respectively. There’s a video for this Raspberry Pi launch, and all of the details are on the Raspberry Pi 4 website.

A Better CPU, Better Graphics, and More Memory

The CPU on the new and improved Raspberry Pi 4 is a significant upgrade. While the Raspberry Pi 3 featured a Broadcom BCM2837 SoC (4× ARM Cortex-A53 running at 1.2GHz) the new board has a Broadcom BCM2711 SoC (a quad-core Cortex-A72 running at 1.5GHz). The press literature says this provides desktop performance comparable to entry-level x86 systems.

Of note, the new Raspberry Pi 4 features not one but two HDMI ports, albeit in a micro HDMI format. This allows for dual-display support at up to 4k60p. Graphics power includes H.265 4k60 decode, H.264 1080p60 decode, 1080p30 encode, with support for OpenGL ES, 3.0 graphics. As with all Raspberry Pis, there’s a component  composite video port as well tucked inside the audio port. The 2-lane MIPI DSI display port and 2-lane MIPI CSI camera port remain from the Raspberry Pi 3.

Continue reading “Raspberry Pi 4 Just Released: Faster CPU, More Memory, Dual HDMI Ports”