Fail Of The Week: How Not To Re-Reflow

There’s no question that surface-mount technology has been a game-changer for PCB design. It means easier automated component placement and soldering, and it’s a big reason why electronics have gotten so cheap. It’s not without problems, though, particularly when you have no choice but to include through-hole components on your SMT boards.

[James Clough] ran into this problem recently, and he tried to solve it by reflowing through-hole connectors onto assembled SMT boards. The boards are part of his electronic lead screw project, an accessory for lathes that makes threading operations easier and more flexible. We covered the proof-of-concept for the project; he’s come a long way since then and is almost ready to start offering the ELS for sale. The PCBs were partially assembled by the board vendor, leaving off a couple of through-hole connectors and the power jack. [James]’ thought was to run the boards back through his reflow oven to add the connectors, so he tried a few experiments first on the non-reflow rated connectors. The Phoenix-style connectors discolored and changed dimensionally after a trip through the oven, and the plastic on the pin headers loosened its grip on the pins. The female header socket and the power jack fared better, so he tried reflowing them, but it didn’t work out too well, at least for the headers. He blames poor heat conduction due to the lack of contact between the board and the reflow oven plate, and we agree; perhaps an aluminum block milled to fit snugly between the header sockets would help.

Hats off to [James] for trying to save his future customers a few steps on assembly, but it’s pretty clear there are no good shortcuts here. And we highly recommend the electronic leadscrew playlist to anyone interested in the convergence of machine tools and electronics.

Continue reading “Fail Of The Week: How Not To Re-Reflow”

Hackaday Links Column Banner

Hackaday Links: July 28, 2019

It looks like Apple is interested in buying Intel’s modem chip business. Seriously interested; a deal worth $1 billion could be announced as early as this week. That might look like a small potato purchase to the world’s biggest company – at least by market capitalization – but since the technology it will be buying includes smartphone modems, it provides a look into Apple’s thinking about the near future with regard to 5G.

It turns out that Make Magazine isn’t quite dead yet. [Dale Dougherty], former CEO of Maker Media, which went under in June, has just announced that he and others have acquired the company’s assets and reformed under the name “Maker Community LLC.” Make: Magazine is set to resume publication, going back to its roots as a quarterly publication in the smaller journal format; sadly there’s no specific word about the fate of Maker Faire yet.

The hoopla over the 50th anniversary of Apollo 11 may be over, but we’d be remiss not to call out one truly epic hack related to the celebration: the full restoration of an actual Apollo Guidance Computer. The AGC was from a test model of the Lunar Module, and it ended up in the hands of a private collector. Since November of 2018 the AGC has been undergoing restoration and tests by [Ken Shirriff], [Mike Stewart], and [Carl Claunch]. The whole effort is documented in a playlist by [Marc “CuriousMarc” Verdiell] that’s worth watching to see what was needed to restore the AGC to working condition.

With the summer sun beating down on the northern hemisphere, and air conditioners at working extra hard to keep things comfortable. [How To Lou] has a quick tip to improve AC efficiency. Turns out that just spraying a fine mist of water on the condenser coils works wonders; [Lou] measured a 12% improvement in cooling. It may not be the best use of water, and it may not work as well in very humid climates, but it’s a good tip to keep in mind.

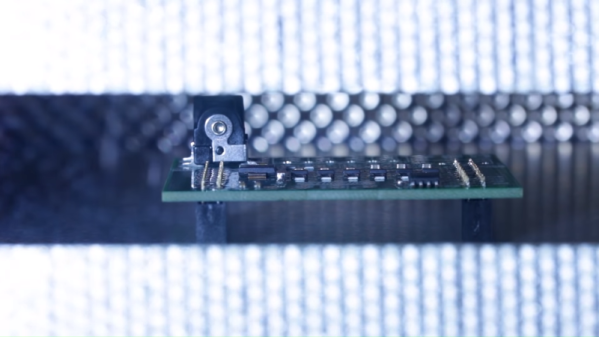
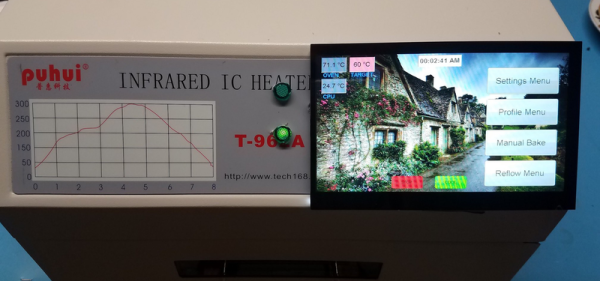
Be careful with this one; between the bent spoon, the syringe full of amber liquid, and the little candle to heat things up, this field-expedient reflow soldering setup might just get you in trouble with the local narcotics enforcement authorities. Even so, knowing that you can assemble a small SMD board without a reflow oven might prove useful someday, under admittedly bizarre circumstances.

From the “Considerably more than 8-bits music” file, check out the Hull Philharmonic Orchestra’s “8-Bit Symphony.” If your personal PC gaming history included a Commodore 64, chances are you’ll recognize songs from titles like “Monty on the Run”, “Firelord”, “Green Beret”, and “Forbidden Forest.” Sure, composers like [Ben Daglish] and [Paul Norman] worked wonders with the three-channel SID chip, but hearing those tunes rendered by a full orchestra is something else entirely. We found it to be particularly good background music to write by.

A Drop-In Controller Replacement For Commercial Reflow Ovens

If you need a reflow oven, you can very easily head down to Walmart or Target and pick up a toaster oven for fifteen bucks or so. Even without any control electronics, a bone-stock toaster oven works well enough for reflow soldering, but if you want to do it right you’ll also want to add a themocouple, a microcontroller, and maybe a fancy display. That’s option one.

If you value your time more than your money, you’ll probably just plonk down a few hundred bucks for a T-962A reflow oven, the standard infrared oven that’s meant for reflowing solder. It’s a good oven, but as with all bargain basement tools from China, the user interface isn’t great. [PhillyFlyers] is working on a drop-in controller for what is probably the most popular reflow oven on the planet, and this thing looks good.

This is a controller for the T-962A oven that includes all the connectors as the stock control board. We’ve seen a few of these projects to improve cheap tools, from 3D printer controllers to a replacement board for the ubiquitous K40 laser cutter. Now the most popular reflow oven is getting the same treatment.

The specs for this replacement board include a five-inch, 800 x 480 display, powered by an STM32H7 microcontroller. All of the usual functionality of the oven is retained, but it adds the ability to hand-draw reflow profiles, save reflow profiles to an SD card, and support for four K-type thermocouples. Basically, it’s what you would expect from an upgraded version of the T-962 oven.

Most importantly, this is a direct drop-in replacement for the stock electronics. Grab one of these boards, and all you have to do for installation is break out a screwdriver. It makes a great tool even better, which is exactly what this very popular reflow oven needs.

DIY Reflow Oven Is Heavily Documented

[DJ Legion] decided he wanted a reflow oven so he bought a toaster oven and an assortment of parts including a solid state relay, a Teensy, a display, and a thermocouple. What makes this a different project is the amount of video documentation. The four videos below encompass about 50 minutes of information and he’s promising more to come.

We haven’t found his software — probably because he’s still working on it, but we’re watching his GitHub page expectantly. We really liked the 3D printed faceplate that integrated the controller into the oven. It almost looks like a commercial unit. The use of the woodgrain paper over the 3D printed parts was a nice touch.

[DJ] is not done, though. He wants to increase the heat up time and possibly add convection. He’s also planning on a new video that will show actually making a board and how he has refined the calibration curves.

We are impressed but would have been tempted to just grab a Reflowduino. The work’s already done, and you get wireless control and lots of other goodies. Of course, we also get the urge to do it yourself, so we can’t really throw stones. If you don’t want to mess with an oven, you can always raid the hair salon.

Continue reading “DIY Reflow Oven Is Heavily Documented”

Recover Data From Damaged Chips

Not every computer is a performance gaming rig. Some of us need cheap laptops and tablets for simple Internet browsing or word processing, and we don’t need to shell out thousands of dollars just for that. With a cheaper price tag comes cheaper hardware, though, such as the eMMC standard which allows flash memory to be used in a more cost-advantageous way than SSDs. For a look at some the finer points of eMMC chips, we’ll turn to [Jason]’s latest project.

[Jason] had a few damaged eMMC storage chips and wanted to try to repair them. The most common failure mode for his chips is “cratering” which is a type of damage to the solder that holds them to their PCBs. With so many pins in such a small area, and with small pins themselves, often traditional soldering methods won’t work. The method that [Jason] found which works the best is using 0.15 mm thick glass strips to aid in the reflow process and get the solder to stick back to the chip again.

Doing work like this can get frustrating due to the small sizes involved and the amount of heat needed to get the solder to behave properly. For example, upgrading the memory chip in an iPhone took an expert solderer numerous tries with practice hardware to finally get enough courage to attempt this soldering on his own phone. With enough practice, the right tools, and a steady hand, though, these types of projects are definitely within reach.

CNC Mill Repairs IPhone 7

Modern smartphones are highly integrated devices, bringing immense computing power into the palm of one’s hand. This portable computing power and connectivity has both changed society in innumerable ways, and also tends to lead to said powerful computers ending up dropped on the ground or into toilets. Repairs are often limited to screen replacement or exchanging broken modules, but it’s possible to go much further.

The phone is an iPhone 7, which a service center reported had issues with the CPU, and the only fix was a full mainboard replacement. [The Kardi Lab] weren’t fussed, however, and got to work. The mainboard is installed in a CNC fixture, and the A10 CPU is delicately milled away, layer by layer. A scalpel and hot air gun are then used for some further cleanup of the solder pads. Some conductivity testing to various pads is then carried out, for reasons that aren’t entirely clear.

At this point, a spare A10 CPU is sourced, and a stencil is used to apply solder paste or balls – it is not immediately obvious which. The new chip is then reflowed on to the mainboard, and the phone reassembled. The device is then powered on and shown to be functional.

It’s an impressive repair, and shows that modern electronics isn’t so impossible to fix – as long as you have the right tools to hand. The smart thing is, by using the CNC machine with a pre-baked program, it greatly reduces the labor required in the removal stage, making the repair much more cost-effective. The team are particularly helpful, linking to the tools used to pull off the repair in the video description. We’ve seen similar hacks, too – such as upgrading an iPhone’s memory.  Video after the break.

[Thanks to Nikolai for the tip!]

Continue reading “CNC Mill Repairs IPhone 7”

Multi-Board Solder Stencils Explained

There was a time when reflow soldering was an impossibly exotic process at our level, something that only the most superhuman of hackers could even dream of attempting. But a demystification of the process plus the ready availability of affordable PCB and stencil manufacture has rendered into the range of almost all constructors, and it is likely that many of you reading this will have done it yourself.

Screen-printing solder paste onto a single board presents a mild alignment challenge, but how about doing it with many boards at once? [Eric Gunnerson] had this problem with a small-volume board he’s selling, and not being in the happy position of having his PCBs supplied on a panel, had to create his own multi-board alignment jig and stencil. His write-up provides a comprehensive and fascinating introduction to the process whether you are an occasional dabbler or embarking on a production run as he is.

The problem facing any would-be stenciler is that the board has to be held in place reliably in the same alignment as the stencil. With a single board, it’s easy enough to do the usual thing of taping scraps of PCB board to constrain its edges and hold it in place as a rudimentary jig, then lower the stencil onto it. Perhaps you’ve used one of those commercial stencil jigs, in which a set of magnets hold the stencil in place, or maybe you use pins to line everything up.

[Eric] takes us through the process of creating a laser-cut alignment jig for twelve boards, and cutting a matching twelve-board stencil. This includes all the software side using Inkscape, the selection of materials to match PCB thickness, and some of the issues with cutting Mylar sheet for the stencil without shrinkage at the corners. He’s using pins for alignment, and he even finds a handy supply of those in the form of shelf support pins.

We’ve visited the world of reflowing many times before. If you’d like a primer, here’s our Tools of the Trade piece on it, and if you aren’t daunted by larger projects, here’s an account of a prototype run of a significantly complex board.