Vintage IBM 1403 Printer Problem Evades An Easy Fix

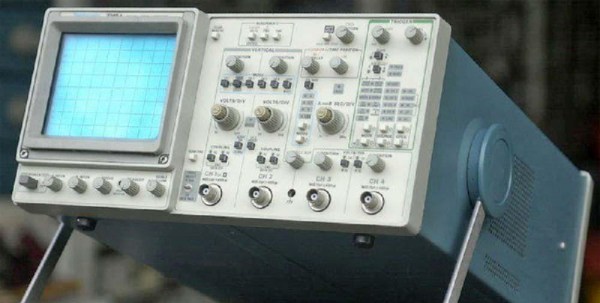
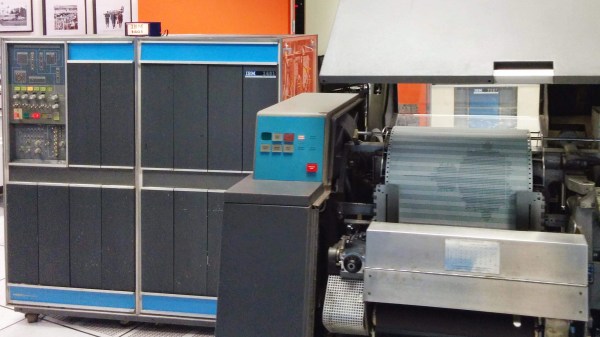
The Computer History Museum in Mountain View has two operational IBM 1401 mainframes, which use IBM 1403 high-speed printers. They aren’t some decades-old notion of “high speed” that barely looks sluggish today, either. These monsters slam out ten lines per second thanks to a rotating chain of type slugs and an array of electromagnetic hammers. Every 11.1 microseconds, a character in the chain would be lined up with a hammer, and if the control circuitry identified it as a character that needed to be printed, the hammer behind the paper would drive the paper into the print ribbon and the slug, putting an imprint of the character onto the paper. When one of these printers failed with a sync error, it kicked off some serious troubleshooting to diagnose the problem.

The IBM 1403’s type chain has a repeating set of characters that spins around at high speed. Unlike a typewriter or label maker, the hammers are not inside this unit. The hammers are on the outside, and work by pressing the paper onto the type slugs as the required characters line up.

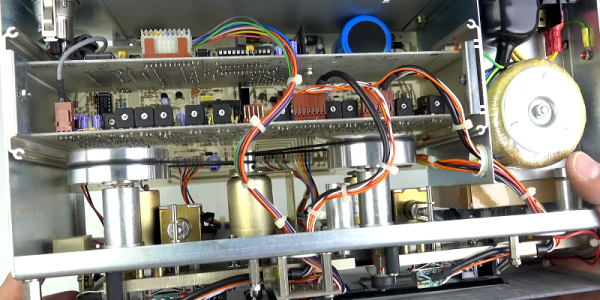
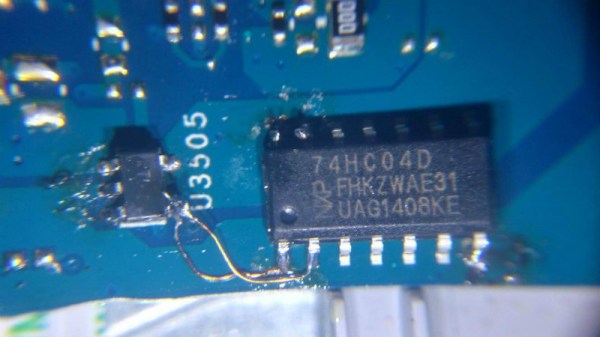
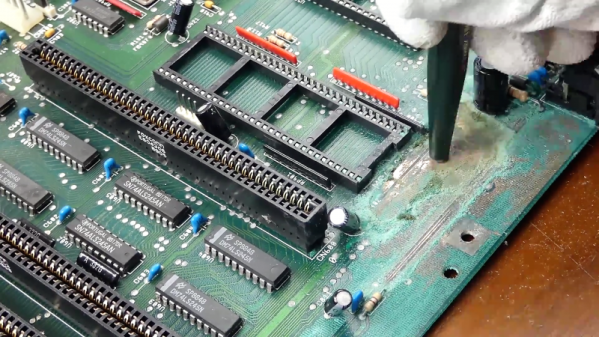
Investigation of the problem ultimately led to an intermittent connection in a driver card due to a broken PCB trace, but by then some fuses had been blown as well. In the end the printer was brought back online, but possibly with a slightly damaged coil on one of the hammers.

[Ken]’s writeup on the repair process is highly detailed and walks through the kind of troubleshooting and repairs involved when solving problems with vintage electronics. Electrical fundamentals might be the same, but a deep understanding of not only the architecture but also the failure modes of vintage hardware is needed in order to troubleshoot effectively.

If IBM 1401 mainframes and fixing 1403 printers sounds familiar, it’s because a printer fix has been done before. That was due to a different problem, but still a challenging task to narrow down and fix.

The Guts Of Switched Mode Power Supplies, Brought To You By Oscilloscope Repair

The Tektronix 2000 series of oscilloscopes are a mainstay for any electronics lab. They work, they’re relatively cheap, they’re good, and they’re available in just about any surplus electronics store. [Mr.RC-Cam] has been hoarding one of these for twenty years, and like any classic piece of equipment, it needs a little refurbishment every now and again. Now, it’s time. Here’s how you repair one of the best values in analog oscilloscopes.

This repair adventure began when the scope died. There were no lights, no screen trace, and a brief hiss sound when it was powered on. (Ten points if you can guess what that hiss sound was!) Armed with a schematic, [Mr.RC-Cam] dove in and pulled the power supply, being careful to discharge the CRT beforehand.

There were no bulging capacitors, no obviously overheated components, and just a little bit of dust. The only solution was to look at the parts with a meter one at a time. Removing the big caps provided access to a row of diodes, which revealed the culprit: a single shorted diode. This part was ordered, and a few other housekeeping tasks were taken care of. The lithium battery on the processor board responsible for storing the calibration constants was replaced, and the new, smaller, caps got lovely 3D printed mounting flange adapters. Now, this old ‘scope works, and we’ve got a lovely story to tell around the electronic campfire.

Teardown And Repair Of A Police Recorder

You should probably hope you haven’t seen [Techmoan’s] cassette recorder before. That’s because it is a Neal interview recorder that was mainly used by police to tape interrogations. This one was apparently used by the Royal Navy and was sold for parts. Turns out, the repair was simple, but the teardown and the analysis of the machine — you can see it in the video below — is pretty interesting if you’ve never seen one of these before.

The unit looks like a heavy-duty piece of industrial electronics from the 1980s. Unlike a commercial tape deck, this one is made to do one thing: record. You can’t even rewind a tape in it. Also unlike a consumer recorder, the Neal has a few special features aimed at making sure you didn’t miss some important confession on tape. First, it beeps if there’s no microphone plugged in. When [Techmoan] showed the recording head, we noticed it looked like it was split in half. Towards the end of the video, we found out why. In addition, the unit records two tracks: one audio track and another with a voice reading the elapsed time every 10 seconds — pretty high tech for its day.

Continue reading “Teardown And Repair Of A Police Recorder”

You’ll Flip For This 7404 IC Motherboard Fix

We often lament that the days of repairable electronics are long gone. It used to be you’d get schematics for a piece of gear, and you could just as easily crack it open and fix something as the local repairman — assuming you had the knowledge and tools. But today, everything is built to be thrown away when something goes wrong, and you might as well check at the end of a rainbow if you’re searching for a circuit diagram for a new piece of consumer electronics.

But [Robson] writes in with an interesting story that gives us hope that the “old ways” aren’t gone completely, though they’ve certainly changed for the 21st century. After blowing out his laptop’s USB ports when he connected a suspect circuit, he was desperate for a fix that would fit his student budget (in other words, nearly zero). Only problem was that he had no experience fixing computers. Oh, and it takes months for his online purchases to reach him in Brazil. Off to a rocky start.

His first bit of luck came with the discovery he could purchase schematics for his laptop online. Now, we can’t vouch for the site he used (it sure isn’t direct from Dell), but for under $5 USD [Robson] apparently got complete and accurate schematics that let him figure out what part was blown on the board without even having to open up the computer. All he had to do was order a replacement IC (SY6288DAAC), and solder it on. It took two months for the parts to arrive, and had to do it with an iron instead of a hot air station, but in the end, he got the part installed.

Continue reading “You’ll Flip For This 7404 IC Motherboard Fix”

Damaged Power Cord Repaired With Shop-Made Mold

We’ve likely all seen a power tool with a less-than-functional strain relief at one end of the power cord or the other. Fixing the plug end is easy, but at the tool end things are a little harder and often not worth the effort compared to the price of just replacing the tool. There’s no obsolescence like built-in obsolescence.

But in the land of Festo, that high-quality but exorbitantly priced brand of premium tools, the normal cost-benefit relationship of repairs is skewed. That’s what led [Mark Presling] to custom mold a new strain relief for a broken Festool cord. The dodgy tool is an orbital sander with Festool’s interchangeable “Plug It” type power cord, which could have been replaced for the princely sum of $65. Rather than suffer that disgrace, [Mark] built a mold for a new strain relief from two pieces of aluminum. The mold fits around the cord once it has been slathered with Sugru, a moldable adhesive compound. The video below shows the mold build, which has some interesting tips for the lathe, and the molding process itself. The Sugru was a little touchy about curing, but in the end the new strain relief looks almost like an original part.

Hats off to [Presser] for not taking the easy way out, and for showing off some techniques that could really help around the shop. We suppose the mold could have been 3D-printed rather than machined; after all, we’ve seen such molds before, and that 3D-printed dies can be robust enough to punch metal parts.

Continue reading “Damaged Power Cord Repaired With Shop-Made Mold”

Ancient Teletype Revived In Labor Of Retrocomputing Love

Readers with not too many years under their belts may recall a time when the classic background sound effect for radio and television news programs included a staccato mechanical beat, presumably made by the bank of teletype machines somewhere in the studio, clattering out breaking stories onto rolls of yellow paper. It was certainly true that teletypes were an important part of the many communications networks that were strung together over the 20th century, but these noisy, greasy beasts had their day and are now largely museum pieces.

Which is exactly where the ancient Model 19 Teletype machine that [CuriousMarc] and company are restoring is destined. Their ongoing video series, six parts long as of this writing, documents in painstaking detail how this unit worked and how they are bringing it back to its 1930s glory. Teletypes were made to work over telephone lines with very limited bandwidth, and the hacks that went into transmitting text messages with a simple 5-bit encoding scheme are fascinating. The series covers the physical restoration of the machine, obviously well-loved during its long service with the US Navy. Of particular interest is the massive power supply with its Thyratron tubes and their mysterious blue glow.

The whole series is worth a watch if you’re even slightly interested in retrocomputing. We’re particularly taken with the mechanical aspects of these machines, though, which have a lot in common with mechanical calculators. [Al Williams] recently covered the non-replacement of the power supply caps for this unit, which is an interesting detour to this restoration.

Continue reading “Ancient Teletype Revived In Labor Of Retrocomputing Love”

Amiga Repairs Put One Tough Little Machine Back In Service

Returning a piece of retro hardware to factory condition is generally a labor of love for the restorationist. A repair, on the other hand, is more about getting a piece of equipment back into service. But the line between repair and restoration is sometimes a fine one, with the goals of one bleeding over into the other, like in this effort to save an otherwise like-new Amiga 2000 with a leaky backup battery.

Having previously effected emergency repairs to staunch the flow of electrolyte from the old batteries and prevent further damage, [Retromat] entered the restoration phase of the project. The creeping ooze claimed several caps and the CPU socket as it spread across the PCB, but the main damage was to the solder resist film itself. In the video below you can clearly see flaky, bubbly areas in the mask where the schmoo did its damage.

Using a fiberglass eraser, some isopropyl alcohol, and far more patience than we have, [Retromat] was able to remove the damaged resist to reveal the true extent of the damage below. Thankfully, most of the traces were still intact; only a pair of lines under the CPU socket peeled off as he was removing it. After replacing them with fine pieces of wire, replacing the corroded caps and socket, and adding a coin-cell battery holder to replace the old battery, the exposed traces were coated with a varnish to protect them and the machine was almost as good as new.

Amigas were great machines in their day and launched more than one business. They’ve proved their staying power too, some even in mission-critical roles.

Continue reading “Amiga Repairs Put One Tough Little Machine Back In Service”