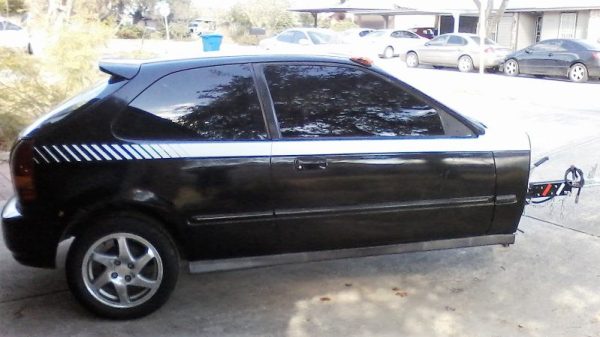
Omaha Mini Maker Faire: Recycle All The Things

A young maker named [Allie] drew a lot of attention at the 2nd annual Omaha Mini Maker Faire. Her booth was full of the various creations she has designed and built herself throughout the course of her short life. The biggest draw was her green design dollhouse, which focuses on environmentally friendly living. With the exception of the LEDs lighting the interior, some tape, and the requisite bit of hot glue, the entire structure and its contents were made from recycled materials.

green-dollhouse-thumb
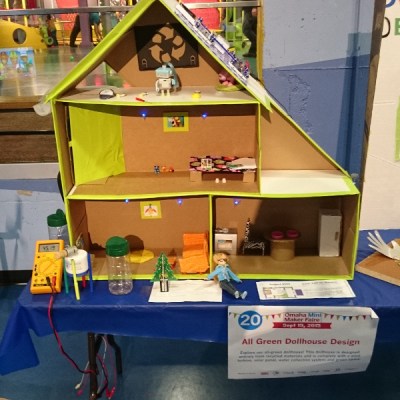
The cardboard structure features a kitchen, living room, bedroom, bathroom, and attic. Every piece of furniture and all the decorations are made from salvaged materials and packaging. One side of the roof holds a Snap Circuits board with a solar panel that powers some blue LEDs on the bedroom wall. [Allie] poured water down the other side of the roof to demonstrate the rain water collection system. The house’s rain barrel was made from a grated parmesan cheese container, which is perfectly designed for the airline tubing running into it from the recycled plastic guttering.

owl-says-noOne of [Allie]’s other projects is a disagreeable owl fashioned from cardboard and a salvaged canister. Hidden away beneath the owl’s platform lies a simple gear system attached to a key on the front. Turning the key causes the owl’s head to swivel back and forth. We tried to make it spin all the way around, but the full range of motion is about 270 degrees. She also brought Mountain Dew, a hummingbird model made from a spark plug and other metal bits and bobs, including a pair of soda can wings.

mountain-dew-hummingbird
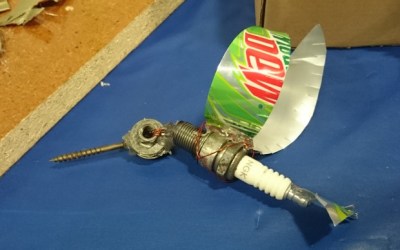
In addition to her crafty skills, [Allie] is one well-spoken tween. She was more than happy to discuss her creations in detail to anyone who would listen, which included at least two local journalists and this impressed reporter. We learned through a bit of light research that a robot [Allie] built a few years ago inspired a British toy company to produce a new doll, the Robot Girl Lottie. She’s an inspiration to makers of all ages.

Retrotechtacular: Salvaging A Capsized Ocean Liner

salavaging-a-capsized-ocean-liner

The scale of this salvage operation is nothing short of daunting. The SS Normandie was an ocean liner put into service in 1935 and capable of carrying 1,972 people across the Atlantic Ocean. The ship is still the fastest turbo-electric-propelled passenger vessel ever built, so it’s no surprise that it was seized by the US Navy during World War II for conversion to a troop carrier called the USS Lafayette. But in 1942, during retrofit operations, the vessel caught fire and capsized. The topic of today’s Retrotectacular is the remarkable salvage operation that righted the ship. Unfortunately, it was subsequently scrapped as bringing it into service was going to be too costly. Lucky for us the US Navy documented the salvage operation which makes for a fascinating 35-minutes of footage.

Continue reading “Retrotechtacular: Salvaging A Capsized Ocean Liner”

Desoldering Chips With Fire

Salvaging components is a staple of any electronic enthusiast, but many times those interesting chips – old 8-bit microcontrollers, memories, and CPUs found in everything from game consoles to old computers – are rather difficult to remove from a board. [Ryan] over on Instructables has a rather interesting method of removing old SMD packages using nothing more than a little fire and a pair of tweezers.

Obviously the best way to go about salvaging SMD components is with a heat gun, but lacking the requisite equipment, [Ryan] managed to remove a few SMD chips using rubbing alcohol as a heat source. In a properly controlled environment, [Ryan] filled a small metal dish with alcohol, set it on fire, and used the heat generated to remove a few components. Alcohol lamps are a common bench tool in a range of repair disciplines because the fuel is cheap and burns relatively cleanly (not leaving an unwanted residue on the thing you’re heating).

It’s an interesting kludge, and given [Ryan]’s display of desoldered components, we’re going to call it a success. It might also work for through-hole components, allowing for easy removal of old SRAM, ROM, and other awesome chips.

One Man’s Microwave Oven Is Another Man’s Hobby Electronics Store

There are loads of Internet content depicting the usefulness of salvaged innards found in defunct microwave ovens. [Mads Nielsen] is an emerging new vblogger with promising filming skills and intriguing beginner electronics content. He doesn’t bring anything new from the microwave oven to the dinner table, yet this video should be considered a primer for anybody looking to salvage components for their hobby bench. To save some time you can link in at the 5 minute mark when the feast of parts is laid out on the table. The multitude of good usable parts in these microwave ovens rolling out on curbsides, in dumpsters, and cheap at yard sales all over the country is staggering and mostly free for the picking.

The harvest here was: micro switches, X and Y rated mains capacitors, 8 amp fuse, timer control with bell and switches, slow turn geared synchronous 4 watt motor 5 rpm, high voltage capacitor marked 2100 W VAC 0.95 uF, special diodes which aren’t so useful in hobby electronics, light bulb, common mode choke, 20 watt 68 Ohm ceramic wire-wound resistor, AC fan motor with fan and thermostat cutout switches NT101 (normally closed).

All this can be salvaged and more if you find newer discarded units. Our summary continues after the break where you can also watch the video where [Mads] flashes each treasure. His trinkets are rated at 220 V but if you live in a 110 V country such components will be rated for 110 V.

Continue reading “One Man’s Microwave Oven Is Another Man’s Hobby Electronics Store”

Salvaging Lithium Cells And Circuits

Lithium cells outperform Nickel Cadmium and Nickel Metal Hydride in almost every way. But they also need a little bit more babysitting to get the most out of them. That comes in the form of control circuitry that charges them correctly and won’t let them get below a certain voltage threshold during discharge. We enjoyed reading about [Carlos’] Lithium cell salvage efforts as it discusses these concerns.

He wanted to salvage a Lithium power source for his projects. He had the three cell pack from a dead Macbook Pro seen in the upper left, as well as the single blown cell from a digital picture frame shown on the right. The three-pack didn’t monitor each cell individually, so the death of one borked the entire battery. He desoldered them and probed their voltage level to find one that was still usable. To prevent his project from draining the source below the 2.7V mark he scavenged that circuit board from the digital picture frame. A bit of testing and the system is up and running in a different piece of hardware.

Don’t be afraid of this stuff. If you learn the basics it’ll be easy to use these powerful batteries in your projects. For more background check out this charging tutorial.

Laptop Touchpad As A Standalone Peripheral

[Viktor] is working on salvaging parts from a dead laptop. In his eyes the biggest gem to be had is the touchpad, so he set out to see if he could make the touchpad a standalone device. You might be envisioning the many hells of interfacing this with a microcontroller and writing firmware to measure and translate the input to HID compatible commands. The good news is it’s quite a bit simpler than that, with just one gotcha.

He looked around to see what he could find about the chip that drives the touchpad. He couldn’t locate an exact match, but a datasheet from a similar family of controllers make him think that there should be a PS/2 data and clock output from the chip. After probing the test points on the board he found them, as well as the voltage and ground rails. Above you can see he soldered an old mouse cable to the board and it works when plugged in.

But we did mention the gotcha. There doesn’t seem to be any support for the right and left buttons. Those were housed on a flexible PCB which attached to the white connector seen above. That PCB also connected to the computer so we don’t know if they will work with this hack or not.

altoids-pocket-projector

DIY Film Projector Fits In The Palm Of Your Hand

DSLRs aside, the price of digital cameras these days can make it easy to consider just tossing your old one out when it breaks. [Leonidas Tolias] had another idea, and with a few broken cameras he had on hand he constructed a slick little pocket-sized projector.

The project started out as a pair of lenses from busted cameras and an Altoids tin in which he mounted them. The larger lens from a video camera was installed on the exterior of the tin, while the smaller of the two was mounted inside. Bits from disposable cameras were used to create a set of film reels, which he supports with some hand cut scrap aluminum. He made some test photo slides by printing some images on transparency paper, which he can cycle through using a film advancement rig he built out of string and a couple of gears.

While you won’t be using this projector for your next boring PowerPoint presentation, it does work pretty well as you can see in pictures on [Leonidas’] site.

[Thanks, Taylor]