Interfacing With A Digital Speedometer

After swapping the engine out in his scooter, [James Stanley] made an unfortunate discovery. The speedometer was digitally controlled, and while the original engine had a sensor which would generate pulses for it to interpret, his new engine didn’t. Learning that the original sensor would pull the signal wire to ground each time it detected a tooth of one of the spinning gears, [James] reasoned he needed to find a way to detect the scooter’s speed and create these pulses manually.

To find the scooter’s speed, he installed a magnet on the front wheel and a hall effect sensor on the fork to detect each time it passed by. Since the wheel is of a known circumference, timing the pulses from the sensor allows calculation of the current speed. A GPS receiver could be used if you wanted fewer wires, but the hall effect sensor on the wheel is simple and reliable. With the speed of the scooter now known, he needed to turn that into a signal the speedometer understands.

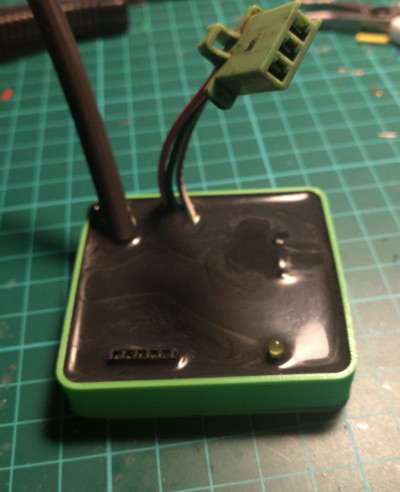
Speedometer controller potted with resin.

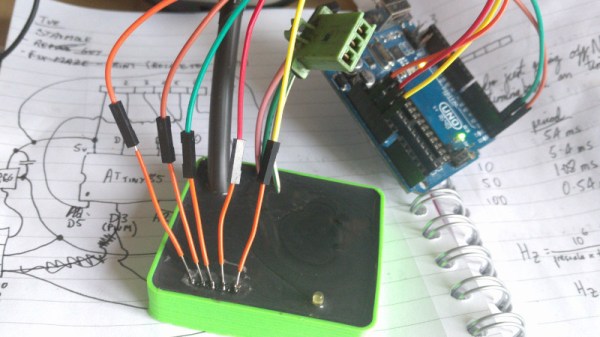
[James] wrote a program for an ATmega that would take the input from the wheel sensor and use it to create a PWM signal. This PWM signal drives a transistor, which alternates the speedometer sensor wire between low and floating. With a bit of experimentation, he was able to come up with an algorithm which equated wheel speed to the gearbox speed the speedometer wanted with accuracy close enough for his purposes.

While the software side of this project is interesting in its own right, the hardware is an excellent case study in producing robust electronic devices suitable for use on vehicles. [James] 3D printed a shallow case for the circuit board, and potted the entire device with black polyurethane resin. He even had the forethought to make sure he had a debugging LED and programming connector before he encapsulated everything (which ended up saving the project).

While the specific scenario encountered by [James] is unlikely to befall others, his project is an excellent example of not only interfacing with exiting electronics but producing rugged and professional looking hardware without breaking the bank. Even if scooters aren’t your thing, there are lessons to be learned from this write-up.

For all you two wheeled hackers out there, we’ve covered similar projects designed for bicycles, as well as some very slick digital speedometer mods for motorcycles.

Simple Electric Bike Conversion From 3D-Printed Parts

Challenge: Perform an electric conversion on a bicycle. Problem: No significant metal working skills or equipment. Solution: 3D print everything needed to electrify the bike.

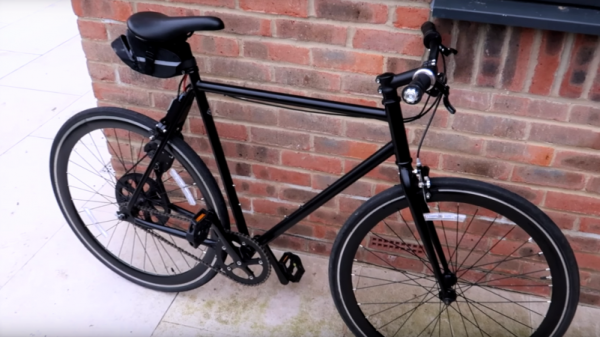
At least that’s the approach that [Tom Stanton] took to his electric bike build. Having caught the electric locomotion bug on a recent longboard build, [Tom] undertook the upgrade of a cheap “fixie,” or fixed-gear bike. His delta printer was big enough for the motor mount and weather-resistant ESC enclosure, but he needed to print the drive pulley in four quadrants that were later glued together. We can’t say we hold much faith in the zip ties that transmit all the torque through the rear wheel’s spokes, but as a proof of concept it seems sturdy enough. With a throttle from an electric scooter and a battery in a saddle bag, the bike turns in pretty decent performance — at least after a minor gearing change. And everything blends in or accents the black frame of the bike, so it’s a good-looking build to boot.

Want to catch the cheap electric personal transportation bug too? Check out this electric longboard, or this all-terrain hoverboard.

Continue reading “Simple Electric Bike Conversion From 3D-Printed Parts”

Modifications to a Razor E300 motor controller to remove limits

Converting An Electric Scooter To Lithium Batteries And Disabling The Safeties

There’s a bunch of different electric scooters available nowadays, including those hoverboards that keep catching fire. [TK] had an older Razor E300 that uses lead acid batteries. After getting tired of the low speeds and 12 hour charge times, [TK] decided it was time to swap for lithium batteries.

The new batteries were sourced from a Ryobi drill. Each provides 18 V, giving 36 V in series. The original batteries only ran at 24 V, which caused some issues with the motor controller. It refused to start up with the higher voltage. The solution: disable the safety shutdown relay on the motor controller by bridging it with a wire.

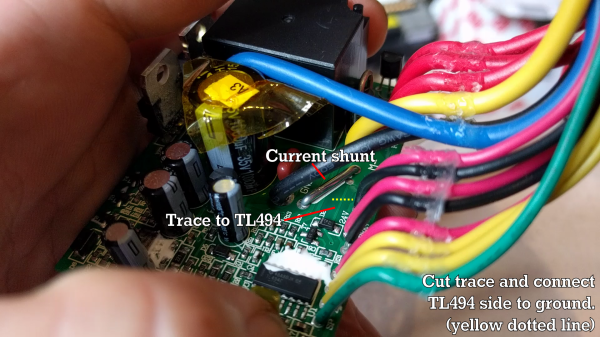
With the voltage issue sorted out, it was time for the current limit to be modified. This motor controller uses a TI TL494 to generate the PWM waveforms that drive a MOSFET to provide variable power to the motor. Cutting the trace to the TL494’s current sense pin removed the current limit all together.

We’re not saying it’s advisable to disable all current and voltage limits on your scooter, but it seems to be working out for [TK]. The $200 scooter now does 28 km/h, up from 22 km/h and charges much faster. With gearing mods, he’s hoping to eke out some more performance.

After the break, the full conversion video.

Continue reading “Converting An Electric Scooter To Lithium Batteries And Disabling The Safeties”

Making A Mobility Scooter Drastically More Mobile

Do you have a spare mobility scooter sitting unused in your garage? Or, maybe you’ve got a grandmother who has been complaining about how long it takes her to get to bingo on Tuesdays? Has your local supermarket hired you to improve grocery shopping efficiency between 10am and 2pm? If you answered “yes” to any of those questions, then the guys over at Photon Induction have an “overclocked” mobility scooter build which should provide you with both inspiration and laughs.

They’ve taken the kind of inexpensive mobility scooter that can be found on Craigslist for a couple hundred dollars, and increased the battery output voltage to simultaneously improve performance and reduce safety. Their particular scooter normally runs on 24V, and all they had to do to drastically increase the driving speed was move that up to 60V (72V ended up burning up the motors).

Other than increasing the battery output voltage, only a couple of other small hacks were necessary to finish the build. Normally, the scooter uses a clutch to provide a gentle start. However, the clutch wasn’t up to the task of handling 60V, so the ignition switch was modified to fully engage the clutch before power is applied. The horn button was then used as the accelerator, which simply engages a solenoid with massive contacts that can handle 60V. The result is a scooter that is bound to terrify your grandmother, but which will get her to bingo in record time.

Continue reading “Making A Mobility Scooter Drastically More Mobile”

Hybrid 50cc Ultracapacitor Scooter

We’re all familiar with hybrid gas-electric cars these days, but how about a hybrid scooter that uses supercapacitors instead of batteries? Our hats are off to [Alex] from Labs Bell for the almost entirely-DIY conversion.

The hybrid idea is to drive the vehicle’s wheels with electric motors, but generate the electricity with a normal gasoline engine. This allows the hybrid to control the engine speed almost independently of the wheel motors’ demand for power, allowing the gas engine to run at its most efficient speed and charge up batteries with the extra energy. As an extra bonus, many hybrids also use regenerative braking to recoup some of the energy normally wasted as heat in your brake pads.

[Alex]’s hybrid scooter does all of the above and more. Since the stock vehicle is a 50cc scooter, any increase in acceleration is doubtless welcome. We’d love to see the scooter starting from stop with a full charge. Using supercapacitors as storage instead of batteries is a win for charging efficiency. In urban stop-and-go traffic, the natural habitat of the 50cc scooter, the regenerative braking should help further with gas consumption.

What’s most impressive to us is the completely DIY hybrid control unit that takes some simple inputs (wheel speed and throttle position) and controls regenerative braking, the gas engine’s throttle, etc. Since the hybrid control system is currently under development, there’s even a button to switch between different trial algorithms on the fly. Very cool!

Oh yeah, and [Alex] points out the fire extinguisher on-board. He had occasion to use it for his hybrid motorcycle V1. Safety first!

Fail Of The Week: Commute-Shortening Electric Scooter

fotw-electric-scooter

Please don’t judge [Alan] on his choice of vests. This project is from 1999 when it was common to see people rockin’ these threads. Anyone who has ever spent time on the University of Minnesota campus in Minneapolis, Minnesota will know that parking is at a premium. [Alan] had a 12-15 minute walk from his parking garage to his office and was considering a cheaper parking location that would balloon that to 20-25 minutes. But engineers don’t see problems, they see project ideas. He started work on a tiny electric scooter that could slim down his commute. Obviously he did find some success, but it was interspersed with failures that make his scooter the Fail of the Week.

Continue reading “Fail Of The Week: Commute-Shortening Electric Scooter”

Scooterputer, The All-in-one Scooter Computer

ScootDisplay-2

We’ve seen a fair share of carputer builds involving a Raspberry Pi in the last few months, but even the power of a Raspi can’t compete with the awesomeness of this Arduino-powered scooterputer.

Like all awesome projects, this build is the product of a massive case of feature creep. Initially, [Kurt] only wanted a voltage monitor for his battery. With an  Arduino Duemilanove, a voltage divider, and an evening of coding, [Kurt] whipped up a simple device with three LEDs to indicate the status of the batter: either low, good, or charging.

The project was complete until he ran across an awesome OLED screen. Using a touch screen display for just battery monitoring is a bit overkill, so [Kurt] made a trip over to Sparkfun and got his hands on a temperature sensor, real-time clock, accelerometer, GPS sensor, and even a cellular shield.

The resulting scooterputer is a masterpiece of in-vehicle displays: there’s a digital speedometer and GPS unit, and the cellular shield works as a tracking device and a way to download real-time maps of the scooter’s current location with itouchmap.

While the majority of the electronics are hidden under the hood of the scooter, the display of course needed to be out in the weather. To do this, [Kurt] found a nice enclosure with a rubber boot that perfectly fit the OLED display. The display is connected to the Arduino with a cat5 cable, and everything should hold up pretty well as long as [Kurt] doesn’t drive through a hurricane.

You can check out a video of the scooterputuer below.

Continue reading “Scooterputer, The All-in-one Scooter Computer”