HamShield Puts Your Arduino On The Radio

Anybody can grab a USB TV tuner card and start monitoring the airwaves, but to get into the real meat of radio you’ll need your amateur radio license. Once you have that, the bandwidth really opens up… if you can afford the equipment. However, [spaceneedle] and friends have dramatically lowered the costs while increasing the possibilities of owning a radio by creating this ham radio shield for the Arduino.

The HamShield, is a versatile shield for any standard Arduino that allows it to function like an off-the-shelf radio would, but with a virtually unlimited number of functions. Anything that could be imagined can be programmed into the Arduino for use over the air, including voice and packet applications. The project’s sandbox already includes things like setting up mesh networks, communicating over APRS, setting up repeaters or beacons, monitoring weather stations, and a whole host of other ham radio applications.

HamShield operates on a wide range of frequencies and only uses a 250 mW amplifier. The power draw is small enough that the HamShield team operated it from a small solar panel, making it ideal for people in remote areas. The project is currently gathering funding and has surpassed their goal on Kickstarter, branding itself appropriately as the swiss army of amateur radio. The transceiver seems to be very robust, meaning that the only thing standing in the way of using this tool is simply writing the Arduino code for whatever project you want to do, whether that’s as a police scanner or even just a frequency counter. And if you want to follow along on hackaday.io, the project can be found here.

Continue reading “HamShield Puts Your Arduino On The Radio”

Bread Online

Bread Online Is A Bread Maker For The Internet Of Things

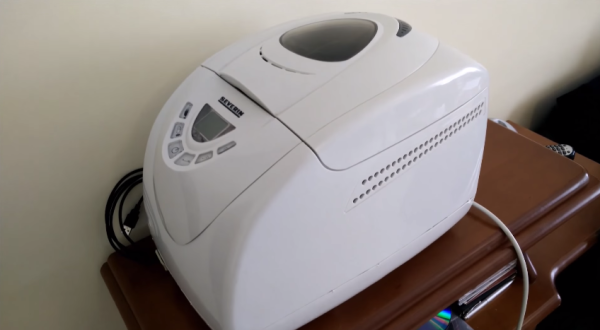
An engineering student at the University of Western Macedonia has just added another appliance to the ever-growing list of Internet enabled things. [Panagiotis] decided to modify an off-the-shelf bread maker to enable remote control via the Internet.

[Panagiotis] had to remove pretty much all of the original control circuitry for this device. The original controller was replaced with an Arduino Uno R3 and an Ethernet shield. The temperature sensor also needed to be replaced, since [Panagiotis] could not find any official documentation describing the specifications of the original. Luckily, the heating element and mixer motor were able to be re-used.

A few holes were drilled into the case to make room for the Ethernet connector as well as a USB connector. Two relays were used to allow the Arduino to switch the heating element and mixer motor on and off. The front panel of the bread maker came with a simple LCD screen and a few control buttons. Rather than let those go to waste, they were also wired into the Arduino.

The Arduino bread maker can be controlled via a web site that runs on a separate server. The website is coded with PHP and runs on Apache. It has a simple interface that allows the user to specify several settings including how much bread is being cooked as well as the desired darkness of the bread. The user can then schedule the bread maker to start. Bread Online also comes with an “offline” mode so that it can be used locally without the need for a computer or web browser. Be sure to check out the video demonstration below. Continue reading “Bread Online Is A Bread Maker For The Internet Of Things”

IP Tracker

An Arduino Device That Monitors Your External IP Address

[Bayres’] dad setup a webcam as a surveillance camera for a remote property. The only problem was that the only stable Internet connection they could get at this property was DSL. This meant that the external IP address of the webcam would change somewhat often; the needed a way to keep track of the external IP address whenever it changed. That’s when [Bayres] built a solution using Arduino and an Ethernet shield.

The main function of this device is to monitor the public IP address and report any changes. This is accomplished by first making a request to checkip.dyndns.org. This website simply reports your current public IP address. [Bayres] uses an Arduino library called Textfinder in order to search through the returned string and identify the IP address.

From there, the program compares this current value to the previous one. If there is any change, the program uses the Sendmail() function to reach out to an SMTP server and send an e-mail alert to [Beyres’] dad. The system also includes a small LCD. The Arduino outputs the current IP address to this display, making it easy to check up on the connection. The LCD is driven by 74HC595 shift register in order to conserve pins on the Arduino.

The system is also designed with a pretty slick setup interface. When it is booted, the user can enter a configuration menu via a Serial terminal. This setup menu allows the user to configure options such as SMTP server, email address, etc. These variables are then edited and can be committed to EEPROM as a more permanent storage solution. Whenever the system is booted, these values are read back out of the EEPROM and returned to their appropriate variables. This means you can reconfigure the device on the fly without having to edit the source code and re-upload.

Helicarrier

Lego Avengers Assemble To The Helicarrier!

The massive engineering-defying Helicarrier from the Avengers is a brilliant work of CGI. Too bad it’d never actually fly… Like… Never.

Luckily, that didn’t stop our favorite RC hackers over at FliteTest from making a scale model of it — that actually works! If you’re not familiar, the Helicarrier is a fictional ship, the pride of S.H.I.E.L.D’s air force, or is it their navy.

It’s a massive aircraft carrier with four huge repulsor engines built into it, borrowing tech from Stark Industries. The shear size of it is what makes it completely ridiculous, but at the same time, it’s also unbelievably awesome.

Unfortunately, repulsor technology doesn’t seem to exist yet, so the FliteTest crew had to settle with a set of 8 brushless outrunner motors, with two per “engine”. The whole thing is almost 6′ long.

It doesn’t handle that well (not surprising!) but they were able to launch another RC  plane off of it, mid-flight! Landing however… well you’ll have to watch the video. Continue reading “Lego Avengers Assemble To The Helicarrier!”

Arduino Lithium Charger Shield

Programmable Lithium Charger Shield For Arduino

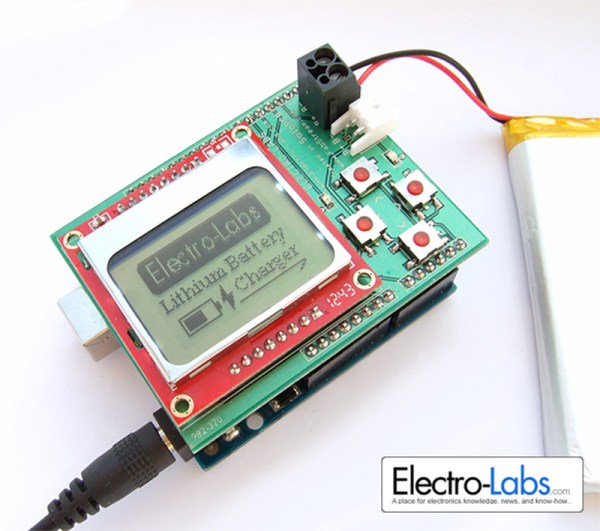
Surely you need yet another way to charge your lithium batteries—perhaps you can sate your desperation with this programmable multi (or single) cell lithium charger shield for the Arduino?! Okay, so you’re not hurting for another method of juicing up your batteries. If you’re a regular around these parts of the interwebs, you’ll recall the lithium charging guide and that rather incredible, near-encyclopedic rundown of both batteries and chargers, which likely kept your charging needs under control.

That said, this shield by Electro-Labs might be the perfect transition for the die-hard-‘duino fanatic looking to migrate to tougher projects. The build features an LCD and four-button interface to fiddle with settings, and is based around an LT1510 constant current/constant voltage charger IC. You can find the schematic, bill of materials, code, and PCB design on the Electro-Labs webpage, as well as a brief rundown explaining how the circuit works. Still want to add on the design? Throw in one of these Li-ion holders for quick battery swapping action.

[via Embedded Lab]

Monitor Shield Leaves No Pin Unused

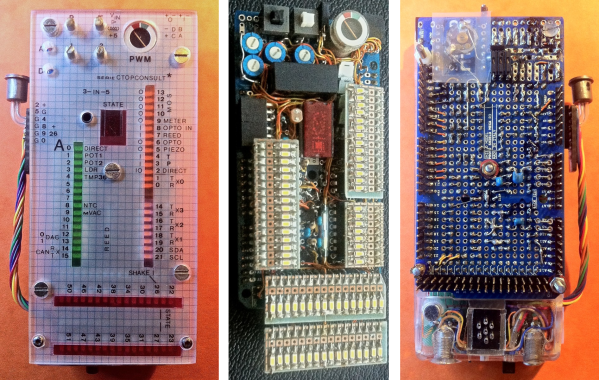
What doesn’t this Arduino Mega shield have? Ponder that as you realize that it doesn’t just attach itself to the pin headers, but uses every single one of the mega’s connections.

This isn’t a bunch of components kludged together either. [Carsten] is an a EE and that explains a lot of the really great choices he made like buffering, opto-isolation, and the clean assembly despite a schematic that’s so busy it’s difficult figure out where to start.

So, what does it do? Looks like a one-stop-shop for quick prototyping needs. For instance, there’s a pushbutton, toggle-switch, and a couple of trimpots for quick and easy input. At the center of the board is a 7-segment display, and multiple rows of LED bar displays (assembled from SMD components and protoboard) to provide feedback to the user.

There are also a number of sensors at the party, including a mercury shake sensor, temperature sensor, microphone, thermistor, and light dependent resistor. If what you need isn’t on the board there are multiple options for connecting external gear including opto-isolated input and output, and a LEMO for digital I/O with another for analog. All of that and we forgot to mention the moving coil voltmeter that measures PWM.

Medical Tricorder Mark I

A handheld tricorder is as good a reason as any to start a project. The science-fiction-derived form factor provides an opportunity to work on a lot of different areas of hardware development like portable power, charging, communications between sensor and microcontroller. And of course you need a user interface so that the values being returned will have some meaning for the user.

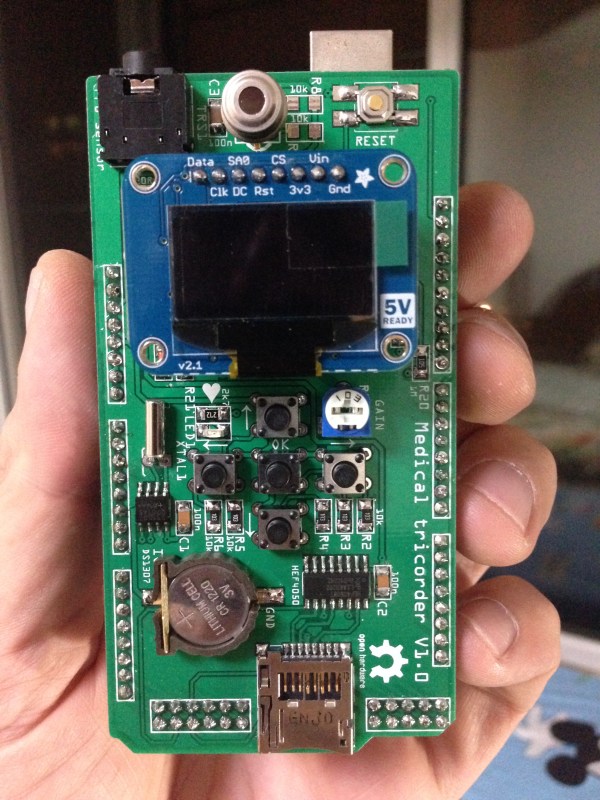
[Marcus B] has done a great job with all of this in his first version of a medical tricorder. The current design hosts two sensors, one measures skin temperature using infrared, the other is a pulse sensor.

For us it’s not the number of sensors that makes something a “tricorder” but the ability of the device to use those sensors to make a diagnosis (or to give the user enough hints to come to their own conclusion). [Marcus] shares similar views and with that in mind has designed in a real-time clock and an SD card slot. These can be used to log sensor data over time which may then be able to suggest ailments based on a known set of common diagnosis parameters.

Looking at the image above you may be wondering which chip is the microcontroller. This build is actually a shield for an Arduino hiding underneath.

There’s a demonstration video after the break. And if you find this impressive you won’t want to miss the Open Source Science Tricorder which is one of the finalists for the 2014 Hackaday Prize.

Continue reading “Medical Tricorder Mark I”