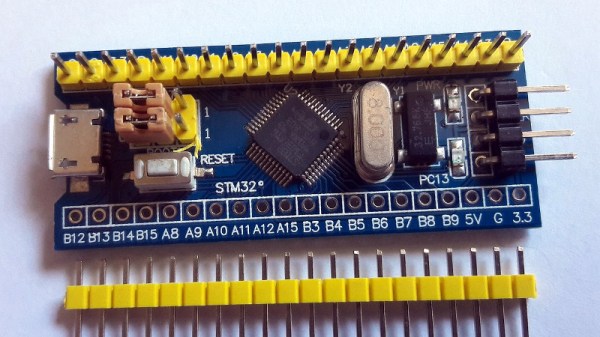
Probably not too many people have heard of Chinese manufacturer GigaDevice who so far has mostly been known as a NOR Flash memory manufacturer. Their GD32 range of MCUs is however STM32-compatible, making them interesting (cheaper) alternatives to sourcing directly from ST. Now GigaDevice has announced during a presentation that they are releasing a range of RISC-V-based MCUs: the GD32V series.
As GigaDevice has not yet updated their English-language website, the information we do have is based on CNX-Software‘s translations from Chinese. The specs for the GD32VF103 series of MCUs are listed by them as follows:
- Core – GD32VF103 RISC-V “Bumblebee Core” @ 108 MHz
- Memory – 8KB to 32KB SRAM
- Storage – 16KB to 128KB flash
- Peripherals – USB OTG and CAN 2.0B
- I/O – 3.3V, 5V tolerant
- Supply Voltage – 2.6 to 3.6V
- Package – QFN36, LQFP48, LQFP64, and LQFP100 packages
Whether they are pin-compatible with the GD32 MCUs is still to be confirmed. If that turns out to be the case, then this might be an interesting drop-in solution for some products. From the specs it seems clear that they are targeting the lower-end ARM-based MCUs such as ST’s Cortex-M3-based STM32F103, which are quite common in a large range of embedded systems.
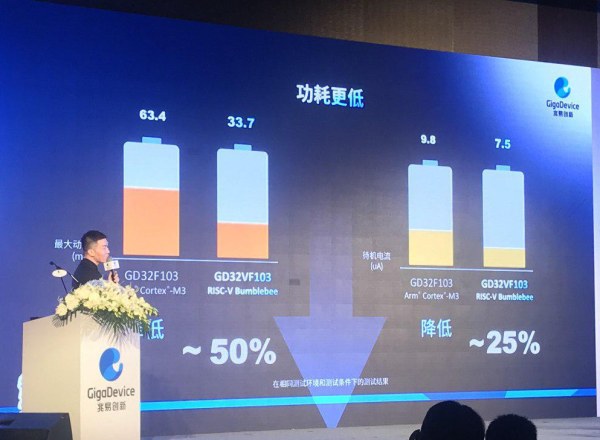
Seeing a performance comparison between both types of MCU would be interesting to see as lower power usage and higher efficiency compared to the ARM cores is being claimed. Both MCUs and development boards are already available for sale at Tmall, with the basic GD32VF103C-START board going for about $11 and the GD32VF103TBU6 MCU (QFN36, 64 kB Flash) for roughly $1.27.
Documentation and SDKs in English seem to be a bit scarce at this point, but hopefully before long we too will be able to use these MCUs without having to take up Chinese language classes.
Thanks to [Flaviu] for the tip!