Custom Strain Gauges Help Keep Paraglider Aloft

No matter what they’re flying, good pilots have a “feel” for their aircraft. They know instantly when something is wrong, whether by hearing a strange sound or a feeling a telltale vibration. Developing this sixth sense is sometimes critical to the goal of keeping the number of takeoff equal to the number of landings.

The same thing goes for non-traditional aircraft, like paragliders, where the penalty for failure is just as high. Staying out of trouble aloft is the idea behind this paraglider line tension monitor designed by pilot [Andre Bandarra]. Paragliders, along with their powered cousins paramotors, look somewhat like parachutes but are actually best described as an inflatable wing. The wing maintains its shape by being pressurized by air coming through openings in the leading edge. If the pilot doesn’t maintain the correct angle of attack, the wing can depressurize and collapse, with sometimes dire results.

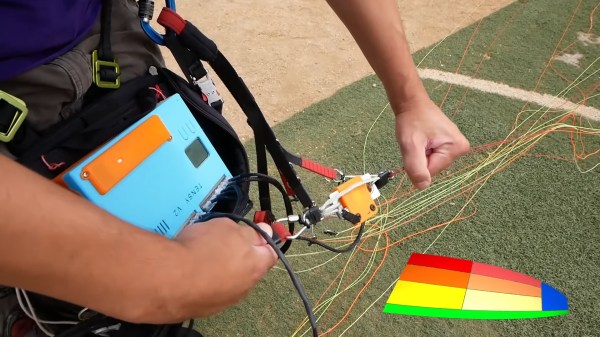
Luckily, most pilots eventually develop a feel for collapse, sensed through changes in the tension of the lines connecting the wing to his or her harness. [Andre]’s “Tensy” — with the obligatory “McTenseface” surname — that’s featured in the video below uses an array of strain gauges to watch to the telltale release of tension in the lines for the leading edge of the wing, sounding an audible alarm. As a bonus, Tensy captures line tension data from across the wing, which can be used to monitor the performance of both the aircraft and the pilot.

There are a lot of great design elements here, but for our money, we found the lightweight homebrew strain gauges to be the real gem of this design. This isn’t the first time [Andre] has flown onto these pages, either — his giant RC paraglider was a big hit back in January.

Continue reading “Custom Strain Gauges Help Keep Paraglider Aloft”

MIDI Harp Looks Pretty Sharp

[Julien] is one of those cool dads who shows his love with time invested rather than money spent. His daughter plays the harp, and you would not believe the price of concert harps. Even the cheap ones are several thousand USD. So naturally, he decided he would build her a MIDI concert harp from the ground up.

This plucky work in progress uses a strain gauge and an AD620 amplifier on every string to detect the tension when plucked. These amplifiers are connected to Arduinos, with an Arduino every nine strings. The Arduinos send MIDI events via USB to a Raspberry Pi, which is running the open synth platform Zynthian along with Pianoteq.

The harp is strung with guitar strings painted with silver, because he wanted capacitive touch support as well. But he scrapped that plan due to speed and reliability issues. Strain past the break to check out a brief demo video.

[Julien] used strings because he wanted to anchor the harpist in tactility. But you’re right; many if not most MIDI harps use lasers.

Continue reading “MIDI Harp Looks Pretty Sharp”

Simple Sensor Provides Detailed Motion Capture For VR Hands

Consider the complexity of the appendages sitting at the end of your arms. The human hands contain over a quarter of the entire complement of bones in the body, use dozens of muscles both in the hand itself and extending up the forearm, and are capable of almost infinite variance in the movements they can create. They are exquisite machines.

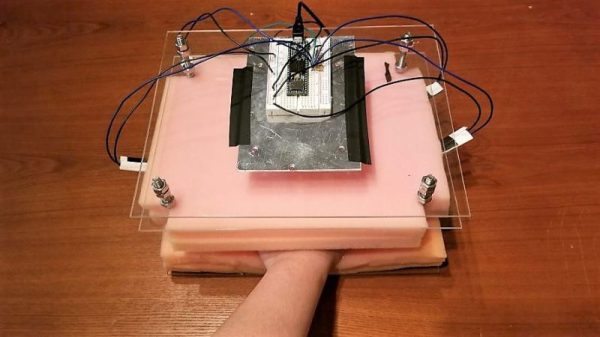
And yet when it comes to virtual reality, most simulations treat the hands like inert blobs. That may be partly due to their complexity; doing motion capture from so many joints can be computationally challenging. But this pressure-sensitive hand motion capture rig aims to change that. The product of an undergraduate project by [Leslie], [Hunter], and [Matthew], the idea was to provide an economical and effective way to capture gestures for virtual reality simulators, which generally focus on capturing large motions from the whole body.

The sensor consists of a sandwich of polyurethane foam with strain gauge sensors embedded within. The user slips his or her hand into the foam and rests the fingers on the sensors. A Teensy and twenty lines of code translate finger motions within the sandwich into five axes of joystick movement, which is then sent to Unreal Engine, where finger motions were translated to a 3D-model of a hand to play a VR game of “Rock, Paper, Scissors.”

[Leslie] and her colleagues have a way to go on this; testers complained that the flat hand posture was unnatural, and that the foam heated things up quickly. Maybe something more along the lines of these gesture-capturing gloves would work?

Quartet Of SMD Resistors Used To Sense Z-Axis Height

Here’s a neat trick for your next 3D-printer build or retrofit: a Z-axis sensor using a DIY strain gauge made from SMD resistors. We’re betting it could have plenty of other applications, too.

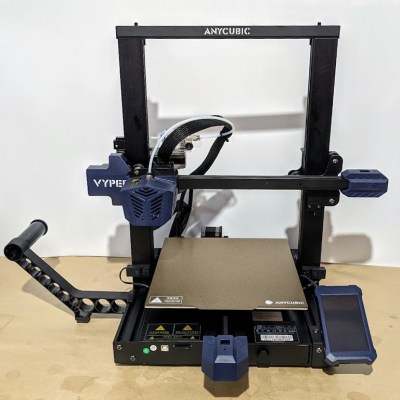
Conventional load cells, at least the ones you can pick up cheaply from the usual sources or harvest from old kitchen or bathroom scales, are usually way too big to be used on the extruder of a 3D-printer. [IvDm] wanted to build a touch sensor for his Hybercube printer, so he built his own load cell to do it. It consists of four 1000 ohm SMD resistors in the big 2512 device size. He mounted them to an X-shaped PCB and wired them in the classic Wheatstone bridge configuration, with two resistors on one side of the board and two on the other.

The extruder mounts into a hole in the center of the board and floats on it. Through an HX711 load cell driver chip, the bridge senses the slight flex of the board when the extruder bottoms out on the bed, and an ATtiny85 pulls a limit switch input to ground. [IvDm] even did some repeatability testing with this sensor and it turned out to be surprisingly consistent. The first minute or so of the video below shows it in action on the Hypercube.

We found the use of SMD resistors as strain gauges pretty clever here, but there’s plenty to do with off-the-shelf load cells: measuring how much filament is left on a roll, checking the thrust of a model rocket engine, or even figuring out if you’re peeing correctly.

Continue reading “Quartet Of SMD Resistors Used To Sense Z-Axis Height”

Brushless Motor Thrust Stand Provides Useful Data

When designing model aircraft of any shape or size, it’s useful to know the performance you can expect from the components chosen. For motors and propellers, this can be difficult. It’s always best to test them in combination. However, with the numbers of propeller and motor combinations possible, such data can be tough to come by. [Nikus] decided it would be easier to just do the testing in-house, and built a rig to do so.

The key component in this build is the strain gauge, which comes already laced up with an Arduino-compatible analog-digital converter module. Sourced for under $10 from Banggood, we can’t help but think that we’ve got it easy in 2018. A sturdy frame secures motor and propeller combination to the strain gauge assembly. An ATMEGA328 handles sending commands to the motor controller, reading the strain gauge results, and spitting out data to the LCD.

It’s a cheap and effective build that solves a tricky problem and would be a useful addition to the workshop for any serious modeler. We’ve seen other approaches in this area too, for those eager to graph their motor performance data. Video after the break.

[Thanks to Baldpower for the tip!]

Continue reading “Brushless Motor Thrust Stand Provides Useful Data”

Kinetic Sculpture Achieves Balance Through Machine Learning

We all know how important it is to achieve balance in life, or at least so the self-help industry tells us. How exactly to achieve balance is generally left as an exercise to the individual, however, with varying results. But what about our machines? Will there come a day when artificial intelligences and their robotic bodies become so stressed that they too will search for an elusive and ill-defined sense of balance?

We kid, but only a little; who knows what the future field of machine psychology will discover? Until then, this kinetic sculpture that achieves literal balance might hold lessons for human and machine alike. Dubbed In Medio Stat Virtus, or “In the middle stands virtue,” [Astrid Kraniger]’s kinetic sculpture explores how a simple system can find a stable equilibrium with machine learning. The task seems easy: keep a ball centered on a track suspended by two cables. The length of the cables is varied by stepper motors, while the position of the ball is detected by the difference in weight between the two cables using load cells scavenged from luggage scales. The motors raise and lower each side to even out the forces on each, eventually achieving balance.

The twist here is that rather than a simple PID loop or another control algorithm, [Astrid] chose to apply machine learning to the problem using the Q-Behave library. The system detects when the difference between the two weights is decreasing and “rewards” the algorithm so that it learns what is required of it. The result is a system that gently settles into equilibrium. Check out the video below; it’s strangely soothing.

We’ve seen self-balancing systems before, from ball-balancing Stewart platforms to Segway-like two-wheel balancers. One wonders if machine learning could be applied to these systems as well.

Continue reading “Kinetic Sculpture Achieves Balance Through Machine Learning”

Assess Your Output With A Cheap DIY Urine Flowmeter

Some things about the human body are trivial to measure. Height, weight, blood pressure, pulse, temperature — these are all easily quantifiable with the simplest of instruments and can provide valuable insights into our state of health. Electrical activity in the heart and the brain can be captured with more complex instruments, too, and all manner of scopes can be inserted into various orifices to obtain actionable information about what’s going on.

But what about, err, going? Urine flow can be an important leading indicator for a host of diseases and conditions, but it generally relies on subjective reports from the patient. Is there a way to objectively measure how well urine is flowing? Of course there is.

The goal for [GreenEyedExplorer]’s simple uroflowmeter is simple: provide a cheap, easy to use instrument that any patient can use to quantify the rate of urine flow while voiding. Now, we know what you’re thinking — isn’t liquid flow usually measured in a closed system with a paddlewheel or something extending into the stream? Wouldn’t such a device for urine flow either be invasive or messy, or both? Rest assured, this technique is simple and tidy. A small load cell is attached to an ESP8266 through an HX711 load cell amp. A small pan on the load cell receives urine while voiding, and the force of the urine striking the pan is assessed by the software. Reports can be printed to share with your doctor, and records are kept to see how flow changes over time.

All kidding aside, this could be an important diagnostic tool, and at 10€ to build, it empowers anyone to take charge of their health. And since [GreenEyedExplorer] is actually a urologist, we’re taking this one seriously.

Continue reading “Assess Your Output With A Cheap DIY Urine Flowmeter”