The Very Slow Movie Player Does It With E-Ink

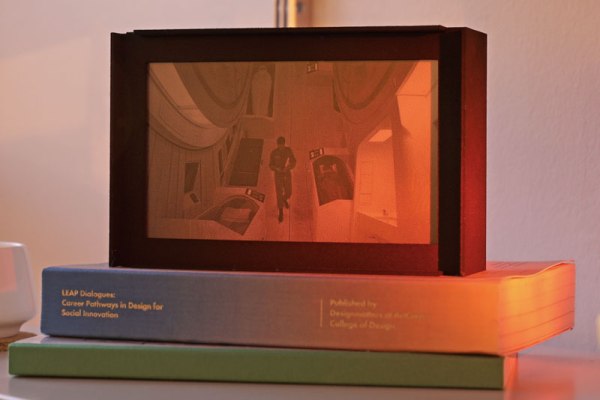
Most displays are looking to play things faster. We’ve got movies at 60 frames per second, and gaming displays that run at 144 fps. But what about moving in the other direction? [Bryan Boyer] wanted to try this out, so he built the VSMP, or Very Slow Movie Player. It’s a neat device that plays back a movie at about 24 fph (frames per hour) on an e-ink display to demonstrate something that [Bryan] calls Slow Seeing, which, he says “helps you see yourself against the smear of time.” A traditional epic-length movie is now going to run you greater than 8,000 hours of viewing.

Artistic considerations aside, it’s an interesting device from a technical point of view. [Bryan] built it from a 7.4-inch e-ink display from Pervasive Displays. The controller is connected to a Raspberry Pi Zero, which is running a Python script to convert a frame of the movie file into a dithered file, then send it to the display. Because the Pi Zero isn’t a very fast computer, this takes some time, and thus the slow speed of the VSMP. Originally, [Bryan] had set it up to run as fast as the system could manage, which was about 25 seconds per frame, or about 2 frames per minute. He decided to slow it down a bit further to the more attractive multiple of 24 frames per hour to contrast with the 24 frames per second of the original movie. He did this by using a CRON job that kicks of the conversion script once every 2.5 minutes and increments the frame counter. All of this is topped off with a nice 3D-printed case that has a lovely interference pattern to make a rather neat and intriguing project.

Perhaps the best part of this is see a time-lapse of the VSMP — life moves quickly around it while 2001: A Space Odyssey plays at normal speed.

Continue reading “The Very Slow Movie Player Does It With E-Ink”

Motorize Your Camera Slider, The Hacker Way

Camera sliders are a fantastic tool for those who wish to shoot beautiful and smooth panning video, or take expressive time-lapse shots. They can also be remarkably expensive, which creates an incentive for the DIYer to innovate at home. [Richard] wanted a motorized slider and didn’t want to break the bank, and thus, a build was born.

Starting with an existing non-motorized camera slider makes things easier, though there’s no reason [Richard]’s techniques couldn’t be applied to a completely DIY build. A NEMA stepper motor is fitted to the frame, and connected to the camera shuttle with a toothed belt. The stepper is controlled by an Arduino, which allows for both timelapse and smooth panning modes, and can be controlled with an IR remote sourced from Amazon. The slider is also interfaced with a Processing sketch, which gives a graphical representation of the slider’s current position on the laptop’s screen, which helps for setting up a shot.

[Richard] has shared the code and a shopping list, and is confident that the build can be completed for under $100. That’s a satisfying price given the quality of shots possible with a good slider.

We see plenty of slider builds here, including this impressive pantograph-type build. Video after the break.

[Thanks to Baldpower for the tip!]

Continue reading “Motorize Your Camera Slider, The Hacker Way”

3D Printer Time Lapse Videos Ditch The Blur

Example output of Octolapse with the print head absent from the images.

Most time-lapse videos of 3D prints show a steadily growing print with a crazy blur of machine movement everywhere else. This is because an image is captured at a regular time interval, regardless of what’s physically going on with the machine. But what if images were captured at consistent machine positions instead? [FormerLurker]’s Octolapse plugin for OctoPrint came out of beta recently and does exactly that, and the results are striking. Because OctoPrint knows where a 3D printer’s print head is at all times, it’s possible for a plugin to use this information to create time-lapse videos where the print head position is consistent instead of a crazy blur, or even have the print head absent from the shot altogether.

[FormerLurker] had originally created stabilized time lapses by hand editing G-code, which had great results but was inefficient and time-consuming. This plugin is the result of his work at automating and enhancing the process, and is also his first serious open source programming project. We’ve covered upgrading a 3D printer with OctoPrint before, and the plugins functionality of OctoPrint means features can be added independently from the core system, which itself largely remains a one-woman effort by creator and maintainer [Gina Häußge].


Trio Of Tips For A Cetus Printer

Thanks to the holiday gifting cycle, many homes are newly adorned with 3D printers. Some noobs are clearly in the “plug and play” camp, looking for a user experience no more complicated than installing a new 2D printer. But most of us quickly learn that adding a dimension increases the level of difficulty substantially, and tinkering ensues.

One such tinkerer, [Marco Reps], has been taking his new Cetus 3D printer to new places, and his latest video offers a trio of tips to enhance the user experience of this bare-bones but capable printer. First tip: adding a heated bed. While the company offers a heated aluminum bed for ABS and PETG printing at a very reasonable price, [Marco] rolled his own. He bolted some power resistors to the aluminum platen, built a simple controller, and used the oversized stock power supply to run everything.

To contain the heat, tip two is an enclosure for the printer. Nothing revolutionary here — [Marco] just built a quick cover from aluminum profiles and acrylic.

But the clear case allows for tip number three, the gem of this video: synchronized time-lapse photography. Unhappy with the jerky time-lapse sequences that are standard fare, he wrote a Python program that uses OpenCV to compare webcam frames and save those that are similar to the last saved frame. This results in super smooth time-lapse sequences that make it look like the print is being extruded as a unit. Pretty neat stuff.

Did you find a 3D printer under your Festivus Pole, and now you’re wondering what’s next? Check out [Tom Nardi]’s guide for 3D newbies for more tips.

Continue reading “Trio Of Tips For A Cetus Printer”

Easy Time-lapse Video Via Phone And Command Line

A good time-lapse video can be useful visual documentation, and since [Tommy]’s phone is the best camera he owns he created two simple shell scripts to grab time-lapse images and assemble them into a video. [Tommy]’s work is just the glue between two other things: an app that turns the phone into an IP camera with a web server on the local network, and the ability to grab a still image from that server on demand.

The app he uses for his iPhone normally serves video but has an undocumented feature that allows single frames to be downloaded by adding ‘/photo’ to the end of the URL, but the ability to get a still image is a common feature on IP camera apps for smartphones. His capture script (GitHub repository here) should therefore need only minor changes to work with just about any IP camera app.

Perching a phone over a workspace and using it to create a time-lapse with a couple of shell scripts is a great example of combining simple tools to get better functionality. It could be a good way to get additional use out of an older smartphone, too. Heck, even older dumbphones can still get some use out of them; Shmoocon 2017 brought us details on rolling your own 1G network.

Take A Time-Lapse Or Bake A Cake With This Kitchen Timer Panning Rig

Seems like the first thing the new GoPro owner wants to do is a time-lapse sequence. And with good reason – time-lapses are cool. But they can be a bit bland without a little camera motion, like that provided by a dirt-cheap all-mechanical panning rig.

Let’s hope [JackmanWorks]’ time-lapse shots are under an hour, since he based his build on a simple wind-up kitchen timer, the likes of which can be had for a buck or two at just about any store. The timer’s guts were liberated from the case and a simple wooden disc base with a 1/4″-20 threaded insert for a tripod screw was added. The knob, wisely left intact so the amount of time left in the shot is evident, has a matching bolt for the camera’s tripod socket. Set up the shot, wind up the timer, and let it rip at 1/60 of an RPM. Some sample time-lapse shots are in the video below.

Turning this into a super-simple powered slider for dollying during a time-lapse wouldn’t be too tough — if you’ve already got a nice pantograph slide rig built.

Continue reading “Take A Time-Lapse Or Bake A Cake With This Kitchen Timer Panning Rig”

Hackaday Prize Entry: FabDoc Is Version Control For Project Images

FabDoc is an interesting concept that attempts to tackle a problem many of us didn’t realize we had. There are plenty of version control systems for software, but many projects also have a hardware element or assembly process. Those physical elements need to be documented, but that process does not easily fit the tools that make software development and collaboration easier. [Kevin Cheng] sums FabDoc up as “a system to capture time-lapse pictures as pre-commits.”

With FabDoc a camera automatically records the physical development process, allowing the developer to focus on work and review later. The images from the camera are treated as pre-commits. Upon review, the developer selects relevant key images (ignoring dead ends or false starts) and commits them. It’s a version control and commit system for the physical part of the development process. The goal is to remove the burden of stopping the work process in order to take pictures, automatically record the development process and attach it to a specific project, and allow easy management of which images to commit.

The current system uses a Raspberry Pi Zero with a camera mounted on safety glasses, and some support software. Some thought has certainly gone into making the system as easy to use and manage as possible; after setting up a repository, scanning a QR code takes care of telling the system what to do and where to put it. The goal is to make FabDoc fast and easy to use so that it can simply work unattended.

We saw a visual twist on version control some time ago with a visual diff for PCBs, which was a great idea to represent changes between PCB designs visually, diff-style. It’s always exciting to see someone take a shot at improving processes that are easy to take for granted.