Let’s face it, in your workshop there are convenient tools, and there are quality tools, but so often they aren’t both. Think back to the tools you reach for first. Very often for me, speed and convenience win out. I don’t want to look too hard for that drill or saw, and want them to work as expected when I reach for them. At the same time, there are some tools that simply must be stored away, and can’t perch on my workbench forever or sit on a shelf.
It really is a balancing act sometimes. I don’t have a sure fire formula for when to break out the expensive tools, and what jobs are easy with the less expensive. I’ll lay out some of my most-often utilized tools in my arsenal, then I want to hear from you on your own faves.
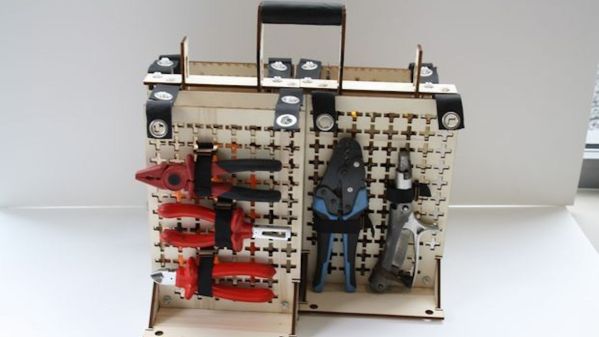
[ystoelen] created this modular wooden toolbox out of laser-cut 5mm plywood secured with leather hinges bolted into place. The leather strips secure the various tool boards with grommets connecting to plastic plugs. The toolboards use cross-shaped holes with laser-cut plugs and strips of elastic securing the tools, allowing each board to be uniquely configured depending on what tool is being stored there. There is a larger, “main” board, onto which smaller boards can be placed depending on what tools you’ll need.
While this is a clever approach to tool transport, we have some concerns about this project. Usually the problem with a box full of tools is that you’ve overloaded it and can’t readily lift it up. Often this involves a steel toolbox that won’t break, no matter what happens. But a plywood construct isn’t nearly that strong, and if overloaded or dropped it’s gonna take some damage.
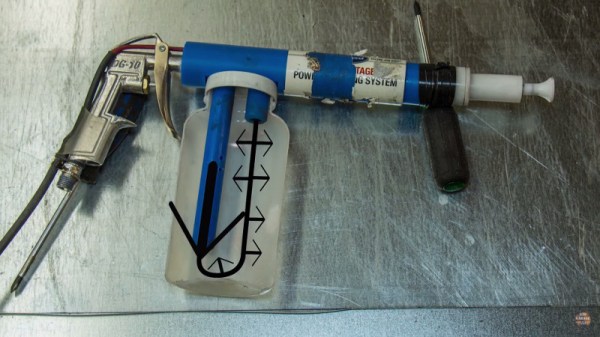
In life, tools come in two varieties – good tools, and cheap tools. This is where the hacker steps in, to transform a cheap tool into more than the sum of its parts. [Josh] had problems with his Eastwood powdercoating gun. [Josh] decided to fix things with a couple of tasteful mods.
The problem with the gun was related to the delivery of powder to the workpiece. The stream was either too weak to coat properly, or too heavy, delivering a thick stream of powder. [Josh] surmised that with better airflow into the powder reservoir, the gun would deliver a properly mixed cloud of powder as required. By drilling a couple of small holes into the air feed into the reservoir, the powder stream was much less heavy and the gun’s performance was greatly improved.
[Josh] then decided to take things a step further, by fitting a tip from a more expensive gun to his Eastwood model. There were some challenges in getting it connected electrically, but nothing a little electrical tape couldn’t fix. While this did further improve results, it was a minor improvement compared to the air feed modifications.
Overall, [Josh] was able to take a poorly performing tool and transform it into something much more useful, just by drilling a couple of holes. Check out our Hacklet on quick tool hacks, or share your best work in the comments.
The 2×4 Contest at my local hackerspace captured my interest. The challenge was to build something cool out of a single eight-foot 2×4 with the winner getting free wood storage in the space. I had half an idea for a project, but I ran out of time and never even started it. My idea was to cut the board into half-thickness strips and glue them edge-to-edge with some biscuits holding them together — to basically make wider, thinner boards to do… something cool with it.
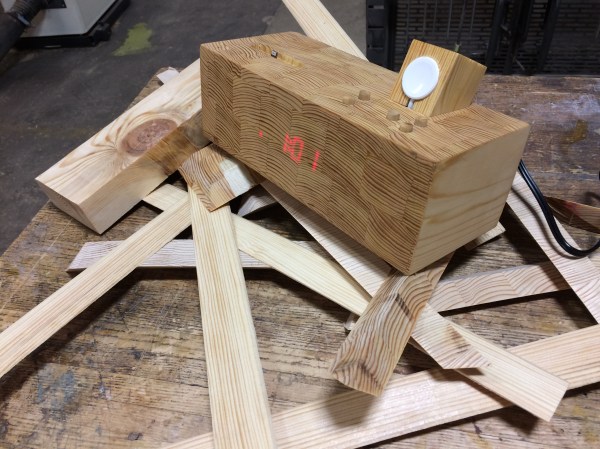
One of the entries is pictured above. [Jon Alt] designed this clock and phone charger that includes a capacitive charger for his smart watch. He makes use of the 2×4’s grain to make a gorgeous enclosure, carving away the rear of the front panel so only a credit-card’s thickness of wood remained, allowing the 7-segments to shine through. The other entries were great as well and I especially liked the 2×4 guitar.
Mostly what interested me about the contest was what it showed about the wood shop: thanks to the volunteers and board, that is a wood shop doing well. Stuff is going on! A sad wood shop doesn’t hold contests. By extension, when the shop is doing well, that means the hackerspace is also doing well.
A wood shop is one of those areas of a hackerspace that is tool-driven. It’s not just a gathering place for like-minded folks; people go to use a specific tool or tools they can’t afford, and let’s face it, there’s always tools to buy that costs a bunch of money.
I’ve seen this particular shop begin as an empty concrete room with a cheap drill press and someone’s old bandsaw. Pretty soon worktables, shelving, and storage were built. More tools arrived, some donated, some loaned, some purchased with dues. So how can other spaces replicate this wood shop success story?
As the threat of climate change looms, more and more industries are starting to electrify rather than using traditional fuel sources like gasoline and diesel. It almost all cases, the efficiency gains turn out to be environmentally and economically beneficial. Obviously we have seen more electric cars on the roads, but this trend extends far beyond automobiles to things like lawn equipment, bicycles, boats, and even airplanes. The latest in this trend of electrified machines comes to us from YouTube user [J Mantzel] who has built his own solar-powered bulldozer.
The fact that this bulldozer is completely solar-powered is only the tip of the iceberg, however. The even more impressive part is that this bulldozer was built completely from scratch. The solar panel on the roof charges a set of batteries that drive the motors, and even though the bulldozer is slow it’s incredibly strong for its small size. It’s also possible for it to operate on solar alone if it’s sunny enough, which almost eliminates the need for the batteries entirely. It’s also built out of stainless steel and aluminum, which makes it mostly rust-proof.
This is an impressive build that goes along well with [J Mantzel]’s other projects, most of which center around an off-grid lifestyle. If that’s up your alley, there is a lot of inspiration to be had from his various projects. Be sure to check out the video of his bulldozer below as well. You don’t have to build an off-grid bulldozer to get started in the world of living off-the-grid, though, and it’s easy to start small with just one solar panel and a truck.
What’s on your bench? Mine’s mostly filled with electronic test equipment, soldering kit, and computers. I’m an electronic engineer by trade when I’m not writing for Hackaday, so that’s hardly surprising. Perhaps yours is like mine, or maybe you’ve added a 3D printer to the mix, a bunch of woodworking tools, or maybe power tools.
So that’s my bench. But is it my only bench? On the other side of the room from the electronics bench is a sturdy folding dining table that houses the tools and supplies of my other bench. I’m probably not alone in having more than one bench for different activities, indeed like many of you I also have a messy bench elsewhere for dismantling parts of 1960s cars, or making clay ovens.
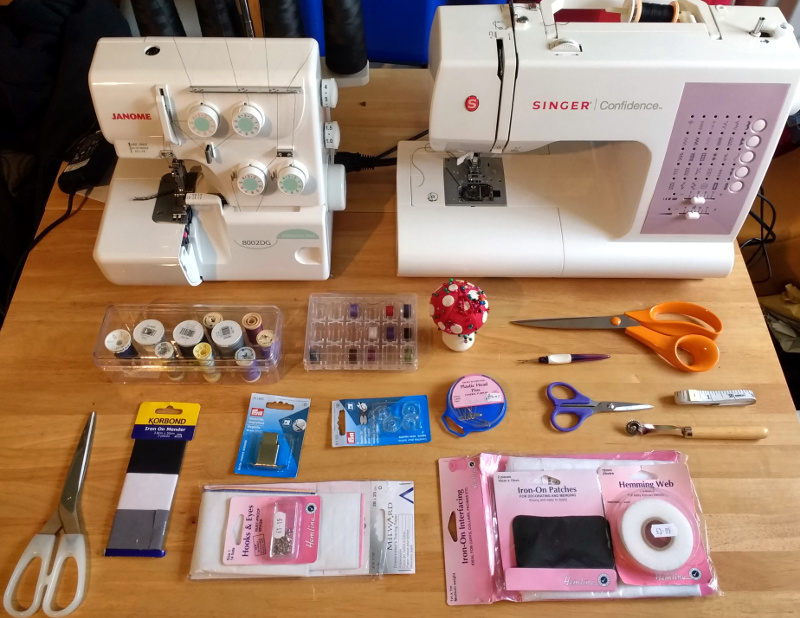
My textile bench, with a selection of the equipment used on it.
The other bench in question though is not for messy work, in fact the diametric opposite. This is my textile bench, and it houses the various sewing machines and other equipment that allow me to tackle all sorts of projects involving fabric. On it I’ve made, modified, and repaired all sorts of clothing, I’ve made not-very-successful kites, passable sandals, and adventurous tent designs among countless other projects.
Some of you might wonder why my textile bench is Hackaday fodder, after all it’s probably safe to assume that few readers have ever considered fabricating their own taffeta ball gown. But to concentrate only on one aspect of textile work misses the point, because the potential is there for so much cross-over between these different threads of the maker world. So I’m going to take you through my textile bench and introduce you to its main tools. With luck this will demystify some of them, and maybe encourage you to have a go.
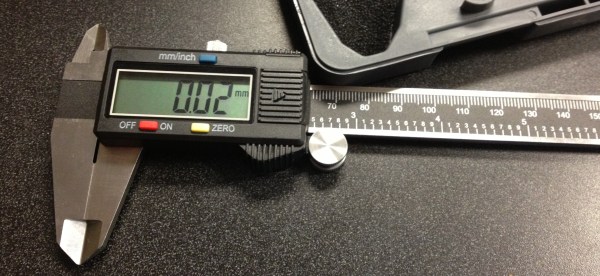
Surface mount diodes are simple enough — all you need to do is make sure you have the anode and cathode in the right order when you place them on the pad when you solder them. These SMD diodes come in industry-standard packages, but do you think there’s an industry-standard way of marking the cathode? Nope, not by a long shot. To solve the problem of figuring out which way the electrons go through his LEDs, [Jesus] built a simple pair of LED tweezers.
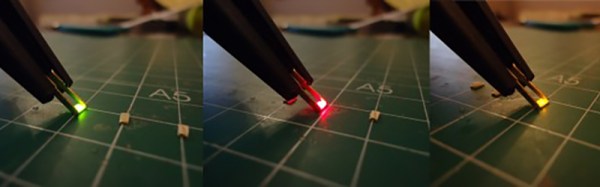
The purpose of these tweezers is to figure out which way is up on a LED. To do this, [Jesus] picked up a pair of multimeter and power supply compatible SMD test clips that are sufficiently tweezy. These tweezers come with red and black wires coming out the back, but cutting those leads off, peeling back the insulation and adding a CR2032 battery holder and 220Ω resistor turns these tweezers from a probe into an electrified poker.
To figure out what the arcane symbols on the bottom of an SMD diode mean, all [Jesus] has to do is touch each side of the pair of tweezers to one of the contacts on a LED. If it lights up, it’s that way around. If it doesn’t light up, the battery is dead, or the diode is backwards. It’s a great project, especially since these SMD test clip tweezer things can be had from the usual online retailers for just a few bucks. We would recommend a switch and marking which tweeze is ground, though.