Review: FriedCircuits USB Tester

Over the last decade or so, USB has somehow changed. It’s not just for connecting printers, keyboards, mice, and webcams any more. It’s not even just for stuff you would have plugged into a serial port. It’s a power outlet. If you want to charge your phone, plug it into a power outlet that can deliver up to 2.5 Watts. Unintended consequences, I guess. If you ever find yourself in 1995 again, go over to Intel and tell them to bump up the current limit.

Being a power outlet, having a device to measure current, voltage, power, and all the other intricacies of the what’s going on inside a USB cable would be neat. The USB Tester from Fried Circuits is that device.

DSC_0009The Fried Circuits USB tester isn’t so much a single device, but a small set of tools that allow you to probe everything going on inside a USB cable. In its simplest form, it’s just a board with a USB A connector at one end, a USB micro connector at the other, and breakouts for measuring current, voltage, the differential data signals, and that weird ID pin that’s useful if you’re working with USB chargers or OTG devices.

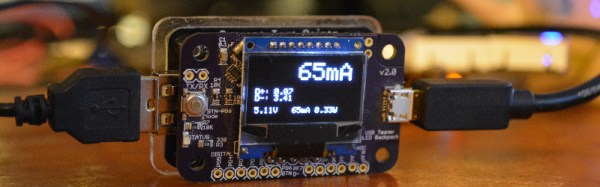
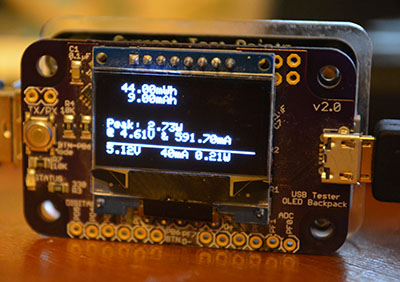
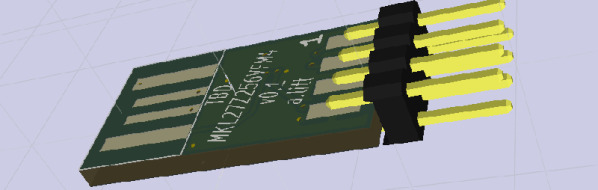
This breakout board also has two rows of five pins broken out. That’s for the USB Tester Backpack, which is really the heart of this device. This backpack features a microcontroller and a 128×64 resolution OLED display for current, voltage, and power monitoring, reading the voltage on the data lines, and graphing everything on the display. Everything you would ever want to know about a USB port – except for the actual bits being shoved through, of course – is right there on the display. Press the button on the side a few times, and whatever info you need will be presented in tall, very readable numbers.

The Entire Reason For Buying One

If you’re only going to use this to look at voltages, amps, and current flowing through a USB cable, you’re throwing your money away with this USB Tester. If simple, at-a-glance monitoring is what you need, you can hop on Amazon and get a USB current/voltage meter for $15. Even Adafruit has one for $7.50. If you only need to read the volts and amps for a USB device, your money is better spent elsewhere.

USBData
The Fried Circuits Java app.

The Fried Circuits USB tester does something none of these other USB meters can do. It can log all the data to a computer over USB.

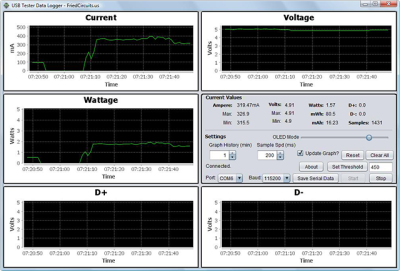
In my initial review of the USB Tester for the Hackaday Store, the only ‘official’ option for recording data from the Tester to a computer was a Java app. The developer of the USB Tester, [Will], chose Java because of the ‘write once, run anywhere’ Sun and Oracle have been shoving down our throats for the last 20 years. In theory, Java was an excellent choice for a datalogging solution for the USB Tester.

In practice, however, it just didn’t work. By [Will]’s own admission, it was the first thing he’s ever done in Java, and I think he set some of the options in NetBeans wrong. I could not get the data logging app to run on my Windows 8 box, or my OS X box, or my Linux boxxen. The only way I could run this app was by digging out an old XP box. Apparently, [Will]’s copy of NetBeans was configured for Java 5 or something.

[Will] knew about this problem, and last month he officially teamed up with [Edouard Lafargue] of wizkers.io. This is a platform for scientific instruments that runs in a Chrome App. The choice of running instrumentation in a Chrome app may seem odd, but this is apparently the new hotness; you can program an Arduino in a Chrome app, and there’s a lot of interesting stuff happening in this space.

You can try out the Chrome app right here, and with the USB Tester everything works as intended:

Wizkers
The Wizkers.io app.

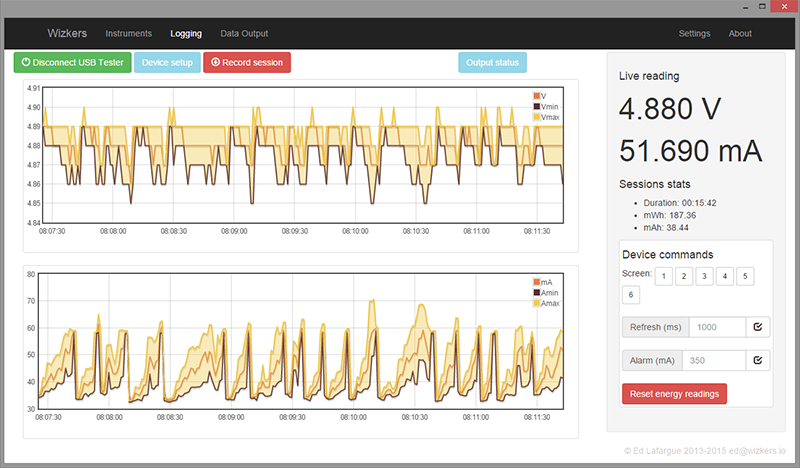
The Wizkers.io app can do everything you would expect from a datalogging app. It will tell you the volts, amps, watts, mWh, and mAh of the device currently under test. There are pretty graphs, and everything can be downloaded to a computer for further analysis.

It might seem like cheating to review this device with a 3rd party app, but by [Will]’s own admission, there were problems with the Java-based logger, and the Chrome app works perfectly. There’s also the delicious irony that a Chrome app is more portable than one written in Java. I appreciate that.

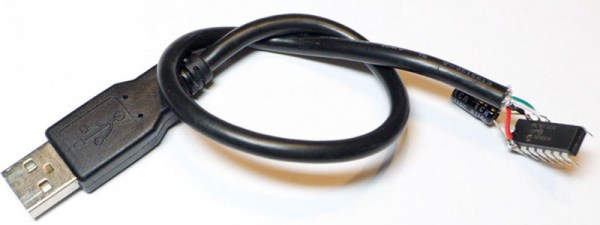
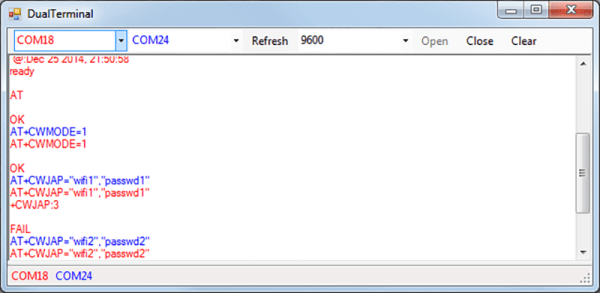
Of course the USB Tester also outputs this data over a serial connection (in JSON format, too!). If you just want to connect this to a computer, solder up some wires to the TX and RX lines.

Conclusion

If you want a device that just tells you how many mA a USB device is sucking up, you don’t need this. You can buy something for less than $10 that will tell you that. If you’re developing some USB hardware, you’ll eventually want to characterize how much power your device is drawing and when it’s drawing that much power. This will require a data logging tool, and apart from cutting up a few USB cables and wiring it into an expensive power supply, you can’t do better than the Fried Circuits USB tester.

USB Switch

Reverse Engineering How A USB Switch Switches

[Daniel] found himself with a need to connect a single USB device to two Linux servers. After searching around, he managed to find an inexpensive USB switch designed to do just that. He noticed that the product description mentioned nothing about Linux support, but he figured it couldn’t be that hard to make it work.

[Daniel] started by plugging the device into a Windows PC for testing. Windows detected the device and installed an HID driver automatically.  The next step was to install the control software on the Windows system. This provided [Daniel] with a tray icon and a “switch” function. Clicking this button disconnected the HID device from the Windows PC and connected the actual USB device on the other side of the USB switch. The second computer would now have access to the HID device instead.

[Daniel] fired up a program called SnoopyPro. This software is used to inspect USB traffic. [Daniel] noticed that a single message repeated itself until he pressed the “switch” button. At that time, a final message was sent and the HID device disconnected.

Now it was time to get cracking on Linux. [Daniel] hooked up the switch to a Linux system and configured a udev rule to ensure that it always showed up as /dev/usbswitch. He then wrote a python script to write the captured data to the usbswitch device. It was that simple. The device switched over as expected. So much for having no Linux support!

Game And Watch

Give In To Nostalgia With A Retro Game And Watch

One of the earliest Nintendo products to gain popularity was the Game and Watch product line. Produced by Nintendo between 1980 and 1991, they are a source of nostalgia for many an 80s or 90s kid. These were those electronic handheld games that had pre-drawn monochrome images that would light up to make very basic animations. [Andrew] loved his old “Vermin” game as a kid, but eventually he sold it off. Wanting to re-live those childhood memories, he decided to build his own Game and Watch emulator.

The heart of [Andrew’s] build is a PIC18F4550 USB demo board he found on eBay. The board allows you to upload HEX files directly via USB using some simple front end software. [Andrew] wrote the code for his game in C using MPLAB. His device uses a Nokia 5110 LCD screen and is powered from a small lithium ion battery.

For the housing, [Andrew] started from another old handheld game that was about the right size. He gutted all of the old parts and stuck the new ones in their place. He also gave the housing a sort of brushed metal look using spray paint. The end result is a pretty good approximation of the original thing as evidenced by the video below. Continue reading “Give In To Nostalgia With A Retro Game And Watch”

Hackaday Prize Entry: A Bit Dingus

There was a time when just about every computer – even laptops – came with a parallel port. That’s 25 pins of bit-banging goodness, accessible from every programming environment, that could control any random pile of electronics sitting on a desk. The days of parallel ports are behind us now, and if you want to blink a pin with a computer, you’re looking at controlling a microcontroller over USB or something.

[ajlitt]’s Tiny Bit Dingus is just that: a microcontroller stuffed into a USB plug with a few pin headers. With the right app, you can control these pin headers over USB. It’s the closest you’re going to get to a parallel port with modern hardware.

This bit dingus isn’t meant to replace the Bus Pirate, an Arduino, or anything else; it’s meant to be a small and simple way to connect random electronics to a computer with as few parts as possible. If you’re looking for a part to add to your electronic tinkerer everyday carry rig, this would be it.

There’s a few bits of interesting hardware inside the Bit Dingus. A while back, [ajltt] ran into the Freescale KL27, a Cortex M0+ that does USB without a crystal, has a USB bootloader, and doesn’t require many additional components at all. It’s the perfect size for the project at 5x5mm, and is unbrickable while still being flashable over USB.


The 2015 Hackaday Prize is sponsored by:

A Tool For Spying On Serial Data

[Piotr] was working on a recent Arduino project when he ran into a problem. He was having trouble getting his Arduino Pro Mini to communicate with an ESP8266 module. He needed a way to snoop on the back and forth serial communications. Since he didn’t have a specialized tool for this task, [Piotr] ended up building his own.

spying-on-serial-thumb
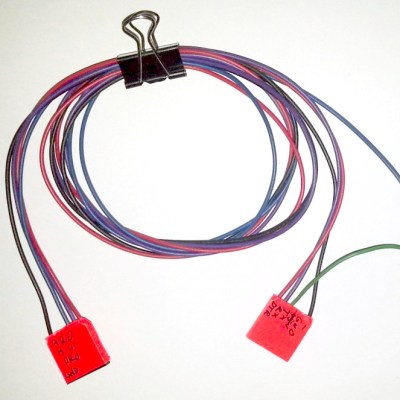
The setup is pretty simple. You start with a standard serial cable containing the TX, RX, DTR, and GND wires. This cable connects the Arduino to the ESP8266 WiFi module. The TX and RX lines are then tapped into. Each wire is routed to the RX pin of two different serial to USB adapters. This way, the data being sent from the Arduino shows up on one COM port and the data being transmitted from the module shows up on the other.

The next piece of the puzzle was coming up with a way to see the data more clearly. [Piotr] could have opened two serial terminals simultaneously, but this wasn’t ideal because it would be difficult to compare the timing of the data. Instead, [Piotr] spent less than an hour writing his own simple serial terminal. This one connects to two COM ports at the same time and prints the data on the same screen. The data from each COM port is displayed in a separate color to make it easy to differentiate. The schematic and source code to this project can be found on [Piotr’s] website.

Hackaday Prize Entry: BS Free USB

Take a look at some old electronics magazines, or even a few blog posts from 10 years ago, and you’ll notice something strange: parallel ports. Those big ‘ol DB25 were the way to get bits out of a computer and into a microcontroller. There was a reason for this: it was exceptionally easy to do.

Now, we have USB to deal with, and that means VIDs and PIDs, drivers, enumeration, and a whole bunch of cruft that makes blinking an LED a surprisingly complicated process. [Colin O’Flynn]’s project for the 2015 Hackaday Prize aims to fix that with BSU – BS Free USB.

Instead of USB to serial chips attached to another microcontroller, [Colin] is using a few microcontrollers with a built-in USB interfaces. These chips are loaded up with firmware and controlled with a simple API on the computer side. If you want to blink a pin, just add a library to your project and set the pin high. Want some SPI on your computer? That’s just setting a few pins as MOSI, MISO, and SCK and typing in a few bytes. It’s basically a $2 Bus Pirate that you can stick into any project.

If [Colin]’s name sounds familiar in the context of The Hackaday Prize, it’s because he won second place with the ChipWhisperer last year. While a tiny USB thing isn’t quite as cool as a tool to break embedded encryption, the BSU certainly seems more useful to millions of hardware tinkerers around the world.


The 2015 Hackaday Prize is sponsored by:

VCF East X: The World’s Largest USB Thumb Drive

The Vintage Computer Festival last weekend featured racks and racks of old minicomputers, enough terminals for an entire lab, and enough ancient storage devices to save a YouTube video. These storage devices – hard disks, tape readers, and 8″ disk drives – were only connected to vintage hardware, with one exception: a DEC RL02 drive connected to a modern laptop via USB.

The DEC RL02 drive is the closest you’re going to get to a modern mechanical hard drive with these old machines. It’s a huge rack unit with removable platters that can hold 10 Megabytes of storage. [Chris] found one of these old drives and because he wanted to get into FPGA development, decided to create a USB adapter for this huge, old drive.

The hardware isn’t too terribly complex, with a microcontroller and an FPGA that exposes the contents of the drive over USB mass storage. For anyone trying to bootstrap a PDP-11 or -8 system, [Chris] could download disk images from the Internet, write them to the disk, and load up the contents of the drive from the minicomputer. Now, he’s using it with SimH to have a physical drive for an emulated system, but the controller really doesn’t care about what format the disk pack is in. If [Chris] formatted a disk pack with a FAT file system, he would have the world’s largest and heaviest USB thumb drive in the world.

Video below.

Update: As promised, [Chris] put all the code in a git

Continue reading “VCF East X: The World’s Largest USB Thumb Drive”