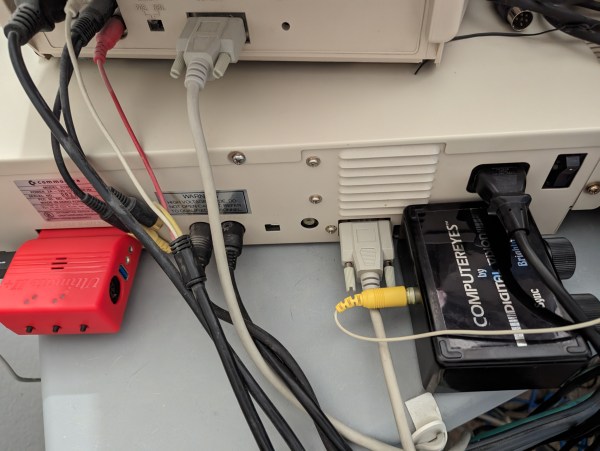
A Commodore 128 with a video capture device attached

Hacking The Commodore 128 To Capture Almost Real-Time Video

Although watching and editing videos may be among the primary tasks of many PCs today, it wasn’t that long ago that working with video required powerful processors and expensive video capture hardware. Even in the 1980s, home computer users were looking for ways to connect video sources to their Commodores and Ataris despite their hardware limitations. [Cameron Kaiser] has a mid-1980s consumer-grade video capture device, which he has managed to turn into an almost real-time video capture system.

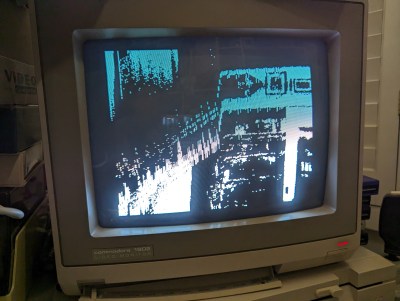
A distorted video image on a C128's monitor
Allowing the graphics chip to interrupt the CPU mid-capture results in a severely distorted image

His work revolves around a device called “ComputerEyes”, a 1984-vintage hardware interface that made it possible to connect a composite video source to a home computer. The limitations of mid-1980s CPUs meant that it took around six seconds for the computer to do a quick scan of a single video frame, or a multiple of that if you wanted a higher-quality image. Another limitation, at least on Commodore machines, was that the screen had to be turned off during video capture – otherwise, the video chip would interrupt the CPU halfway through the process, causing it to lose its synchronization with the video source.

[Cameron] however, plugged his ComputerEyes into a Commodore 128. This machine, largely designed by Hackaday contributor [Bil Herd], has an unusual hardware architecture consisting of two different CPUs and, crucially, two separate video chips. The primary 8564 “VIC-II” graphics chip is used to keep compatibility with existing Commodore 64 programs, while the secondary 8563 “VDC” is mainly aimed at newer high-resolution text-based software. The VDC is also much more independent from the main system bus than the VIC-II, allowing it to display an image without disturbing the CPU.

More after the break.

Continue reading “Hacking The Commodore 128 To Capture Almost Real-Time Video”

GB Interceptor Enables Live Screen Capture From Game Boy

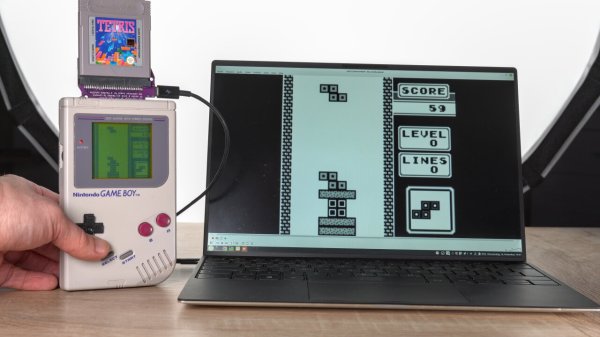
[Sebastian] had a tricky problem to solve. Competitors in a Tetris tournament needed to stream video of their Game Boy screens, but no solution readily existed. For reasons of fairness, emulators were right out, and no modifications could be made to the Game Boys, either. Thus, [Sebastian] created the GB Interceptor, a Game Boy capture cartridge.

Thanks to the design of the Game Boy, there’s plenty of access to useful signals via the cartridge port itself. [Sebastian] realized that a non-invasive capture device could be built to sit in-between the Game Boy and a cart, and send video to a computer. Unfortunately, there’s no direct access to the video RAM via this port, but [Sebastian] figured out a nifty workaround.

The build uses a Raspberry Pi Pico. The chip’s two cores emulate the Game Boy’s CPU and Picture Processing Unit, respectively. Doing this, while having the chips keep up with what’s going on in the Game Boy, required overclocking the Pico to 225 MHz. The system works by capturing data from the cartridge’s memory bus, and follows along with the instructions being run by the Game Boy. By doing this, the Pico is able to populate its own copy of the video RAM. It then spits this out over USB, where it can be displayed and streamed online as desired.

There are some edge-case limitations, but for its intended purpose, the system works great. Currently, the hardware is usable on Linux and Windows, though it does require some fiddling in the latter case. Files are on Github for those eager to build their own. If you simply want to dump carts rather than stream from your Game Boy, we can help there, too. Video after the break.

Continue reading “GB Interceptor Enables Live Screen Capture From Game Boy”

ESP32 And Raspberry Pi Take Over Game Boy LCD

The Nintendo Game Boy and its many permutations represent one of the most well-known and successful gaming platforms ever produced. There was a decades-long stretch of time where the most popular kid in the lunch room was the one who brought in their Game Boy so the rest of the class could huddle around and check out the latest Pokemon title.

But those days are long gone, and now these once-coveted handhelds can be had for a song on the second-hand market. Which makes it the perfect time to check out this project [kgsws] released recently that allows you to interface the Game Boy LCD with the ESP32 or the Raspberry Pi. In the most basic of applications, it lets you push video from your Linux computer out to the Game Boy LCD over WiFi. But as the video below illustrates, that’s just the tip of the iceberg.

With the ESP32 wired between the handheld’s LCD and main PCB, the microcontroller can also act as a capture device using I2S camera mode. Compared to what ends up showing on the handheld’s LCD, the recorded gameplay [kgsws] shows off looks fantastic. Visuals are crisp and fluid, and naturally devoid of the Game Boy’s iconic (if slightly nauseating) greenish tint.

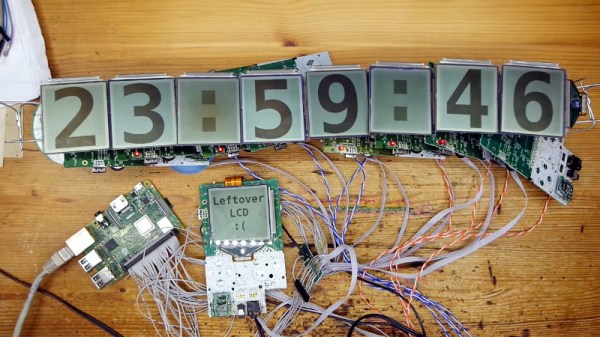
The project also includes the capability to control an array of Game Boy LCDs, which allows for some interesting possibilities. The image can be stretched to cover multiple displays, which [kgsws] demonstrates by playing a game on 3 x 3 grid of salvaged panels, but each LCD also can be controlled individually as is the case with the large digital clock seen above.

Whether you’re looking for a way to capture gameplay on the real hardware, or want to run RetroPie on a real Game Boy screen, we’re excited to see what folks come up with using this project.

Continue reading “ESP32 And Raspberry Pi Take Over Game Boy LCD”

Teaching A Machine To Be Worse At A Video Game Than You Are

Is it really cheating if the aimbot you’ve built plays the game worse than you do?

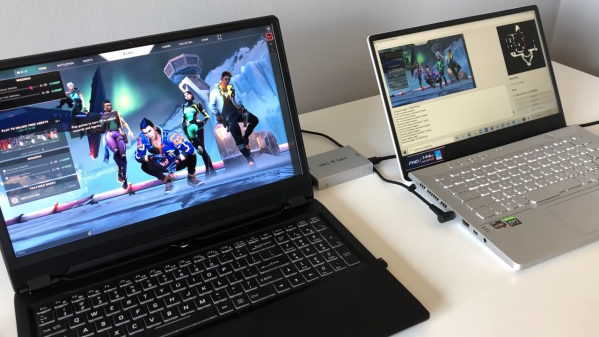
We vote no, and while we take a dim view on cheating in general, there are still some interesting hacks in this AI-powered bot for Valorant. This is a first-person shooter, team-based game that has a lot of action and a Counter-Strike vibe. As [River] points out, most cheat-bots have direct access to the memory of the computer which is playing the game, which gives it an unfair advantage over human players, who have to visually process the game field and make their moves in meatspace. To make the Valorant-bot more of a challenge, he decided to feed video of the game from one computer to another over an HDMI-to-USB capture device.

The second machine has a YOLOv5 model which was trained against two hours of gameplay, enough to identify friend from foe — most of the time. Navigation around the map was done by analyzing the game’s on-screen minimap with OpenCV and doing some rudimentary path-finding. Actually controlling the player on the game machine was particularly hacky; rather than rely on an API to send keyboard sequences, [River] used a wireless mouse dongle on the game machine and a USB transmitter on the second machine.

The results are — iffy, to say the least. The system tends to get the player stuck in corners, and doesn’t recognize enemies that pop up at close range. The former is a function of the low-res minimap, while the latter has to do with the training data set — most human players engage enemies at distance, so there’s a dearth of “bad breath range” encounters to train to. Still, we’re impressed that it’s possible to train a machine to play a complex FPS game at all, let alone this well.

A Raspberry Pi 4 Video Streaming Backpack

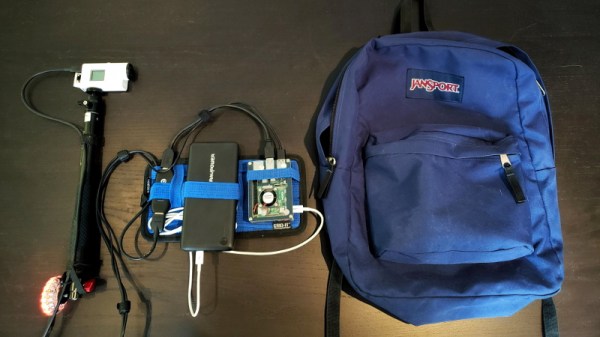
Were you aware that there’s a market for backpack-housed live streaming video systems, and that they can cost as much as $1600? Apparently these things are popular with social media moguls who want to stream themselves living their fabulous lives to people sitting at home watching on YouTube or Twitch. But believing that even slack jawed yokels like us should have access to the same technology, [Speedify Labs] has been working on less expensive DIY alternative based on the Raspberry Pi 4.

Now you’ll note we didn’t use the term “cheap” to describe this build. As detailed here, it’s still going to cost you around $600. You could always swap out the Sony AS-300 camera and Elgato Cam Link capture device with cheaper versions, but the goal of this project was to deliver high quality HD video that’s comparable to what the professional rigs are capable of, so those kinds of concessions were avoided.

Whatever video source your audience and budget are comfortable with, it eventually gets fed into the Raspberry Pi 4 which uses an ffmpeg one-liner to encode the video and ultimately push it out as 720p at 24 FPS, which [Speedify Labs] says seems to be about as good as the Pi can do. The operator is able to start and stop the stream at will using a Circuit Playground Express and a Python script.

Of course, the trick to all of this is getting the video stream uploaded over potentially flaky mobile networks. But as you might have guessed, that’s where [Speedify Labs] gets to flex their eponymous product: a VPN with software channel bonding that allows you to combine multiple Internet connections for higher bandwidth and reliability. With their software, the Pi is able to stream the video through two mobile phones connected to it over USB. As demonstrated in the video below, the setup was able to maintain the stream even as they walked in and out of buildings.

Our very own [Lewin Day] wrote about his experiments with streaming video over 4G on the Raspberry Pi which might be of interest to anyone looking to take their show on the road. Though if you want to get serious it would be worth taking a look at the impressive mobile streaming rig that [Jenny List] saw at the BornHack 2019 hacker camp in Denmark.

Continue reading “A Raspberry Pi 4 Video Streaming Backpack”

EEPROM Hack To Fix Autodetection Issues

Autodetection of hardware was a major part of making computers more usable for the average user. The Amiga had AutoConfig on its Zorro bus, Microsoft developed Plug And Play, and Apple used NuBus, developed by MIT. It’s something we’ve come to take for granted in the modern age, but it doesn’t always work correctly. [Evan] ran into just this problem with a video capture card that wouldn’t autodetect properly under Linux.

The video capture card consisted of four PCI capture cards with four inputs each, wired through a PCI to PCI-E bus chip for a total of sixteen inputs. Finding the cause of the problem wasn’t too difficult – the driver was detecting the card as a different model with eight inputs, instead of the sixteen inputs actually present on the card. The driver detects the device plugged in by a unique identifier reported by the card. The code on the card was identical to the code for a different model of card with different hardware, causing the issue.

As a quick test, [Evan] tried fudging the driver selection, forcing the use of a driver for a sixteen-input model. This was successful – all sixteen inputs could now be used. But it wasn’t a portable solution, and [Evan] would have to remember this hack every time the card needed to be reinstalled or moved to a different computer.

Looking further at the hardware, [Evan] discovered the card had four 24c02 EEPROM chips on board – one for each PCI card on board. Dumping the contents, they recognised the unique identifier the driver was using to determine the card’s model. It was then a simple job to change this value to one that corresponded with a sixteen-input card to enable functional autodetection by burning a new value to the EEPROM. [Evan] then published the findings to the LinuxTVWiki page. Continue reading “EEPROM Hack To Fix Autodetection Issues”

Reverse Engineering An HDMI Extender

There’s a number of devices out there that extend HDMI over IP. You connect a video source to the transmitter, a display to the receiver, and link the two with a CAT5/5e/6 cable. These cables are much cheaper than HDMI cables, and can run longer distances.

[Daniel] didn’t care about extending HDMI, instead he wanted a low cost HDMI input for his PC. Capture cards are a bit expensive, so he decided to reverse engineer an IP HDMI extender.

After connecting a DVD player and TV, he fired up Wireshark and started sniffing the packets. The device was using IP multicast on two ports. One of these ports had a high bitrate, and contained JPEG headers. It looked like the video stream was raw MJPEG data.

The next step was to write a listener that could sniff the packets and spit the data into a JPEG file. After dealing with some quirks, JPEG images could be saved from the remote device. Some more code was needed to have the computer initiate the streaming, and to extract audio from the second port.

In the end, video capture with the low cost device was possible. [Daniel] also provided a bonus teardown of the device in his writeup.