Drill Jig Helps Mount WeMos D1 Mini

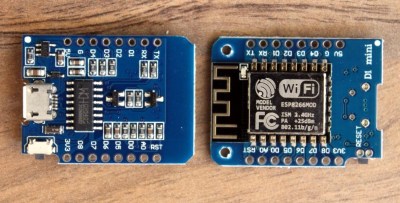
As far as ESP8266 boards go, the WeMos D1 Mini is a great choice if you’re looking to get started with hackerdom’s microcontroller du jour. It’s small, well supported, and can be had ridiculously cheap. Often going for as little as $3 USD each, we buy the things in bulk just to have spares on hand. But that’s not to say it’s a perfect board. For one, it lacks the customary mounting holes which would allow you to better integrate it into finished products.

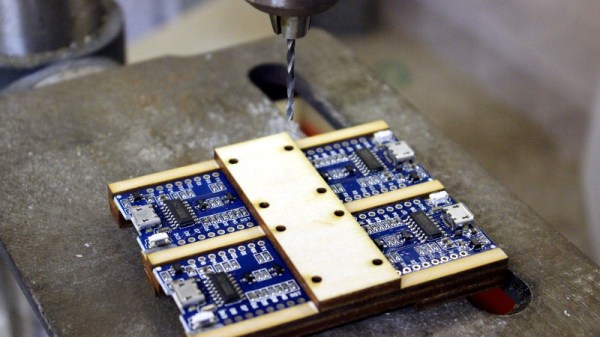
This minor annoyance was enough to spring [Martin Raynsford] into action. He noticed there was some open area on the D1 Mini’s PCB where it seemed he could drill through to add his own mount points, but of course popping holes in a modern PCB can be risky business. There’s not a lot of wiggle room between success and heartbreak, and it’s not like the diminutive D1 Mini is that easy to hold down to begin with. So he designed a laser-cut jig to allow him to rapidly add mounting holes to his D1 Mini’s assembly line style.

For those who might be skeptical, [Martin] reports he’s seen no adverse effects from drilling through the board, though does admit it’s possible the close proximity of the metal screw heads to the ESP8266’s antenna may have a detrimental effect. That said, he’s tested them in his projects out to 25 m (82 feet) with no obvious problems. He’s using a 2 mm drill bit to make his hole, and M2 x 6 mm machine screws to hold the boards down.

The jig design is released as a SVG and DXF for anyone with a laser cutter to replicate, but it shouldn’t be too difficult to extrude those designs in the Z dimension for hackers who haven’t yet jumped on the subtractive manufacturing bandwagon.

When a project makes the leap from prototype to in-house production, designing and building jigs become an essential skill. From flashing firmware to doing final checkout, the time and effort spent building a jig early on will pay for itself quickly in production.

Create Your Own ESP8266 Shields

The ESP8266 has become incredibly popular in a relatively short time, and it’s no wonder. Cheap as dirt, impressively powerful, Arduino-compatible, and best of all, includes Wi-Fi right out of the box. But for all its capability and popularity, it’s still lagging behind the Arduino in at least one respect. Namely, the vast collection of add-on “Shields” which plug into the Arduino to add everything from breadboards to GPS receivers.

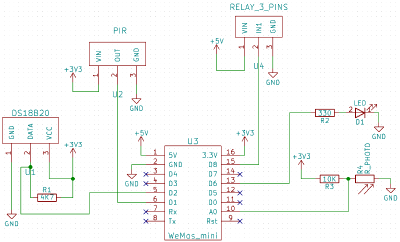
Until such time as the free market decides to pick up the pace and start making standardized shields for the various ESP8266 development boards, it looks as if hackers are going to have to pick up the slack. [Rui Santos] has put together a very detailed step-by-step guide on the creation of a simple shield for the popular Wemos D1 Mini board, which should give you plenty of inspiration for spinning up your own custom add-on modules.

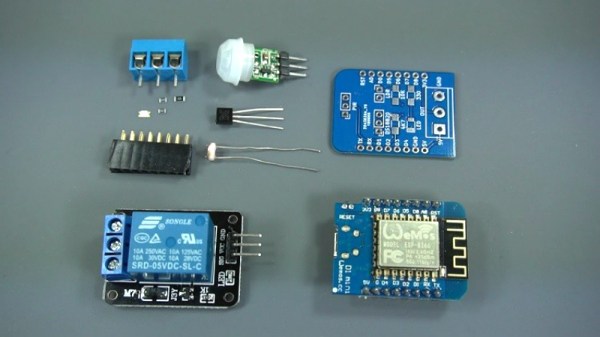
Presented as a written tutorial as well as a two part video, this guide covers everything from developing and testing your circuit on a breadboard to designing your PCB in KiCad and sending it off for fabrication. The end result is a professional looking PCB that matches the footprint of the stock D1 Mini and adds a DS18B20 temperature sensor, PIR motion detector, photoresistor, and some screw down terminals.

[Rui] goes on to show how you can utilize the new sensors shield via a web interface hosted on the ESP8266, and even wraps the whole thing up in a 3D printed enclosure. All worthwhile skills to check out if you’re looking to produce more cohesive finished products.

If you’re looking for a similar project for the ESP32, [Rui] has you covered there as well. You may also be interested in the series of ESP8266 tutorials we recently highlighted.

Continue reading “Create Your Own ESP8266 Shields”

Fail Of The Week: How Not To Make A 3D Scanner

Sometimes the best you can say about a project is, “Nice start.” That’s the case for this as-yet awful DIY 3D scanner, which can serve both as a launching point for further development and a lesson in what not to do.

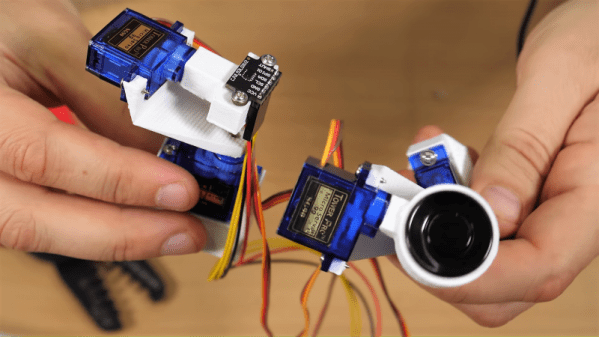
Don’t get us wrong, we have plenty of respect for [bitluni] and for the fact that he posts his failures as well as his successes, like composite video and AM radio signals from an ESP32. He used an ESP8266 in this project, which actually uses two different sensors: an ultrasonic transducer, and a small time-of-flight laser chip. Each was mounted to a two-axis scanner built from hobby servos and 3D-printed parts. The pitch and yaw axes move the sensors through a hemisphere gathering data, but unfortunately, the Wemos D1 Mini lacks the RAM to render the complete point cloud from the raw points. That’s farmed out to a WebGL page. Initial results with the ultrasonic sensor were not great, and the TOF sensor left everything to be desired too. But [bitluni] stuck with it, and got a few results that at least make it look like he’s heading in the right direction.

We expect he’ll get this sorted out and come back with some better results, but in the meantime, we applaud his willingness to post this so that we can all benefit from his pain. He might want to check out the results from this polished and pricey LIDAR scanner for inspiration.

Continue reading “Fail Of The Week: How Not To Make A 3D Scanner”

A Super Simple ESP8266 IOT Motion Sensor

It’s really hard to overstate how awesome ESP8266 development boards like the Wemos D1 Mini really are. For literally a couple of dollars you can get a decently powerful Wi-Fi enabled microcontroller that has enough free digital pins to do some useful work. Like the Arduino and Raspberry Pi before it, the ESP8266 is a device that’s opening up whole new areas of hacking and development that simply weren’t as practical or cost-effective as previously.

As a perfect example, take a look at this stupendously simple Internet-connected motion detector that [Eric William] has come up with. With just a Wemos D1 Mini, a standard PIR sensor, and some open source code, you can create a practical self-contained motion sensor module that can be placed anywhere you want to keep an eye on. When the sensor picks up something moving, it will trigger an IFTTT event.

It only takes three wires to get the electronics connected, but [Eric] has still gone ahead and provided a wiring diagram so there’s no confusion for young players. Add a 3D printed enclosure from Thingiverse and the hardware component of this project is done.

Using the Arduino Sketch [Eric] has written, you can easily plug in your Wi-Fi information and IFTTT key and trigger. All that’s left to do is put this IoT motion sensor to work by mounting it in the area to be monitored. Once the PIR sensor sees something moving, the ESP8266 will trigger IFTTT; what happens after that is up to you and your imagination. In the video after the break, you can see an example usage that pops up a notification on your mobile device to let you know something is afoot.

With its low cost and connectivity options, the ESP8266 is really the perfect platform for remote sensing applications. Though to give credit where credit’s due, this still isn’t the simplest motion sensor build we’ve seen.

Continue reading “A Super Simple ESP8266 IOT Motion Sensor”

Lucky Cat POV Display Ditches The Waving And Windmills Out Of Control

If you’ve been in a Japanese restaurant, you’ve probably seen a maneki-neko, the lucky cat charm, where a cat welcomes you with a beckoning arm. It’s considered to bring good luck, but we’re not sure if [Martin Fitzpatrick] is pushing his luck with this Lucky Cat POV display. He hacked one of the figurines so the arm forms a persistence of vision (POV) display, where blinking LEDs on the paw create a dot-matrix style display.

Inside the hapless neko is a Wemos D1, motor driver, and a few other components that turn the cat into a working display. The five LEDs he attached to the paw are wide enough to display 5×7 characters. The tricky part in the mechanical design is getting signals from a stationary base to a spinning arm(ature). In this case it was easily solved with a 6-wire slip ring from Adafruit. [Martin] revs the lucky cat up using a brushed DC motor and a couple of gears.

The ESP8266 is running MicroPython — the combination should make this a snap to hook into any web service API you want to display your own messages. Right now the arm doesn’t have positional awareness so the message isn’t locked in a single position like it would be if a hall effect sensor was used. But [Martin] says there’s plenty of room left inside the cat and a future upgrade could include stashing the batteries inside for a cordless, all-in-one build. If he takes that on it’s a perfect time to add some type of shaft encoding as well.

Check the Lucky Cat showing off in the clip after the break.

Continue reading “Lucky Cat POV Display Ditches The Waving And Windmills Out Of Control”

Giving An LED Bulb Some Smarts

How many of your projects been spawned purely out of bored daydreaming? For want of something more productive to do, [dantheflipman] hacked a standard LED bulb from Wal-Mart into a smart bulb.

After pulling it apart, they soldered wires to the threaded socket and added a connector for a Hi-Link hlk-pm01 power module. The output caps at 5 V and 600 mA, but who says this was going to be a searchlight? A Wemos D1 Mini clone slides nicely beside the power module, and stacked on top is a NeoPixel Jewel 7. [dantheflipman] admits he has yet to add a capacitor to ahead of the Jewel, so we’ll see how long the LEDs last. Crammed back together, the bulb is controlled via a prototype Blynk app. Good enough for a quick hack.

[dantheflipman] is upfront about messing with mains voltages: don’t do it unless you absolutely know what you’re doing. In this case, he has taken care with their soldering and epoxied all wire and solder joints to be sure nothing will come loose and short, and a ‘stress test’ is forthcoming.

Smart bulbs are cool no matter how you slice it, so a little more insight into how smart bulbs work with some of the nitty gritty that goes into hacking them might sate your thirst for knowledge.

[Via /r/arduino]

Checking The Weather Without A Window

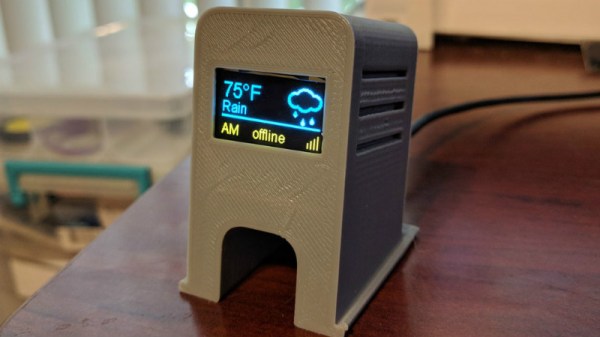
Making a weather display is great because it’s a simple project that shows off some skills and has an obvious daily use. So [ACROBOTIC Industries] decided to make an easy kit for the Hackaday Prize to make weather displays even more accessible.

Calling it the ESPecter, [ACROBOTIC Industries] wanted to make this a simple project for anyone, regardless of skill with a soldering iron or Arduino toolkit. So they decided to base the guts on common components that can be put together easily, specifically a Wemos Mini D1 with an OLED shield as a bright display. They also designed a cool tiltable 3D-printed enclosure for this small device so that you can orient it to your eye level.

ESPecter breadboarded prototype.

While they already have a breadboarded prototype, and a 3D printed case, some software work remains to make the project really shine. They plan to add nice features like a web interface to configure location and network information, alerts, additional locations, and historical weather data. They also want to create a weather library to display well on a low-resolution screen and add battery operation.

We look forward to seeing the final version later in the Hackaday Prize!

This isn’t the first weather project we’ve seen around here. Other variants include mirror weather displays, an ESP8266-based weather monitoring station, a very low-power weather station, and this roundup of weather displays which might give you some inspiration.