Garage Door Automation With No Extra Hardware

Home automation projects have been popular as long as microcontrollers have been available to the general public. Building computers to handle minutiae so we don’t have to is one of life’s great joys. Among the more popular is adding some sort of system to a garage door. Besides adding Internet-connected remote control to the action of opening and closing, it’s also helpful to have an indicator of the garage door state for peace-of-mind. Most add some sensors and other hardware to accomplish this task but this project doesn’t use any extra sensors or wiring at all.

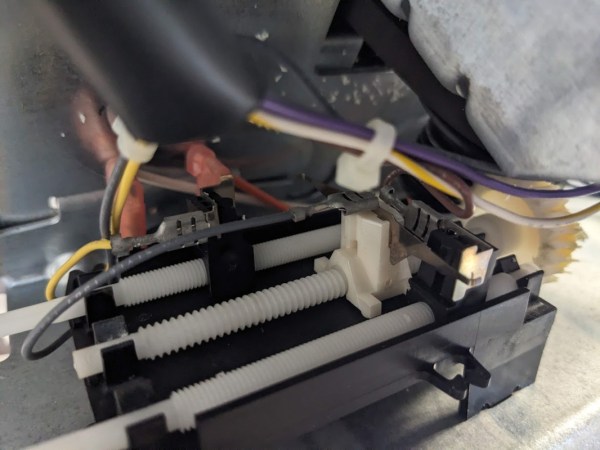
In fact, the only thing added to the garage door for this build besides some wiring is the microcontroller itself. After getting the cover of the opener off, which took some effort, a Shelly Uni was added and powered by the 12V supply from the opener itself. The garage door opener, perhaps unsurprisingly, has its own way of detecting when the door is fully open or closed, so some additional wire was added to these sensors to let the microcontroller know the current state. Shelly Uni platforms have a WiFi module included as well, so nothing else was needed for this to function as a complete garage door automation platform.

[Stephen] uses Home Assistant as the basis for his home automation, and he includes all of the code for getting this platform up and running there. It wouldn’t be too hard to get it running on other openers or even on other microcontroller platforms; the real key to this build is to recognize that sometimes it’s not necessary to reinvent the wheel with extra sensors, limit switches, or even power supplies when it’s possible to find those already in the hardware you’re modifying. This isn’t always possible, though, especially with more modern devices that might already be Internet-connected but probably don’t have great security.

Baseboard Heaters Get Automated

If you’re lucky enough to have central heating and/or air conditioning, with an automatic thermostat, you probably don’t have to worry too much about the outside temperature. But central HVAC is far from the only way of maintaining temperature in a home. From wood stoves to boilers there are many options depending on your climate and home type, and [Murphy’s Law] has a decentralized baseboard system instead of something centralized. An ESP8266 solution was found that was able to tie them all together.

There are other types of baseboard heaters, but in [Murphy’s Law]’s case the heaters were electric with a separate thermostat for each heater. Rather than build a control system from the ground up to replace the thermostats, turnkey smart wall switches were used instead. These switches happened to be based on the popular ESP8266 microcontroller, like plenty of other off-the-shelf automation solutions, which meant less work needed to be done on the line voltage side and the microcontroller’s firmware could be easily customized for use with Home Assistant.

While [Murphy’s Law] doesn’t live in the home with the fleet of electric baseboard heaters anymore, the new home has a single baseboard heater to keep a bathroom warm since the central heating system doesn’t quite keep it warm enough. This system is able to scale up or down based on number of heaters, though, so it’s still a capable solution for the single room and has since been updated to use the ESP32. All of the code for this project is available on GitHub as well, and for those of you attempting to add other HVAC components to a home automation system this project that loops in a heat pump is worth taking a look at as well.

Wozamp Turns Apple II Into Music Player

Besides obvious technological advancements, early computers built by Apple differed in a major way from their modern analogs. Rather than relying on planned obsolescence as a business model, computers like the Apple II were designed to be upgradable and long-term devices users would own for a substantially longer time than an iPhone or Macbook. With the right hardware they can even be used in the modern era as this project demonstrates by turning one into a music player.

The requirements for this build are fairly short; an Apple II with a serial card and a piece of software called surl-server which is a proxy that allows older computers to communicate over modern networks. In this case it handles transcoding and resampling with the help of a Raspberry Pi 3. With that all set up, the media player can play audio files in an FTP network share or an online web radio station. It can also display album art on the Apple II monitor and includes a VU meter that is active during playback.

Although the 11.52 kHz sampling rate and 5-bit DAC may not meet the stringent requirements of audiophile critics, it’s an impressive build for a machine of this era. In fact, the Apple II has a vibrant community still active in the retrocomputing world, with plenty of projects built for it including others related to its unique audio capabilities. And if you don’t have an original Apple II you can always get by with an FPGA instead.

Emails Over Radio

The modern cellular network is a marvel of technological advancement that we often take for granted now. With 5G service it’s easy to do plenty of things on-the-go that would have been difficult or impossible even with a broadband connection to a home computer two decades ago. But it’s still reliant on being close to cell towers, which isn’t true for all locations. If you’re traveling off-grid and want to communicate with others, this guide to using Winlink can help you send emails using a ham radio.

While there are a number of ways to access the Winlink email service, this guide looks at a compact, low-power setup using a simple VHF/UHF handheld FM radio with a small sound card called a Digirig. The Digirig acts as a modem for the radio, allowing it to listen to digital signals and pass them to the computer to decode. It can also activate the transmitter on the radio and send the data from the computer out over the airwaves. When an email is posted to the Winlink outbox, the software will automatically send it out to any stations in the area set up as a gateway to the email service.

Like the cellular network, the does rely on having an infrastructure of receiving stations that can send the emails out to the Winlink service on the Internet; since VHF and UHF are much more limited in range than HF this specific setup could be a bit limiting unless there are other ham radio operators within a few miles. This guide also uses VARA, a proprietary protocol, whereas the HF bands have an open source protocol called ARDOP that can be used instead. This isn’t the only thing these Digirig modules can be used for in VHF/UHF, though. They can also be used for other digital modes like JS8Call, FT8, and APRS.

Continue reading “Emails Over Radio”

A Long-Range Meshtastic Relay

In the past few years we’ve seen the rise of low-power mesh networking devices for everything from IoT devices, weather stations, and even off-grid communications networks. These radio modules are largely exempt from licensing requirements due to their low power and typically only operate within a very small area. But by borrowing some ideas from the licensed side of amateur radio, [Peter Fairlie] built this Meshtastic repeater which can greatly extend the range of his low-power system.

[Peter] is calling this a “long lines relay” after old AT&T microwave technology, but it is essentially two Heltec modules set up to operate as Meshtastic nodes, where one can operate as a receiver while the other re-transmits the received signal. Each is connected to a log-periodic antenna to greatly increase the range of the repeater along the direction of the antenna. These antennas are highly directional, but they allow [Peter] to connect to Meshtastic networks in the semi-distant city of Toronto which he otherwise wouldn’t be able to hear.

With the two modules connected to the antennas and enclosed in a weatherproof box, the system was mounted on a radio tower allowing a greatly increased range for these low-power devices. If you’re familiar with LoRa but not Meshtastic, it’s become somewhat popular lately for being a straightforward tool for setting up low-power networks for various tasks. [Jonathan Bennett] explored it in much more detail as an emergency communications mode after a tornado hit his home town.

Continue reading “A Long-Range Meshtastic Relay”

Drop-In Switch Mode Regulators

Perhaps the simplest way to regulate a DC voltage is using a voltage divider and/or an active device like a Zener diode. Besides simplicity, they have the additional advantage of not being particularly noisy, but with a major caveat: they are terribly inefficient. To solve this problem a switching regulator can be used instead, but that generally increases complexity and noise. With careful design, though, a switching regulator can be constructed to almost completely replicate a linear regulator like this drop-in TO3 replacement. (Google Translate from German)

While the replacement regulator was built by [Mr. Floppy], the units are being put to the test in the linked video below by [root42]. The major problem these solve compared to other switching regulators is the suppression of ripple, which is a high-frequency artifact that appears on the DC voltage. Reducing ripple in this situation involved designing low-inductance circuit traces on the PCB as well as implementing a number of EMI filters on both input and output. The final result is an efficient voltage supply for retrocomputers which has a ripple lower than their oscilloscopes can measure without special tools.

[root42] is not only testing these, but the linked video also has him using the modules to repair a Commodore 1541 which originally had the linear TO3 voltage regulators. It’s definitely a non-trivial task to build a switching power supply that meets the requirements of sensitive electronics like these. Switch mode power supplies aren’t new ideas, either, and surprisingly pre-date the first commercially-available transistor although modern ones like these are much less expensive to build.

Continue reading “Drop-In Switch Mode Regulators”

Video Killed The Radio Alarm Clock

For decades now, MTV has been on a bizarre trajectory given its original name was an acronym for Music Television. In the original days in the 80s and 90s it kept mostly true to its name, but starting around two decades ago they expanded into reality and other non-musical television programming and have now left it largely behind. Plenty of those who grew up in its heyday have an understandable amount of nostalgia for the channel as a cultural touchstone, and [Derf] used MTV archival footage to build a video alarm clock which helps him keep in tune with the past.

To keep the appropriate 80s aesthetic, the build uses a portable TV from the late 80s with its original CRT. The video files are hosted on more modern technology though, in this case a Raspberry Pi. The Pi is set up to run a python script which launches the VLC media player with a playlist loaded with video files, in this case a long list of MTV shows. Some configuration needs to be done to get it to output to the old CRT properly which depends on the hardware used, but once that’s in place it’s ready to be used as an alarm. [Derf] is using a smart outlet to power the TV at the appropriate time, and a cron job which starts the video player simultaneously at a somewhat random point in the playlist.

As far as retro TVs go, having one as an alarm clock is certainly a novel idea. We have seen a few others in the past, though, one to play the golden age of The Simpsons, and another that recreates the nostalgia of 90s cable television complete with a preview channel and era-appropriate commercials.

Continue reading “Video Killed The Radio Alarm Clock”