A Classroom-Ready Potentiometer From Pencil And 3D Prints

If you need a potentiometer for a project, chances are pretty good that you’re not going to pick up a pencil and draw one. Then again, if you’re teaching someone how a variable resistor works, that old #2 might be just the thing.

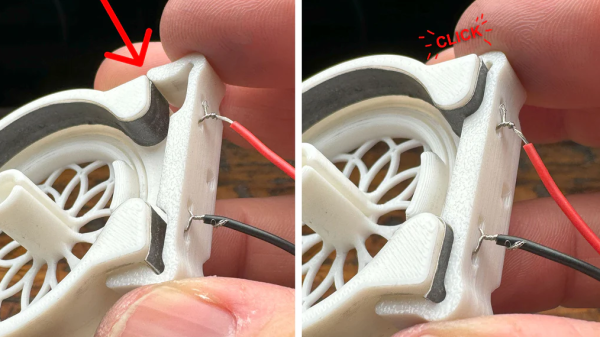
When [HackMakeMod] realized that the graphite in pencil lead is essentially the same thing as the carbon composition material inside most common pots, the idea for a DIY teaching potentiometer was born. The trick was to build something to securely hold the strip while making contact with the ends, as well as providing a way to wipe a third contact across its length. The magic of 3D printing provided the parts for the pot, with a body that holds a thin strip of pencil-smeared paper securely around its inner diameter. A shaft carries the wiper, which is just a small length of stripped hookup wire making contact with the paper strip. A clip holds everything firmly in place. The video below shows the build process and the results of testing, which were actually pretty good.

Of course, the construction used here isn’t meant for anything but demonstration purposes, but in that role, it performs really well. It’s good that [HackMakeMod] left the body open to inspection, so students can see how the position of the wiper correlates to resistance. It also makes it easy to slip new resistance materials in and out, perhaps using different lead grades to get different values.

Hats off to a clever build that should be sure to help STEM teachers engage their students. Next up on the lesson plan: a homebrew variable capacitor.

Continue reading “A Classroom-Ready Potentiometer From Pencil And 3D Prints”

Building A GPS Receiver From The Ground Up

One of the more interesting facets of GPS is that, at least from the receiver’s point-of-view, it’s a fairly passive system. All of the information beamed down from the satellites is out in the ether, all the time, free for anyone on the planet to receive and use as they see fit. Of course you need to go out and buy a receiver or, alternatively, possess a certain amount of knowledge to build a circuit that can take those signals and convert them into something usable. Luckily, [leaning_tower] has the required knowledge and demonstrates it with this DIY GPS receiver.

This receiver consists of five separate circuit boards, all performing their own function. The first, a mixer board, receives the signal via an active antenna and converts it to a lower frequency. From there it goes to a second mixer and correlation board to compare the signal to a local reference, then a signal processing board that looks at this intermediate frequency signal to make sense of the data its seeing. Finally, an FPGA interfacing board ties everything together and decodes the information into a usable form.

Dealing with weak signals like this has its own set of challenges, as [leaning_tower] found out. The crystal oscillator had to be decapped and modified to keep from interfering with the GPS radio since they operated on similar frequencies. Even after ironing out all the kinks, the circuit takes a little bit of time to lock on to a specific satellite but with a second GPS unit for checking and a few weeks of troubleshooting, the homebrew receiver is up and running. It’s an impressive and incredibly detailed piece of work which is usually the case with sensitive radio equipment like GPS. Here’s another one built on a Raspberry Pi with 12 channels and a pretty high accuracy.

Well Documented Code Helps Revive Decades-Old Commodore Project

In the 1980s, [Mike] was working on his own RPG for the Commodore 64, inspired by dungeon crawlers of the era like Ultima IV and Telengard, both some of his favorites. The mechanics and gameplay were fairly revolutionary for the time, and [Mike] wanted to develop some of these ideas, especially the idea of line-of-sight, even further with his own game. But an illness, a stint in the military, and the rest of life since the 80s got in the way of finishing this project. This always nagged at him, so he finally dug out his decades-old project, dusted out his old Commodore and other antique equipment, and is hoping to finish it by 2024.

Luckily [Mike’s] younger self went to some extremes documenting the project, starting with a map he created which was inspired by Dungeons and Dragons. There are printed notes from a Commodore 64 printer, including all of the assembly instructions, augmented with his handwritten notes to explain how everything worked. He also has handwritten notes, including character set plans, disk sector use plans, menus, player commands, character stats, and equipment, all saved on paper. The early code was written using a machine language monitor since [Mike] didn’t know about the existence of assemblers at the time. Eventually, he discovered them and attempted to rebuild the code on a Commodore 128 and then an Amiga, but never got everything working together. There is some working code still on a floppy disk, but a lot of it doesn’t work together either.

While not quite finished yet, [Mike] has a well-thought-out plan for completing the build, involving aggregating all of the commented source code and doing quarterly sprints from here on out to attempt to get the project finished. We’re all excited to see how this project fares in the future. Beyond the huge scope of this pet project, we’d also suggest that this is an excellent example of thoroughly commenting one’s code to avoid having to solve mysteries or reinvent wheels when revisiting projects months (or decades) later. After all, self-documenting code doesn’t exist.

Continue reading “Well Documented Code Helps Revive Decades-Old Commodore Project”

Hackaday Prize 2023: Scratch Made 8-Bit Educational Computer

To demonstrate the functionality of an 8-bit computer processor at a very basic level,  [Mazen Gomaa] assembled a Homemade 8-Bit Educational Computer using common CMOS logic chips, a handful of prototyping boards, and an impressive number of carefully connected wires. [Mazen] was inspired by Ben Eater’s 8-bit TTL Breadboard Computer but opted to solder the chips and other components onto proto boards instead of using solderless breadboards.

The 8-Bit computer is based on the Simple-As-Possible (SAP) computer architecture described in the book “Digital Computer Electronics” by [Paul Malvino] and [Jerald Brown]. These useful educational examples demonstrate data, computer logic, and even programming in the context of basic electronic components. Tinkering with such simple computers provides a real “zeros and ones” exposure to computation.

[Mazen] added some additional features and functionality to his computer, including an instruction keypad, an address keypad, a dot matrix memory data viewer, a Schottky diode matrix ROM, and a boot loader that initializes the RAM with data stored in ROM. With clock speeds up to 100 Hz, the computer consumes around 300-500 mA of current.

Future plans include expanding the memory and instruction set from the present 128-bit (8×16) RAM, 64-bit (8×8) ROM, and a set of ten instructions.  Already, this project is a great addition to an ever-growing catalog of homemade solderless breadboard computers, LCD snake games, and VGA video cards.

Continue reading “Hackaday Prize 2023: Scratch Made 8-Bit Educational Computer”

Low-Cost RF Power Sensor Gets All The Details Right

Dirty little secret time: although amateur radio operators talk a good game about relishing the technical challenge of building their own radio equipment, what’s really behind all the DIY gear is the fact that the really good stuff is just too expensive to buy.

A case in point is this super-low-cost RF power sensor that [Tech Minds (M0DQW)] recently built. It’s based on a design by [DL5NEG] that uses a single Schottky diode and a handful of passive components. The design is simple, but as with all things RF, details count. Chief among these details is the physical layout of the PCB, which features a stripline of precise dimensions to keep the input impedance at the expected 50 ohms. Also important are the number and locations of the vias that stitch the ground planes together on the double-sided PCB.

While [Tech Minds]’ first pass at the sensor hewed closely to the original design and used a homebrew PCB, the sensor seemed like a great candidate for translating to a commercial PCB. This version proved to be just as effective as the original, with the voltage output lining up nicely with the original calibration curves generated by [DL5NEG]. The addition of a nice extruded aluminum case and an N-type RF input made for a very professional-looking tool, not to mention a useful one.

[Tech Minds] is lucky enough to live within view of QO-100, ham radio’s first geosynchronous satellite, so this sensor will be teamed up with an ADC and a Raspberry Pi to create a wattmeter with a graphical display for his 2.4-GHz satellite operations.

Continue reading “Low-Cost RF Power Sensor Gets All The Details Right”

DIY Game Boy Games Make The Perfect Christmas Gift

Sometimes, the best gift is the one you make yourself. [Pigeonaut] decided to whip up a few Game Boy games of their very own creation to gift to the special people in their life.

The games were crafted using a platform called GB Studio. It’s a tool that allows the drag-and-drop creation of games for the Game Boy and Game Boy Color handhelds. It’s capable of creating ROM files to run in an emulator, within a web page, or they can be flashed to a cartridge and played on real Nintendo hardware.

For the full effect, [Pigeonaut] went with the latter method. Four games were created: Phantom Shock, Climbing Mount Crymore, Cozy Cat Cafe, and A Tiny Hike. Each was flashed onto a real cart and given a high-quality label to make a lovely tangible gift. Upon gifting, [Pigeonaut]’s friends and partner were able to play their way through their personalized titles on a GameCube running the Game Boy Player accessory.

It’s hard to imagine a more touching gift than a personal game crafted from the ground up. Getting to play it on a real Nintendo is even better, and we’ve seen hardware that can achieve that before. Try out the games in your web browser via the links above, or send us in your own cool homebrew hacks to the Tipsline!

A Primer For The Homebrew Game Boy Advance Scene

As video game systems pass into antiquity, some of them turn out to make excellent platforms for homebrew gaming. Not only does modern technology make it easier to interact with systems that are now comparatively underpowered and simpler, but the documentation available for older systems is often readily available as well, giving the community lots of options for exploration and creativity. The Game Boy Advance is becoming a popular platform for these sorts of independent game development, and this video shows exactly how you can get started too.

This tutorial starts with some explanation of how the GBA works. It offered developers several modes for the display, so this is the first choice a programmer must make when designing the game. From there it has a brief explanation of how to compile programs for the GBA and execute them, then it dives into actually writing the games themselves. There are a few examples that [3DSage] demonstrates here including examples for checking the operation of the code and hardware, some simple games, and also a detailed explanation the framebuffers and other hardware and software available when developing games for this console.

While the video is only 10 minutes long, we recommend watching it at three-quarters or half speed. It’s incredibly information-dense and anyone following along will likely need to pause several times. That being said, it’s an excellent primer for developing games for this platform and in general, especially since emulators are readily available so the original hardware isn’t needed. If you’d like to build something from an even more bygone era than the early 2000s, though, take a look at this tutorial for developing games on arcade cabinets.

Continue reading “A Primer For The Homebrew Game Boy Advance Scene”