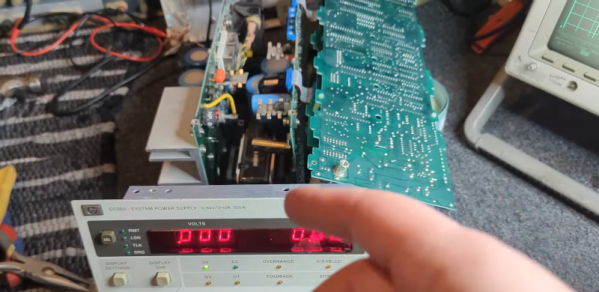
The Short Workbench

Imagine an electronics lab. If you grew up in the age of tubes, you might envision a room full of heavy large equipment. Even if you grew up in the latter part of the last century, your idea might be a fairly large workbench with giant boxes full of blinking lights. These days, you can do everything in one little box connected to a PC. Somehow, though, it doesn’t quite feel right. Besides, you might be using your computer for something else.

I’m fortunate in that I have a good-sized workspace in a separate building. My main bench has an oscilloscope, several power supplies, a function generator, a bench meter, and at least two counters. But I also have an office in the house, and sometimes I just want to do something there, but I don’t have a lot of space. I finally found a very workable solution that fits on a credenza and takes just around 14 inches of linear space.

How?

How can I pack the whole thing in 14 inches? The trick is to use only two boxes, but they need to be devices that can do a lot. The latest generation of oscilloscopes are quite small. My scope of choice is a Rigol DHO900, although there are other similar-sized scopes out there.

If you’ve only seen these in pictures, it is hard to realize how much smaller they are than the usual scopes. They should put a banana in the pictures for scale. The scope is about 10.5″ wide (265 mm and change). It is also razor thin: 3″ or 77 mm. For comparison, that’s about an inch and a half narrower and nearly half the width of a DS1052E, which has a smaller screen and only two channels.

A lot of test gear in a short run.

If you get the scope tricked out, you’ve just crammed a bunch of features into that small space. Of course, you have a scope and a spectrum analyzer. You can use the thing as a voltmeter, but it isn’t the primary meter on the bench. If you spend a few extra dollars, you can also get a function generator and logic analyzer built-in. Tip: the scope doesn’t come with the logic analyzer probes, and they are pricey. However, you can find clones of them in the usual places that are very inexpensive and work fine.

There are plenty of reviews of this and similar scopes around, so I won’t talk anymore about it. The biggest problem is where to park all the probes. Continue reading “The Short Workbench”

Parts We Miss: The Mains Transformer

About two decades ago there was a quiet revolution in electronics which went unnoticed by many, but which overturned a hundred years of accepted practice. You’d have noticed it if you had a mobile phone, the charger for your Nokia dumbphone around the year 2000 would have been a weighty device, while the one for your feature phone five years later would have been about the same size but relatively light as a feather. The electronics industry abandoned the mains transformer from their wall wart power supplies and other places in favour of the much lighter and efficient switch mode power supply. Small mains transformers which had been ubiquitous in electronics projects for many years, slowly followed suit.

Coils Of Wire, Doing Magic With Electrons

Inside and outside views of Jenny Lists's home made linear power supply from about 1990
This was a state of the art project for a future Hackaday scribe back in 1990.

A transformer works through transferring alternating electrical current into magnetic flux by means of a coil of wire, and then converting the flux back to electric current in a second coil. The flux is channeled through a ferromagnetic transformer core made of iron in the case of a mains transformer, and the ratio of input voltage to output voltage is the same as the turns ratio between the two. They provide a safe isolation between their two sides, and in the case of a mains transformer they often have a voltage regulating function as their core material is selected to saturate should the input voltage become too high. The efficiency of a transformer depends on a range of factors including its core material and the frequency of operation, with transformer size decreasing with frequency as efficiency increases.

When energy efficiency rules were introduced over recent decades they would signal the demise of the mains transformer, as the greater efficiency of a switch-mode supply became the easiest way to achieve the energy savings. In a sense the mains transformer never went away, as it morphed into the small ferrite-cored part running at a higher frequency in the switch-mode circuitry, but it’s fair to say that the iron-cored transformers of old are now a rare sight. Does this matter? It’s time to unpack some of the issues surrounding a small power supply. Continue reading “Parts We Miss: The Mains Transformer”

USB-C Power Supply Pushes Almost 2 KW

When the USB standard was first revealed, a few peripherals here and there adopted it but it was far from the “universal” standard implied by its name. It was slow, had limited ability to power anything, and its plug-and-play capability was spotty at best. The modern USB standard, on the other hand, has everything its predecessors lacked including extremely high data transfer rates and the ability to support sending or receiving a tremendous amount of power. [LeoDJ] is taking that latter capability to the extreme, with this USB-C power supply that can deliver 1.7 kW of power.

The project was inspired by the discovery of an inexpensive USB-PD (power delivery) module which is capable of delivering either 100W or 65W. After extensive testing, to see if the modules were following the USB standard and how they handled heat, [LeoDJ] grabbed 20 of the 65W modules and another four of the 100W modules and assembled them all into an array, held together in a metal chassis that also functions as a heat sink. The modules receive their DC power from two server power supplies wired together in series.

There was some troubleshooting, including soldering difficulty and a short circuit, but with all the kinks ironed out this power supply can deliver nearly 2 kW to an array of USB-capable devices and, according to the amount of thermal testing done, can supply that power nearly indefinitely. It’s an over-the-top power supply with a small niche of uses, but to see it built is satisfying nonetheless. For more information on all of the perks of working with USB-C, check out this tell-all we published last year.

A Deep Dive Into Quadcopter Controls

In the old days, building a quadcopter or drone required a lot of hacking together of various components from the motors to the batteries and even the control software. Not so much anymore, with quadcopters of all sizes ready to go literally out-of-the-box. While this has resulted in a number of knock-on effects such as FAA regulations for drone pilots, it’s also let us disconnect a little bit from the more interesting control systems these unique aircraft have. A group at Cornell wanted to take a closer look into the control systems for drones and built this one-dimensional quadcopter to experiment with.

The drone is only capable of flying in one dimension to allow the project to more easily fit into the four-week schedule of the class, so it’s restricted to travel along a vertical rod (which also improves the safety of the lab).  The drone knows its current position using an on-board IMU and can be commanded to move to a different position, but it first has to calculate the movements it needs to make as well as making use of a PID control system to make its movements as smooth as possible. The movements are translated into commands to the individual propellers which get their power from a circuit designed from scratch for this build.

All of the components of the project were built specifically for this drone, including the drone platform itself which was 3D printed to hold the microcontroller, motors, and accommodate the rod that allows it to travel up and down. There were some challenges such as having to move the microcontroller off of the platform and boosting the current-handling capacity of the power supply to the motors. Controlling quadcopters, even in just one dimension, is a complex topic when building everything from the ground up, but this guide goes some more of the details of PID controllers and how they help quadcopters maintain their position.

Continue reading “A Deep Dive Into Quadcopter Controls”

Second Life UPS Mark II: A UPS For Low-Voltage DC Applications

When you have a whole stack of devices and appliances that all have an AC to DC adapter and which you’d like to put on an uninterruptable power supply (UPS), you could do the obvious thing and get an off-the-shelf UPS with myriad AC outputs. In the case of a 19″ rack this means wrangling a power strip or two and any combination of differently sized AC/DC adapters into the rack, with questionable efficiency and waste heat dumped into the rack. This is where a DC-only UPS like [Maciej Grela]’s Second Life UPS Mark II provides an interesting alternative.

At its core it’s a pretty simple concept: A single 400Watt power supply handles the AC/DC conversion from mains to 24 VDC, which feeds the battery charger as well as the outputs. These outputs include 5 VDC, 12 VDC and Vrail, with the latter being either the output from the PSU, or the battery voltage. In case of AC power failure, an LT4416 dual power path controller handles the switch-over from the PSU output to the internal batteries. In the article, [Maciej] covers how the buck modules for the 12 & 5 VDC rails were sized, along with the conversion of an old rack-mounted network switch into a UPS. Continue reading “Second Life UPS Mark II: A UPS For Low-Voltage DC Applications”

Repairing An HP Power Supply

One of the interesting things about living in modern times is that a confluence of the Internet and rapid changes in the electronics industry means that test gear that used to be astronomically priced is now super affordable. Especially if, like [Frankie Mashockie], you can do a little repair work. He picked up an HP6038A power supply for $50. We couldn’t find the original list price, but even refurbs from “professional” sources go for around $800. However, the $50 price came with a “for parts” disclaimer.

The power supply is autoranging. You usually think of that as a feature of meters. In a power supply, autoranging means the device can adjust the voltage based on load as you can see explained in the video below.

Continue reading “Repairing An HP Power Supply”

USB-C For Hackers: Program Your Own PSU

Last time, I showed off a few ways you can convert an existing PSU to USB-C duty, and zoomed in on a particular way you can use to convert one of the ever-abundant 18 V – 20 V laptop PSUs to USB-C. All we have left is to write software for it, and I’ll explain how it works. There’s also that one cool USB-C secret I’ve found out, but you’ll have to read on to find out more.

From the last article, we have a board that has an RP2040 and FUSB302 combo on it, which takes a 20 V DC PSU input from a laptop brick, and can switch either 5 V, 20 V or 0 V to its USB-C socket using FETs. The USB-C communication firmware is simple enough, but there’s caveats, especially regarding safety. Let’s go through those!

The Code Logic

VBUS has to be non-powered by default – we only supply 5 V when the FUSB302 detects a 5.1 kΩ pulldown on one of the CC lines. After supplying 5 V, we send out PSU capability advertisements, of the kind that we’ve learned to parse in the Replying PD article – and whenever we get a Request, we have to switch to the requested profile, connecting the voltage rail requested to the FET. I opt to not do any current consumption control in this design, assuming a well-behaved device, but you theoretically should do that. It wouldn’t be hard to add a high-side current sensor, say, something from Analog Devices – I just don’t want to do that now, especially given that I’m already using two of the exposed ADC pins to do Lenovo/HP PSU capability detection instead, one is used up for VBUS measurement, and the fourth is used for VIN (20 V rail) measurement – that’s four ADCs, which is as much as the RP2040 has got. However, if I ever need more ADCs, I can add an analog mux like 4051 in the next version! Continue reading “USB-C For Hackers: Program Your Own PSU”