Hands On The Stellaris Launchpad

We just got our hands on a Stellaris Launchpad. We had placed an order when the preorder was originally announced, but the marketing folks at TI reached out an offered to send us one a bit sooner and took them up on it. We’ve embedded a quick unboxing video after the break but read on for some info that didn’t make it into that clip.

The look and feel of the board and its packaging are almost exactly the same as the MSP430 version of the Launchpad. But why not? After all it worked so well the first time. This board hosts an ARM Cortex-M4 processor. The two buttons on the bottom are user buttons, the one on the upper right is a reset button. The top of the board is the programmer, with a micro USB port for connectivity. The kit also includes about a 2′ cable for this connection. Next to that jack is a switch that selects a power source. You’ll also notice a USB port to the left, this because the processor includes USB functionality, with a free library available from TI. Power can come from the programmer/debugger USB port, or from this device USB port. There are dual pin headers to either side on the face of the board, and pin sockets on the back which break out pins of the processor. Just below the reset button is a RGB LED, and a clock crystal has also been populated just above the chip.

When plugged in via the programmer’s USB port the PWR LED lights up as does the RGB LED. The firmware that ships on the device fades through a range of colors and the user buttons scroll through a set of predefined colors. The device enumerates as: “Bus 002 Device 005: ID 1cbe:00fd Luminary Micro Inc.” on our machine. But if you connect it via the device USB jack it enumerates as: “Bus 001 Device 015: ID 04e8:689e Samsung Electronics Co., Ltd GT-S5670 [Galaxy Fit]”. Interesting.

We have no idea if there are programming tools for flashing the board using a Linux box, but we’ll be trying to figure it out. If you have some info please share it in the comments.

Continue reading “Hands On The Stellaris Launchpad”

Beginner’s Look At On-Chip Debugging

As your embedded applications get more complicated an On-Chip Debugger will save you a lot of time when things don’t run quite right. On-Chip Debugging (OCD) is just what it sounds like — a way to run your program on the target chip that lets you pause execution to examine values and change them if need be. The Arduino has no built-in method of using OCD, but the AVR chips used by the boards do. The caveat is that you need a proper AVR programmer to access the Debug Wire protocol, or a JTAG interface for some of the larger chips. In this case I’m going to be using an STM32 Discovery Board to give you an overview of OCD. But this will work the same way for any chip that has hardware debugging capabilities. Many IDE’s have debugging support built right in so that you can use a nice GUI as you work. But often these are just a front end for the command line tools I’ll be using. Join me after the break and we’ll get started.

Continue reading “Beginner’s Look At On-Chip Debugging”

Motorized Wheelchair Built From LEGO Pieces

You’re certainly not going to sneak up on anyone if using this LEGO motorized wheelchair. The high-pitched whine of all those tiny motors sounds like an army of robotic mosquitoes out for blood.

Six of the LEGO Mindstorm bricks are used to drive the motors, with a seventh acting as the master. It’s not pictured above, but there is a joystick on the right hand side which allows the rider to navigate. The master brick monitors the four sensors on that joystick. It then uses a pair of motors to actuate switches monitored by the slave bricks. Each slave has one switch for forward, and another for backward and drives two motors. To get around problems with angular velocities dues to turning, all of the wheels are multidirectional.

The plan is to add Bluetooth control in the near future. The master/slave setup should make that relatively easy as it only affects one of the bricks. The idea is to facilitate Android control to the chair like we’ve seen in other Mindstorm builds.

Don’t miss the demo embedded after the break.

Continue reading “Motorized Wheelchair Built From LEGO Pieces”

Quacking Egg Timer

[Tom] managed to build a geeky, quirky digital timer for the kitchen. Where most would have used a few seven segment displays along with some buttons and called it done, he found a way to make it a lot more fun. The plush addition on top is a yellow ducky with an orange beak. When time runs out the duck will quack, call you back to the kitchen.

As you can see in the video after the break, [Tom’s] got his hands full with the family. This project was quick enough for him to fit it in during what dwindling free time he manages to hold onto. He used one of the chips that came with his MSP430 Launchpad. Since this family of processors offer extremely low-power modes when asleep they’re perfect for this type of battery-powered application. As for the duck, it’s a toy that had a couple of watch batteries and a small PCB inside. Some poking around led him to a pad that activates the quacking when grounded.

Continue reading “Quacking Egg Timer”

MIDI Man-in-the-middle Hack Lets You Add Pedal To The Mix

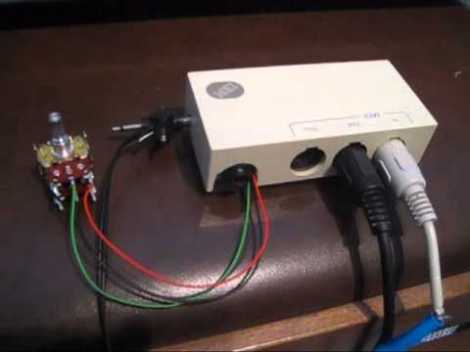
[Sebastian] has a friend who would like to use a pedal with his MIDI setup, but his keyboard doesn’t support one. Some might interpret that as a sign you need to buy a new keyboard. But [Sebastian] has already done a lot of work with the MIDI protocol. He knew it should be possible to create a MIDI pass-through which adds support for a pedal.

You can see the two MIDI cables connected to the box above. One is the input from the keyboard, the other is the output to the synthesizer. There is also a jack for a pedal input to the left. The chip inside intercepts each packet, rolling in values based from the pedal input and passing on the altered packets to the synthesizer. As you can hear in the video after the break, this works like a charm.

Catch more of [Sebastian’s] midi work by following his keyboard sensor replacement projects.

Continue reading “MIDI Man-in-the-middle Hack Lets You Add Pedal To The Mix”

Zelda Engagement Ring Box Seals The Deal

Congratulations to [John Scancella] and his wife to be. Their recent engagement was aided by one of [John’s] projects. Since [Betsy] is a big fan of Zelda, he thought it would be fun to present the ring with the Zelda music playing in the background. He and a friend combined forces to build what you seen in this image.

The music is played by an Arduino with the help of a wave shield. This is pretty much a one-use item so battery life was never a concern. A magnetic switch was used to detect when the box was opened and start the music playing.

You can see the full-sized images after the break, but we can tell that [John] went with a traditional engagement ring. We’re still waiting to see if 3D printed rings are going to catch on in the geek scene. If you just can’t give her anything but precious metal there’s always the idea of encoding messages on the band itself.

Continue reading “Zelda Engagement Ring Box Seals The Deal”

Hybrid Rocket Engine Uses Acrylic As Fuel

We are fascinated by the hybrid rocket engine which [Ben Krasnow] built and tested in his shop. It is actually using a hollow cylinder of acrylic as the fuel, with gaseous oxygen as an oxidizer. We’re already quite familiar with solid rocket propellant, but this hybrid approach is much different.

When a rocket motor using solid propellant is lit it continues to burn until all of the fuel is consumed. That is not the case with this design. The acrylic is actually burning, but if the flow of oxygen is cut off it will go out and can be ignited later. This also opens up the possibility of adjusting thrust by regulating the pressure of the oxygen feed.

[Ben] milled the test rig in his shop. It’s a fat acrylic rod through which he bored a hole. There are two aluminum plates which complete either end of the chamber. The intake has a fitting for a valve which connects to the oxygen tank. There is a nozzle on the outflow end. Check out the video after the break to see a full description. You’ll also get a look at the toll the combustion heat takes on the rig.

Continue reading “Hybrid Rocket Engine Uses Acrylic As Fuel”