LED Tail Lights For Improved Motorcycle Visibility

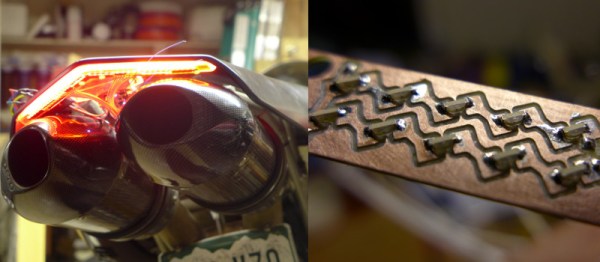
Motorcycles are hard to see at the best of times, so riders are often concerned with making themselves as visible as possible at all times. [Josh] wanted to do this by creating a custom tail light for his Ducati 749.

The tail light is based around SMD LEDs, mounted in acrylic to diffuse the light. The construction is beautiful, using custom PCBs and carefully machined acrylic to match the lines of the bike.

As far as warning lights go, a brighter light will be more obvious in the day time, but could actually hinder visibility at night by blinding other road users. To this end, [Josh] built the tail light around an ATtiny 45, which could be programmed with various routines to optimise the light level depending on ambient conditions. Another feature is that the light’s brightness pulses at high frequency in an attempt to attract the eye. Many automakers have experimented with similar systems. The ATtiny controls the lights through a PCA9952 LED controller over I2C. This chip has plenty of channels for controlling a bunch of LEDs at once, making the job easy.

Overall, it’s a very tidy build that lends a very futuristic edge to the bike. We’ve seen [Josh]’s work in this space before, too – with this awesome instrument display on a Suzuki GSX-R.

3D-Printed Tiger Lopes With The Help Of A Motor

[Greg Zumwalt], master of 3D-printed mechanisms, has published his Saber 2 project as well as an assembly Instructable telling you how to put it together.

Saber 2 is a 3D-printed gear-and-cam saber-toothed tiger that can be motorized to show an excellent loping movement. It’s 14” long and 10” tall and consists of 108 components of which 34 are unique parts, and it all moves with the help of a 6 VDC 60 RPM gearmotor. With threaded PLA rods to keep it all together, and tapped holes to secure the rods, one imagines the printer would have to be pretty finely tuned and leveled for the parts to move as elegantly as you see in the video.

Hackaday readers might recall [Greg]’s 3D-printed projects such as his balloon-powered engine as well as his toy car also powered by balloons.

Continue reading “3D-Printed Tiger Lopes With The Help Of A Motor”

Monoprice Select Mini Gets Smooth

We’ve had a love affair with the Monoprice Select Mini since it came out. The cheap printer has its flaws, though. One of them is that the controller is a bit opaque. On the one hand, it is impressive that it is a 32-bit board with an LCD. On the other hand, we have no way to modify it easily other than loading the ready-built binaries. Want to add bed leveling? Multiple fans? A second extruder and mixing head? Good luck, since the board doesn’t support any of those things. [mfink70] decided the controller had to go, so he upgraded his Mini with a Smoothie board.

On the plus side, the Smoothie board is also a 32-bit board with plenty of power and expansion capability. On the downside, it costs about half as much as the printer does. Just replacing the board was only part of the battle. [mfink70] had to worry about the steppers, the end stops, and a few other odds and ends.

Continue reading “Monoprice Select Mini Gets Smooth”

Precision Pressure In A Piston

[Scott] is building a DIY yeast reactor for his aquarium. What’s a yeast reactor? [Scott] wants to pump carbon dioxide into his aquarium so his aquatic plants grow more. He’s doing this with a gallon of sugary, yeasty water bubbling into a tank of plants and fish. In other words, [Scott] is doing this whole thing completely backward and utilizing the wrong waste product of the yeast metabolism.

However, along the way to pumping carbon dioxide into his aquarium, [Scott] created a very high precision pressure sensor. It’s based on a breakout board featuring the MS5611 air pressure sensor. This has a 24-bit ADC on board, which translates into one ten-thousandths of a pound per square inch of pressure.

To integrate this pressure sensor into the aquarium/unbrewery setup, [Scott] created a pressure meter out of a syringe. With the plunger end of this syringe encased in epoxy and the pointy end still able to accept needles, [Scott] is able to easily plug this sensor into his yeast reactor. The data from the sensor is accessible over I2C, and a simple circuit with an ATmega328 and a character LCD displays the current pressure in the syringe.

We’ve seen these high-resolution pressure sensors used in drones and rockets as altimeters before, but never as a pressure gauge. This, though, is a cheap and novel solution for measuring pressures between a vacuum and a bit over one atmosphere.

Continue reading “Precision Pressure In A Piston”

Featured image

Keep The Burglars Away With Some Pi

Ten years ago, we never imagined we would be able to ward off burglars with Pi. However, that is exactly what [Nick] is doing with his Raspberry Pi home security system.

We like how, instead of using a standard siren, [Nick] utilized his existing stereo system to play a custom audio file that he created. (Oh the possibilities!) How many off the shelf alarm systems can you do that with?

The Pi is the brains of the operation, running an open source software program called Home Assistant. If any of the Z-Wave sensors in his house are triggered while the alarm system is armed, the system begins taking several actions. The stereo system is turned on via IR so that the digital alarm audio file can be played. Lights flash on and off. An IP camera takes several snapshots and emails them to [Nick].

Home Assistant didn’t actually have the ability to send images in an email inline at the time that [Nick] was putting together his system. What did [Nick] do about that? He wrote some code to give it that ability, and submitted it through GitHub. That new code was put into a later version of the program. Ah, the beauty of open source software.

Perhaps the most important part of this project is that there were steps taken to help keep the wife-approval factor of the system on the positive side. For example, he configured one of the scripts so that even if the alarm is tripped multiple times in succession, the alarm won’t play over itself repeatedly.

This isn’t [Nick’s] first time being featured here. Check out another project of his which involves a couple of Pi’s communicating with each other via lasers.


Hackaday Prize Entry: Coaxial Drones

[Glytch] has been building drones since before they were called drones. Instead of submitting his time machine into the Hackaday Prize, he’s throwing his pocket sized, 3D printable coaxial drone into the ring.

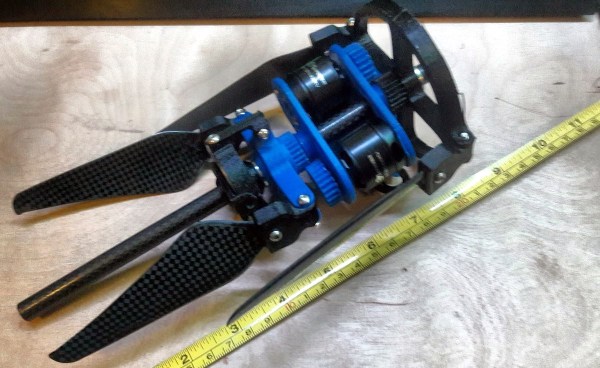
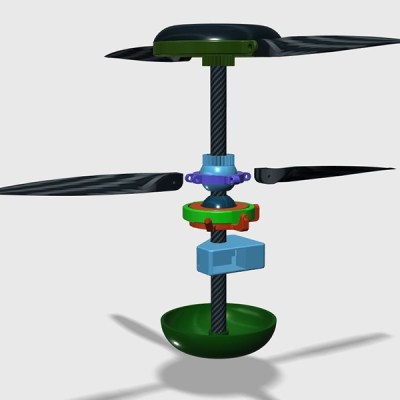
His focus is on designing small and very portable drones, preferably one that has folding arms and can fit into a backpack. His portfolio even includes a clone of the DJI Mavic, the gimbaled camera-carrying consumer drone known for its small volume when folded.

Navi — [Glitch]’s entry for the Hackaday Prize — is a complete departure from quadcopters with folding arms. It’s simple to use, and all he needs to do to launch it is hold it in the air and press a button. It does this by being a coaxial drone, or a cylinder with a pair of folding props sticking out the side. The chassis and mechanics for this drone are 3D printable, making this an awesome entry for the Hackaday Prize.

OBDII to Speed Pulse: Atmel ICE

Building An OBD Speed Pulse: Behold The ICE

I am a crappy software coder when it comes down to it. I didn’t pay attention when everything went object oriented and my roots were always assembly language and Real Time Operating Systems (RTOS) anyways.

So it only natural that I would reach for a true In-Circuit-Emulator (ICE) to finish of my little OBDII bus to speed pulse generator widget. ICE is a hardware device used to debug embedded systems. It communicates with the microcontroller on your board, allowing you to view what is going on by pausing execution and inspecting or changing values in the hardware registers. If you want to be great at embedded development you need to be great at using in-circuit emulation.

Not only do I get to watch my mistakes in near real time, I get to make a video about it.

Getting Data Out of a Vehicle

I’ve been working on a small board which will plug into my car and give direct access to speed reported on the Controller Area Network (CAN bus).

To back up a bit, my last video post was about my inane desire to make a small assembly that could plug into the OBDII port on my truck and create a series of pulses representing the speed of the vehicle for my GPS to function much more accurately. While there was a wire buried deep in the multiple bundles of wires connected to the vehicle’s Engine Control Module, I have decided for numerous reasons to create my own signal source.

At the heart of my project is the need to convert the OBDII port and the underlying CAN protocol to a simple variable representing the speed, and to then covert that value to a pulse stream where the frequency varied based on speed. The OBDII/CAN Protocol is handled by the STN1110 chip and converted to ASCII, and I am using an ATmega328 like found on a multitude of Arduino’ish boards for the ASCII to pulse conversion. I’m using hardware interrupts to control the signal output for rock-solid, jitter-free timing.

Walk through the process of using an In-Circuit Emulator in the video below, and join me after the break for a few more details on the process.

Continue reading “Building An OBD Speed Pulse: Behold The ICE”