DIY Bookshelf Is More Than Meets The Eye

It might surprise you, Dear Reader, that not every project featured on Hackaday needs to pulsate with LEDs, or update the world about its goings-on over Twitter. They don’t even, contrary to what you may have heard, need to have an Arduino inside. No, sometimes you can pull off a pretty neat hack with nothing more than some wood, a couple of tools, and a unique idea which repurposes something that would otherwise be in a landfill.

Such is the case with the latest project from [Keith Decent], which uses plywood and the spines of old books to create a secret compartment “bookshelf”. The concept is probably best described as a roll-top desk on its side, and while the action does appear a little stiff, it scores extra points for how easy it looks to replicate.

Using a router, [Keith] cuts a channel into the top and bottom sheets of plywood, which the “books” will eventually ride in. This channel goes around the entire perimeter of the shelf, and it’s important to make it as straight as possible so nothing binds up. To make sure things move through as smoothly as possible, some sandpaper is used to clean-up the inside edges.
The next step is to rip some books apart and salvage their spines. Used books can be purchased for next to nothing at flea markets, so even if you don’t have a home library filled with vintage tomes to eviscerate, it should be easy enough to get your hands on some if you want to build your own version. For sanity’s sake it would seem that books with the same size spines are ideal, so keep an eye out for old sets of encyclopedias and the like.

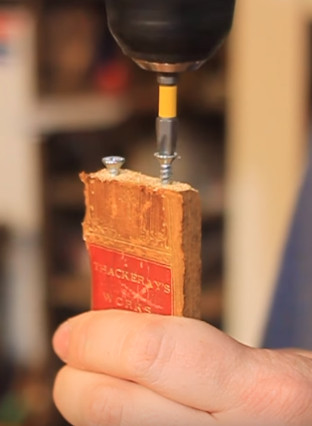
When the spines are removed from the books, they get glued to individual wooden slats. These slats then have holes drilled in the top and bottom, and standard wood screws driven in to act as “rollers”. Real rollers would undoubtedly make for smoother action, but you can’t beat his method if you’re trying to get it done cheaply and quickly.

The slats are then glued onto a piece of fabric, creating what is referred to as a tambour. The fabric backing links all the slats together and makes it so that pushing and pulling one slat will move them all together as one. The book spine tambour is then inserted in the routed channel, and the back panel of the shelf can be installed to lock it all together.

At this point the project is essentially done, but [Keith] does take it the extra mile by sealing all the book spines and doing some finish work on the shelf to make it look more like a real vintage piece of furniture instead of some scrap plywood screwed together.

If this exercise in woodworking has gotten you interested in the wonderful world of dead trees, you’re in luck. We’ve covered several woodworking projects from the hacker perspective, so you won’t be completely lost.


Continue reading “DIY Bookshelf Is More Than Meets The Eye”

Bartop Arcade Cabinet Build Skips The Kit

An arcade cabinet is one of those things that every gamer wants at home, but few ever get. Getting a real arcade cabinet is usually expensive, and building one yourself is no small feat. There are kits you can get now which help the process along, generally taking the form of pre-cut cabinet parts, but with them comes the quiet shame of kit-building. What if your friends found out you used a kit instead of designing it yourself? The drama is almost too much to think about.

That’s how [Bogdan Berg] felt about it, at least. Not content with just getting a pre-cut cabinet kit from eBay, he decided to design and build his own bartop arcade machine in just one week: fast enough for him to fit the whole thing into his Christmas vacation. We don’t know what Christmas was like for his friends and family this year with him toiling away on this beautiful build the whole time, but we can confidently say his Christmas was awesome.

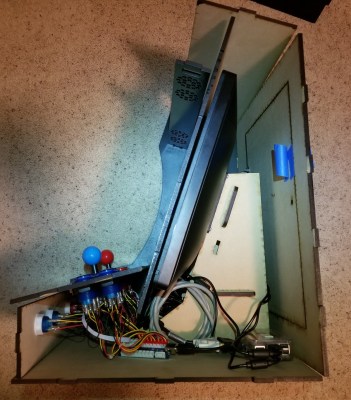
He designed the cabinet in Fusion 360, working around the limitation that the laser cutter he had access to had a work area of 24 inches by 18 inches. Some interesting design choices were made here, including going with a tab and slot construction method. While [Bogdan] admits that this aesthetic isn’t always popular, he liked how sturdy it makes the final product.

He was originally going to use plywood for the cabinet, but owing to the fact that he couldn’t find any pieces that weren’t warped locally, he switched over to MDF. Using MDF did mean he had to seal all the cut pieces with shellac before painting, but in the end he’s happy with the final lacquer paint job; even if it did take more work and materials than he anticipated.

The hardware is pretty much the standard for DIY arcades these days: a 17 inch LCD monitor he had laying around is used for the display, a two player joystick and button kit from Amazon provides the user interface, and emulation is provided by a Raspberry Pi 3 running RetroPie. A recessed door in the rear allows him to get into the machine will still maintaining a finished look on the backside.

While the size of them may vary wildly, DIY arcade cabinets are always a popular project. Whether shamelessly emblazoned with our logo or playing host to glorious LED lighting, it seems like the design of these cabinets provide as much entertainment as the games they play.

Continue reading “Bartop Arcade Cabinet Build Skips The Kit”

Less Dear Heating For The Deer

Keeping animals from tropical regions of the world in a cold climate is an expensive business, they need a warm environment in their pens and sleeping areas. Marwell Zoo was spending a small fortune keeping its herd of nyalas (an antelope, not as the title suggests a deer, native to Southern Africa) warm with electric heating, so they went looking for a technology that could reduce their costs by only heating while an animal was in its pen.

One might expect that a passive IR sensor would solve the problem, but a sleeping nyala too soon becomes part of the background heat for these devices, and as a result, the heaters would not operate for long enough to keep the animals warm. The solution came from an unlikely source, a coffee queue monitoring project at the IBM Watson headquarters in Munich, that used an array of infra-red sensors to monitor the changing heat patterns and thus gauge the likelihood of a lengthy wait for a beverage.

In the zoo application, an array of thermal sensors hooked up to ESP8266 boards talk back to a Raspberry Pi that aggregates the readings and sends them to the IBM Watson cloud where they are analyzed by a neural net. The decision is then made whether or not a nyala is in the field of view, and the animal is toasted accordingly.

This project has some similarities with a Hackaday Prize entry, automated wildlife recognition, in its use of Watson.

Nyala image: Charlesjsharp [CC BY-SA 4.0 ].

Lamp Analysis Tells Sad Truth Behind The Marketing Hype

Here in the northern hemisphere, winter has wrapped us in her monochromatic prison. A solid deck of gray clouds means you need a clock to tell the difference between night and day, and by about the first week of February, it gets to feeling like you’ll never see a blue sky again. It’s depressing, to be honest, and the lack of sunlight can even lead to a mood disorder known as SAD, or seasonal affective disorder.

SAD therapy is deceptively simple — bright full-spectrum light, and lots of it, to simulate the sun and stimulate the lizard brain within us. Not surprisingly, such lights are available commercially, but when [Justin Lam] bought one to help with his Vancouver blues, he decided to analyze the lamp’s output to determine whether the $70 he spent paid for therapy or marketing.

The initial teardown was not encouraging, with what appeared to be a standard CFL “curly fry” light with a proprietary base in a fancy plastic enclosure. With access to a spectrometer, [Justin] confirmed that not only does the SAD light have exactly the same spectrum as a regular CFL, the diffuser touted to provide “full UV protection” does so simply by attenuating the entire spectrum evenly so that the UV exposure falls below the standards. In short, he found that the lamp was $70 worth of marketing wrapped around a $1.50 CFL. Caveat emptor.

Hats off to [Justin] for revealing the truth behind the hype, and here’s hoping he finds a way to ameliorate his current SAD situation. Perhaps one of these DIY lamps will be effective without the gouging.

Robotic Table Saw Automates Finger Joints

We’ve all seen finger joints or box joints, those interlocking puzzle pieces that make laser-cut plywood enclosures such a fixture for DIY projects. But laser cutters make finger joints look much easier to fabricate than they are with traditional woodworking tools, which often lead to disappointing results.

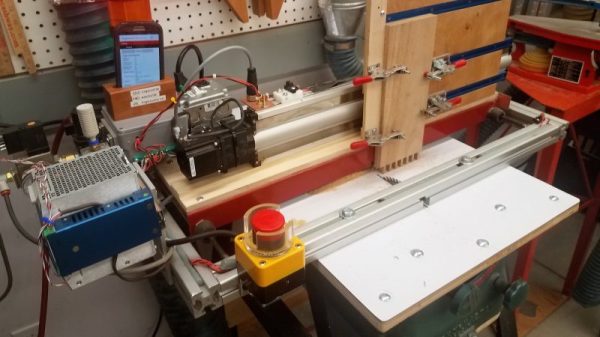
But this finger joint cutting robot is no traditional woodworking tool, and [timschefter] put a lot of work into building the rig. We have to admit that when we first saw the video below, the thought of having a table saw in our shop that could be turned on with a button on a phone gave us pause. But on closer analysis, it looks like safety was a major concern with this build. With a prominent e-stop and an interlock switch, the small table saw that forms the foundation of the robot should be safe enough. On the table top is a sled with a linear slide that moves the workpiece perpendicular to the blade, and the sled moves back and forth over the blade with pneumatic cylinders. The joint is set up with a custom app which calculates the pin width and spacing, which can be evenly distributed across the panel, or, for a bit of geeky fun, controlled to make a joint that encodes a message in Morse.

A lot of work went into this, and while it’s not the first robotic finger joint cutter we’ve seen, it’s pretty impressive. Now if it could only automate dovetails.

Continue reading “Robotic Table Saw Automates Finger Joints”

Vintage Logan Lathe Gets 3D Printed Gears

In December 2016, [Bruno M.] was lucky enough to score a 70+ year old Logan 825 lathe for free from Craigslist. But as you might expect for a piece of machinery older than 95% of the people reading this page, it wasn’t in the best of condition. He’s made plenty of progress so far, and recently started tackling some broken gears in the machine’s transmission. There’s only one problem: the broken gears have a retail price of about $80 USD each. Ouch.

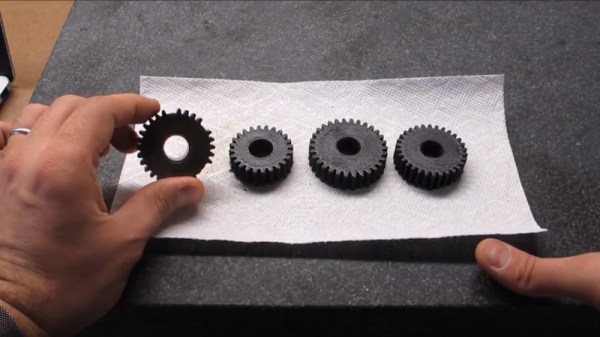
On his blog, [Bruno] documents his attempts at replacing these expensive gears with 3D printed versions, which so far looks very promising. He notes that usually 3D printed gears wouldn’t survive in this sort of application, but the gears in question are actually in a relatively low-stress portion of the transmission. He does mention that he’s still considering repairing the broken gears by filling the gaps left by the missing teeth and filing new ones in, but the 3D printed gears should at least buy him some time.

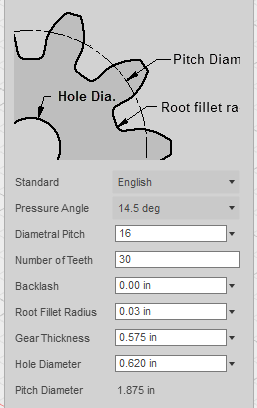
As it turns out, there’s a plugin available for Fusion 360 that helpfully does all the work of creating gears for you. You just need to enter in basic details like the number of teeth, diametral pitch, pressure angle, thickness, etc. He loaded up the generated STL in Cura, and ran off a test gear on his delta printer.

Of course, it didn’t work. Desktop 3D printing is still a finicky endeavour, and [Bruno] found with a pair of digital calipers that the printed gear was about 10% larger than the desired dimensions. It would have been interesting to find out if the issue was something in the printer (such as over-extrusion) or in the Fusion 360 plugin. In any event, a quick tweak to the slicer scale factor was all it took to get a workable gear printed on the third try.

This isn’t the first time we’ve seen 3D printed gears stand in for more suitable replacement parts, nor the first time we’ve seen them in situations that would appear beyond their capability. As 3D printer hardware and software improves, it seems fewer and fewer of the old caveats apply.

Continue reading “Vintage Logan Lathe Gets 3D Printed Gears”

Easy Time-lapse Video Via Phone And Command Line

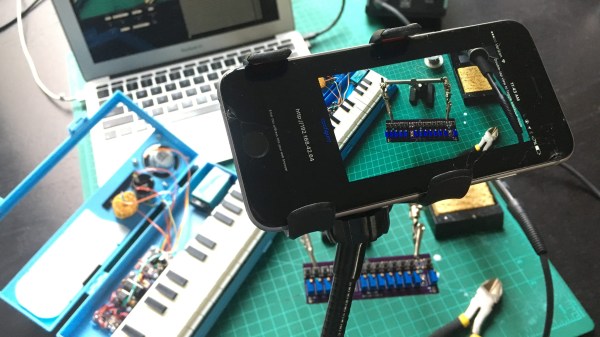
A good time-lapse video can be useful visual documentation, and since [Tommy]’s phone is the best camera he owns he created two simple shell scripts to grab time-lapse images and assemble them into a video. [Tommy]’s work is just the glue between two other things: an app that turns the phone into an IP camera with a web server on the local network, and the ability to grab a still image from that server on demand.

The app he uses for his iPhone normally serves video but has an undocumented feature that allows single frames to be downloaded by adding ‘/photo’ to the end of the URL, but the ability to get a still image is a common feature on IP camera apps for smartphones. His capture script (GitHub repository here) should therefore need only minor changes to work with just about any IP camera app.

Perching a phone over a workspace and using it to create a time-lapse with a couple of shell scripts is a great example of combining simple tools to get better functionality. It could be a good way to get additional use out of an older smartphone, too. Heck, even older dumbphones can still get some use out of them; Shmoocon 2017 brought us details on rolling your own 1G network.