Watch The Snappy, Insect-like Moves Of This DIY Quadruped Robot

Some legged robots end up moving with ponderous deliberation, or wavering in unstable-looking jerks. A few unfortunates manage to do both at once. [MusaW]’s 3D Printed Quadruped Robot, on the other hand, moves in rapid motions that manage to look sharp and insect-like instead of unstable. Based on an earlier design he made for a 3D printable quadruped frame, [MusaW] has now released this step-by-step guide for building your own version. All that’s needed is the STL files and roughly $50 in parts from the usual Chinese resellers to have the makings of a great weekend project.

The robot uses twelve SG90 servos and an Arduino nano with a servo driver board to control them all, but there’s one additional feature: Wi-Fi control is provided thanks to a Wemos D1 Mini (which uses an ESP-8266EX) acting as a wireless access point to serve up a simple web interface through which the robot can be controlled with any web browser.

Embedded below is a brief video. The first half is assembly, and the second half demonstrates the robot’s fast, sharp movements.

Continue reading “Watch The Snappy, Insect-like Moves Of This DIY Quadruped Robot”

An SLA-Printed Pogo Pin Programming Jig

If you have a microcontroller to program, it can be an easy enough process to hook up a serial lead and perform the task. If however you have hundreds of microcontrollers on PCBs to program, connecting that lead multiple times becomes an impossibility. In manufacturing environments they have pogo pin jigs, an array of spring-loaded pins carrying the programming signals that line up perfectly with the appropriate pads on a PCB places on top of it.

[Conor Patrick] is working on an upgrade to the U2F Zero 2-factor authentication token, and he faces exactly this problem of needing to program a lot of boards. His pogo pin jig is very nicely executed, and he’s taken us through his design and manufacture process for it.

Starting with his PCB design in Eagle, he exported it to Fusion 360 in which he was able to create a jig to fit it. Into the jig model he placed the holes for his chosen pogo pins in the appropriate places, before printing it with an SLA 3D printer. He is particularly complementary about the pins themselves, a solder bucket design that comes from mill-Max, and was sourced via DigiKey.

The proof of the pudding is in the eating, and happily when his completed jig received its first board, everything worked as planned and the programming proceeded flawlessly. We’ve shown you other pogo pin jigs, but this one is particularly nicely executed.

This Nixie Device Is Useless, But Pretty

Nixie clocks, they’re a bit of a cliché, aren’t they? But still, they’re pretty to look at.

[Marcin Saj] has completely got our number, and with his Useless Nixie Device has stripped away any pretence of functionality from his Nixie  and concentrated solely on the looking pretty part. It’s a box that steps through the display on any Nixie tube through the use of a set of pluggable socket modules, and it’s encased in an extremely attractive lase-cut acrylic enclosure. Internally it’s an extremely simple device, with a trusty 555 oscillator clocking a 4518 counter that in turn feeds 74141 driver. There is a MAX1771 boost converter in there too to create some high voltage for the tubes.

So it’s a pretty device and you can plug almost any Nixie into it given the right adapter. We guess it might be useful if you have a warehouse full of Nixies to test, but beyond that it’s a pretty desk toy. Still, it’s nice to see a Nixie project that’s not just another clock.

M5Stack Device Disassembled

Putting M5Stack On LoRa And The Things Network

LoRa is the new hotness in low-power, long-range communications. Wanting to let the packets fly, [Xose] was faced with a frequecny problem and ended up developing a Europe-friendly LoRa module for the M5Stack system. The hardware is aimed at getting onto The Things Network, a LoRa based network that provides connectivity for IoT devices. While there was an existing M5Stack module for LoRa, it only supported 433 MHz. Since [Xose] is in Europe, an 868 MHz or 915 MHz radio was needed. To solve this, a custom board was built to connect the HopeRF RFM69 series of modules to the M5Stack.

If you haven’t heard of it before, the M5Stack platform is a stackable development board platform. Like Arduino, you can add functionality by stacking PCBs using a standard header. Unlike Arduino, M5Stack fits in a case nicely and is designed for building devices with user interfaces. For $35, you get an ESP32 based system with WiFi, Bluetooth, a color LCD, battery, buttons, a speaker, and IO connectors.

With the hardware in place, [Xose] 3D printed a custom case to hold the board and added it to the stack. The firmware acts as a monitor for The Things Network, showing live coverage. The final product looks very clean for a prototype, maintaining the finished look of M5Stack.

The firmware, board design, and case design files for the project are all available on Github.

Walk It Off, Healing Robots

For many of us, our first robots, or technical projects, were flimsy ordeals built with cardboard, duct tape, and high hopes. Most of us grow past that scene, and we learn to work supplies which require more than a pair of kitchen scissors. Researchers at Carnegie Mellon University and Iowa State University have made a material which goes beyond durable, it can heal itself when wounded. To a small robot, a standard hole puncher is a dire assailant, but the little guy in the video after the break keeps hopping around despite a couple of new piercings.

The researcher’s goal is to integrate this substance into bio-inspired robots which may come to harm in the field. Fish-like robots could keep swimming after a brush with a bit of coral or a curious predator. Robot snakes could keep slithering after a fall or a gravel road.

Of course, robotic simulacrums are not the only ones who can benefit from healing circuitry. Satellites are prey to punctures from errant space debris.

Continue reading “Walk It Off, Healing Robots”

Gesture Control Without Fancy Sensors, Just Pots And Weights

[Dennis] aims to make robotic control a more intuitive affair by ditching joysticks and buttons, and using wireless gesture controls in their place. What’s curious is that there isn’t an accelerometer or gyro anywhere to be seen in his Palm Power! project.

The gesture sensing consists not of a fancy IMU, but of two potentiometers (one for each axis) with offset weights attached to the shafts. When the hand tilts, the weights turn the shafts of the pots, and the resulting readings are turned into motion commands and sent over Bluetooth. The design certainly has a what-you-see-is-what-you-get aspect to it, and as a whole it works much like an inverted, weighted joystick hanging from one’s palm.

It’s an economical way to play with the idea of motion sensing, and when it comes to prototyping, being able to test a concept while keeping costs to a minimum is a good skill to have.

Turn A Cheap 3D Printer Into A Cheap Laser Cutter

We know it’s hard to hear it, but the days of you being a hotshot at the local Hackerspace because you’ve got a 3D printer at home are long gone. While they’re still one of the most persnickety pieces of gear on the hacker’s bench, they’re certainly not the rarest anymore. Some of these printers are so cheap now they’re almost impulse buys. Like it or not, few people outside of your grandmother are going to be impressed when you tell them you’ve got a personal 3D printer anymore; and we wouldn’t be surprised if even granny picked up a Monoprice Mini during the last open box sale.

But while 3D printer ownership isn’t the pinnacle of geek cred it once was, at least there’s a silver lining: cheap motion platforms we can hack on. [squix] writes in to tell us about how he added a laser to his $200 USD Tevo Tarantula 3D printer, greatly expanding the machine’s capabilities without breaking the bank. The information in his write-up is pretty broadly applicable to most common 3D printer designs, so even if you don’t have a Tarantula it shouldn’t be too hard to adapt the concept.

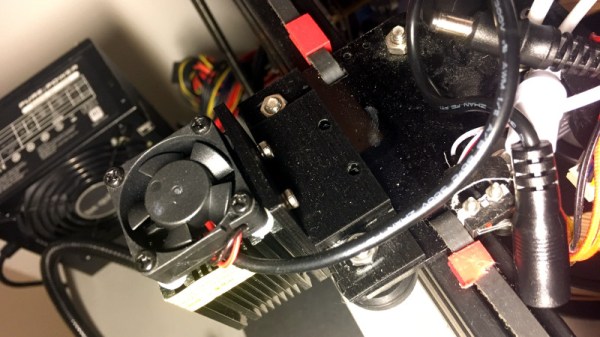
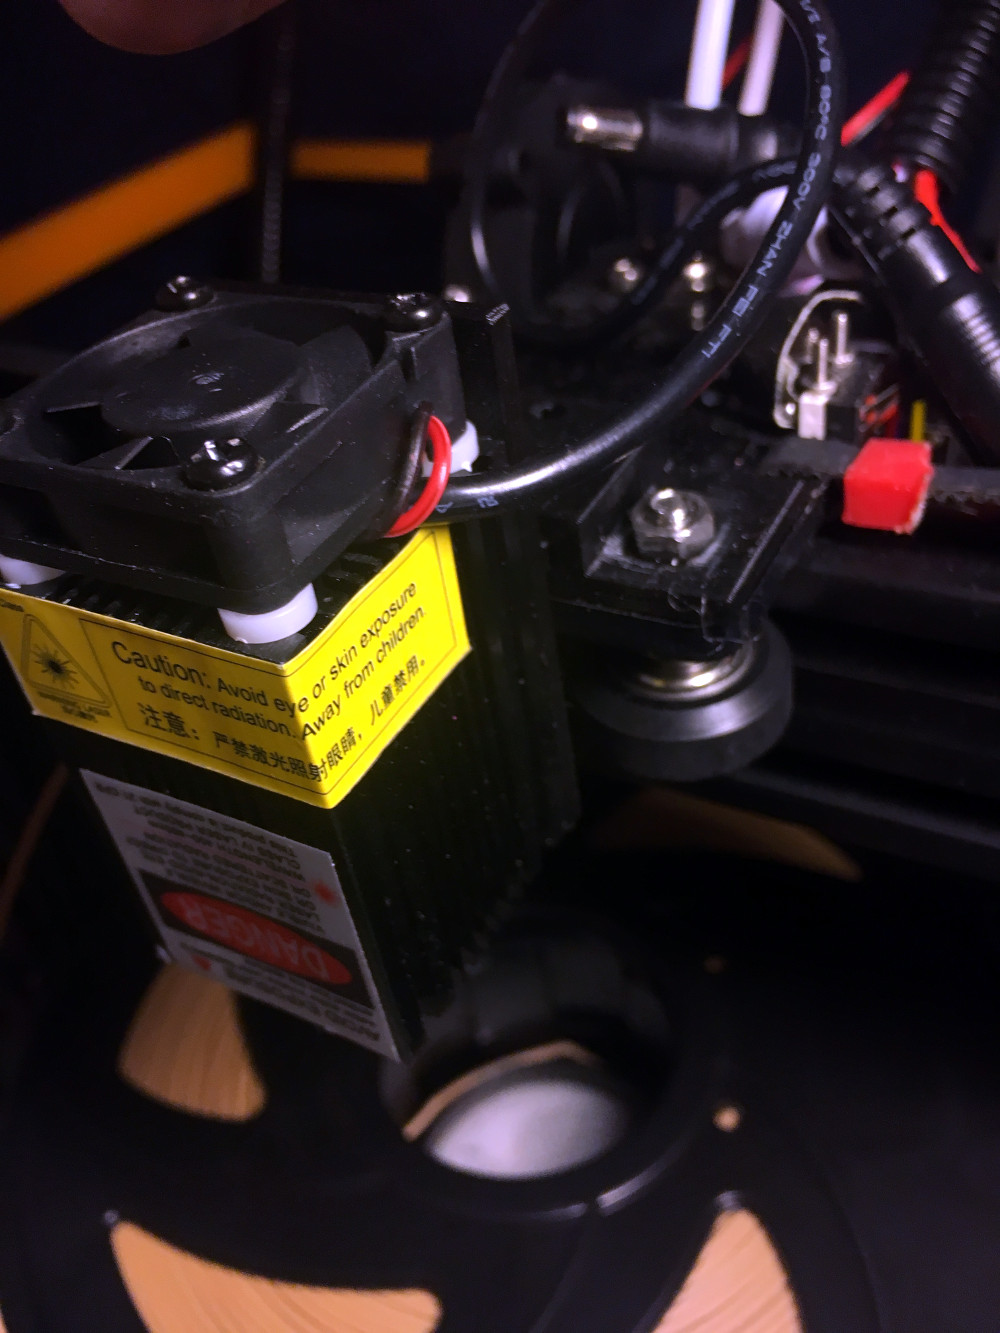
The laser is a 2.5 W 445 nm module which is very popular with low-cost laser cutter setups. It’s a fully self-contained air cooled unit that just needs a source of 12 V to fire up. That makes it particularly well suited to retrofitting, as you don’t need to shoehorn in any extra support electronics. [squix] simply connected it to the existing power wires for the part cooling fan he added to the Tarantula previously.

You may want to check the specs for your 3D printer’s control board before attaching such a high current device to the fan connector. Best case it just overloads the board’s regulator and shuts down, worst case the magic smoke might escape. A wise precaution here might be to put a MOSFET between the board’s fan output the and the laser, but we won’t tell you how to live your life. As far as laser safety, this device should probably work inside an opaque box, or behind closed doors.

Once the laser is hanging off the fan port of your printer’s controller, you can turn it on with the normal GCode commands for fan control, M106 and M107 (to turn it on and off, respectively). You can even control the laser’s power level by adding an argument to the “on” command like: M106 S30.

Then you just need to mount the laser, and it’s more or less business as usual. Controlling a laser engraver/cutter isn’t really that different from controlling a 3D printer, so [squix] is still using OctoPrint to command the machine; the trick is giving it a “3D model” that’s just a 2D image with no Z changes to worry about. We’ve seen the process for doing that in Inkscape previously.

With this laser module going for as little as $60 USD (assuming you’ve got a 3D printer or two laying around to do the conversion on), this is a pretty cheap way to get into the subtractive manufacturing game. Next stop from there is getting one of those K40’s everyone’s talking about.

Continue reading “Turn A Cheap 3D Printer Into A Cheap Laser Cutter”