Friday Hack Chat: Open Hardware For Science

Scientific equipment is expensive. It can cost hundreds of thousands of dollars to set up a lab. Simply the cost of machines, like data acquisition units or even a simple load cell, can cost hundreds of dollars. This makes research cost prohibitive, and that’s the case even if you do spend a dozen hours a week writing grant proposals. Citizen science is right out, because the cost of the tools to do science is so high.

For this week’s Hack Chat, we’re going to be talking about Open Hardware for science. This is the chat that’s all about Open Source equipment, hardware modular electronics, and Open designs to make the tools that make science.

Our guest for this week’s Hack Chat is [Dr. Alexxai Kravitz]. He has a PhD in Neuroscience from UPenn and completed a postdoc at the Gladstone Institutes in San Fransisco. [Lex]’s research focuses on understanding the reward circuitry in the brain, and his publications use a variety of experiments to examine this, including behavioral testing, in vivo electrophysiology, and optogenetics.

For this Hack Chat, we’re going to about how Open Source has made more science possible. Of note, we’ll be discussing:

  • What Open Source science equipment is being used today
  • The initiatives behind Open Source Hardware for science applications
  • Scientific application that could benefit from Open Hardware

You are, of course, encouraged to add your own questions to the discussion. You can do that by leaving a comment on the Hack Chat Event Page and we’ll put that in the queue for the Hack Chat discussion.join-hack-chat

Our Hack Chats are live community events on the Hackaday.io Hack Chat group messaging. This week is just like any other, and we’ll be gathering ’round our video terminals at noon, Pacific, on Friday, May 11th.  Here’s a clock counting down the time until the Hack Chat starts.

Click that speech bubble to the right, and you’ll be taken directly to the Hack Chat group on Hackaday.io.

You don’t have to wait until Friday; join whenever you want and you can see what the community is talking about.

Broken Screen Becomes Polarizing Art Lamp

Got a broken laptop screen sitting around? If you haven’t already pilfered the LEDs and used the polarizing sheets for screen privacy filters, why not turn it into a unique table lamp? See if you can use more parts of the screen than [alexmaree-ross] did.

This is a simple idea with great-looking results, but the process is a bit fiddly. After all the layers are separated and the LEDs extracted, there’s still the matter of figuring out how they’re wired up. [alexmaree] tested them in pairs to see how they’re grouped together and ultimately powered them with a transformer from an old printer. To build the case, [alexmaree] carefully scored and snapped the pieces from the plastic layer and carefully glued pieces of the polarizing layer on top to give it that underwater infinity mirror look. The finishing touch comes from edging the shade with thin metal from the bezel.

The case could be in any shape you want, but we think the prism is quite appropriate considering the polarizing effects. And it looks really cool when you walk around it, which you can do vicariously after the break.

If the screen still works but laptop doesn’t, why not drive it with an FPGA?

Continue reading “Broken Screen Becomes Polarizing Art Lamp”

An Ode To Belgrade

In two weeks the Hackaday Community is gathering in Belgrade for Europe’s greatest hardware con, The Hackaday Belgrade Conference — an event not to be missed — but of course the city itself is a spectacular place to visit and has the perfect feel for those who like to build electronics. Why not join us for your own geek world tour to Serbia? Here’s a few of the things you’ll want to see while in Belgrade.

Aeronautical Museum Belgrade

Aircraft, Inventor, Architecture

Belgrade is a tech center and a hidden jewel of Europe. Need proof? Fly into Belgrade, and you’ll land at Nikola Tesla Airport. Pick up a car at the airport and you’ll pass a great glass torus housing Serbia’s Museum of Aviation. Here, you’ll find aircraft from both sides of the cold war, Sabres and MiGs, Hurricanes and Messerschmitts, a quite rare Sud Caravelle, and the canopy of the only stealth bomber ever to be shot down. It’s an aviation geek’s paradise, and you haven’t even left the airport.

What else is in store for you when you visit Belgrade? For the Hackaday crowd, the most interesting bit will probably be the Nikola Tesla Museum. You might know of Nikola Tesla from a webcomic, but he’s actually the greatest inventor of all time, even more so than Elon Musk. Tesla invented radio, even though Marconi got the credit. Tesla invented radar and discovered x-rays. The only person they could find to portray a figure like Tesla in The Prestige was David Bowie. Nikola Tesla is the most iconic inventor to ever live (change my mind), and his museum is in Belgrade.

Continue reading “An Ode To Belgrade”

8-bit Game Uses Our Favourite IC And Zero Lines Of Code

If a hacker today wanted to build a simple game, he or she could whip it up using an Arduino board and a few other bits and pieces in about an hour, only to be greeted with “where’s the hack?” But when you look at [OiD]’s SPEBEG (Single Player Eight Bit Electronic Game), you’ll understand why building anything using old-skool 70s tech is so awesome and educational.

The SPEBEG is a simple 8-bit game where you aim with the joystick at the target and fire to gain points. As your score increases, so does the game speed. It doesn’t need a single line of code, since the whole design is completely hardware based. And it uses the venerable 555. The display is an 8×8 LED matrix while score and levels are displayed on two 7-segment LED displays.

An 8-bit bus forms the backbone of the game and it is all held together by lots of 74-series TTL logic. The 555 provides a 47 kHz secondary clock, while the 100 Hz signal after the rectifier diodes is used to introduce the essential “randomness” that every game requires. [OiD] does a good job of describing the whole circuit by breaking it down into byte-sized chunks and walking us through each. For something so simple to build using modern technology, he needed over 25 different chips to build it, and ended up setting himself back by almost 200 €.

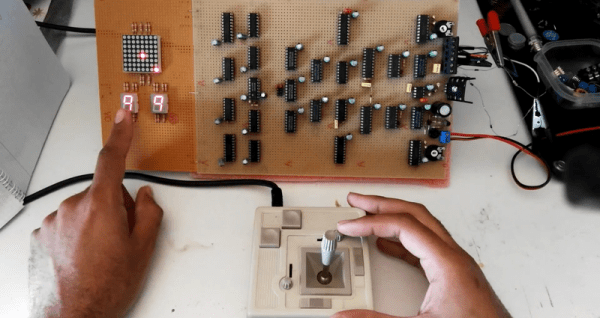
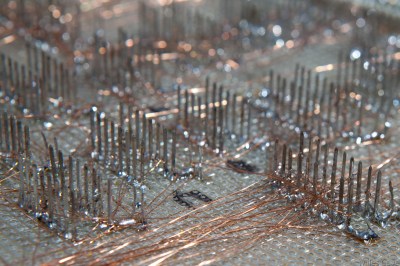
But there’s one more part of this project that amazes us, and that is its construction technique. [OiD] purchased IC sockets with extra long pins and a lot of thin, enamel (insulated) copper wire. A soldering station with a fine tip and high temperature setting allowed him to heat the end of the copper wire to melt its enamel insulation, so it could be soldered to the long pin sockets. Using this method, he assembled the circuit using point-to-point soldering, pretty much like wire wrapping. Only, instead of wrapping the wires, he soldered them.

Despite all of his efforts, the game was pretty much unplayable when he first built it almost five years back. He recently pulled it out of storage, swatted all the hardware bugs, and fixed it nicely. Check out the video after the break. [OiD]’s project is decidedly more simple compared to this game that was Fabricated from the Original Arcade Pong Schematics.

Continue reading “8-bit Game Uses Our Favourite IC And Zero Lines Of Code”

Gorgeous NickelBot Serves Up Lasered Wooden Nickels

[bdring] just recently completed his absolutely fantastic NickelBot, which is a beautifully made unit that engraves small wooden discs with a laser like some kind of on demand vending machine, and it’s wonderful. NickelBot is small, but a lot is going on inside. For example, there’s a custom-designed combination engraving platform and hopper that takes care of loading a wooden nickel from a stack, holding it firm while it gets engraved by a laser, then ejects it out a slot once it’s done.

NickelBot is portable and can crank out an engraved nickel within a couple of minutes, nicely fulfilling its role of being able to dish out the small items on demand at events while looking great at the same time. NickelBot’s guts are built around a PSoC5 development board, and LaserGRBL is used on the software side to generate G-code for the engraving itself. Watch it work in the video embedded below.

Continue reading “Gorgeous NickelBot Serves Up Lasered Wooden Nickels”

Push It To The Limit: SSD1306 At 150 FPS

A good deal of the projects we cover here at Hackaday are not, in the strictest sense, practical endeavors. If we required that everything which graced our digital pages had a clear end result, the site would be in a rather sad state of affairs. Sometimes it’s enough just to do something for the challenge of it. But more often than not, you’ll learn something in the process which you can use down the line.

That’s precisely what pushed [Larry Bank] to see how well he could optimize the frame rate on the popular SSD1306 OLED display. After several iterations of his code, he was able to achieve a blistering 151.5 FPS, with apparently still some room for improvement if he’s feeling up to the challenge. But considering his first attempt was only running at 5.5 FPS, we’d say he’s already more than earned his hacker cred on this one.

A few different tricks were used to achieve such incredible performance gains. To start with, while the official I2C specification says you’re supposed to wait for an acknowledgment back from the device when communicating with it, [Larry] realized the SSD1306 didn’t actually care. He could continuously blast commands at the display without bothering to wait for an acknowledgment. He admits there are problems with this method, but you can’t argue with the results.

To really wring all the performance out of the system he could, [Larry] donned his Assembly Cap and examined how the Arduino IDE compiler was interpreting his code. He identified a few areas where changing his C code would force the compiler to generate faster output. He notes that this wouldn’t normally be required when working with more advanced compilers, but that the Arduino toolchain needs its hand held occasionally.

This isn’t the first time we’ve seen somebody try and push more pixels through the very same OLED display, and it’s interesting to see the two very different approaches to the same goal.

Windows Notepad Now Supports Unix Line Endings

In what is probably this century’s greatest advancement in technology, Windows Notepad now supports Unix line endings. This is it, people. Where were you when Kennedy was assassinated? Where were you when Neil Armstrong set foot on the moon? Where were you when Challenger blew up? Where are you now?

Previously, Windows Notepad only supported Windows End of Line Characters — a Carriage Return (CR) and Line Feed (LF). Unix text documents use LF for line endings, and Macs use CR for line endings. The end result of this toppling of the Tower of Babel for End of Line characters is a horrific mess; Windows users can’t read Unix text files in Notepad, and everything is just terrible. Opening a Unix text file in Windows produces a solid block of text without any whitespace. Opening a Windows text file in anything else puts little rectangles at the end of each line.

Starting with the current Window 10 Insider build, Notepad now supports Unix line endings, Macintosh line endings, and Windows line endings. Rejoice, the greatest problem in technology has now been solved.