Tracktorino Shields You From Poor Interfaces

On-screen controls in a digital audio workstation expand the power of a DJ or musician, but they are not intuitive for everyone. The tactility of buttons, knobs, sliders and real-world controls feels nothing like using a mouse, trackpad, or even a touchscreen. Unfortunately, devices meant to put control into a DJs hands can be unavailable due to location or cost. [Gustavo Silveira] took charge of the situation so he could help other DJs and musicians take control of their workstations with a customized MIDI interface for Traktor DJ software.

MIDI is a widely used serial protocol which has evolved from a DIN connector to USB, and now it is also wireless. This means that the Traktorino is not locked to Traktor despite the namesake. On the Hackaday.io page, there’s even a list of other workstations it will work with, but since many workstations, all the good ones anyway, accept MIDI hardware like this, the real list is a lot longer.

The custom circuit board is actually a shield. Using an Arduino UNO, the current poster child of the Arduino world, opens up the accessibility for many people who don’t know specialized software. A vector drawing for a lasercut enclosure is also included. This means that even the labeling on the buttons are not locked into English language.

Here’s another project which combined laser cutting and MIDI to make some very clever buttons or turn your DIN MIDI connector into USB.

Continue reading “Tracktorino Shields You From Poor Interfaces”

Building A POV Display On A PC Fan

We’ve covered plenty of persistence of vision (POV) displays before, but this one from [Vadim] is rather fun: it’s built on top of a PC fan. He’s participating in a robot building competition soon and wanted to have a POV display. So, why not kill two birds with one stone and build the display onto a fan that could also be used for ventilation?

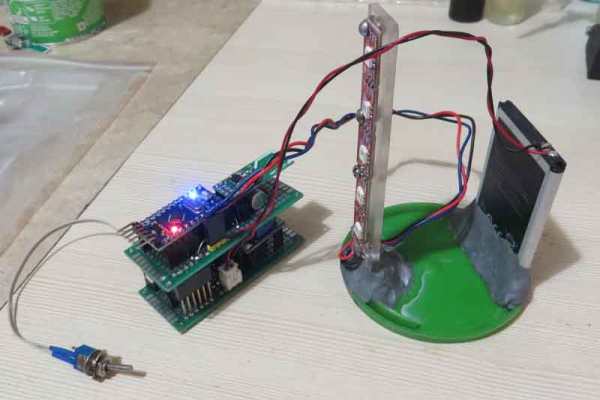
The display is a stand-alone module that includes a battery, Neopixels, Arduino and an NRF240L01 radio that receives the images to be displayed. That might seem like overkill, but putting the whole thing on a platform that rotates does get around the common issue of powering and sending signals to a rotating display: there is no need for slip connections.

[Vadim] goes into a good level of detail on how he built the display, including the problems he had diagnosing a faulty LED chip, and why it is important to test at each stage as it is easier to debug when the display isn’t whizzing around at high speed.

It’s a bit of a rough build that uses more protoboard than might be necessary, but we’re keeping our fingers crossed that it doesn’t fly off during the competition.

Continue reading “Building A POV Display On A PC Fan”

Nerf Blaster Goes Next-level With Propane Power

There are no shortage of Nerf gun mods out there. From simply upgrading springs to removing air restrictors, the temptation of one-upping your opponents in a Nerf war speaks to many!

Not content with such lowly modifications [Peter Sripol] decided that his blaster needed to see some propane action.

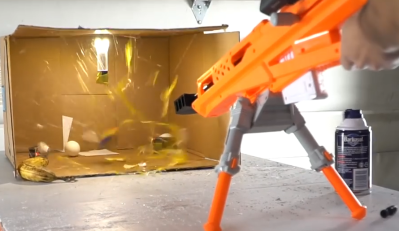
[Peter] completely stripped out the existing firing mechanism before creating a new combustion chamber from some soldered copper pipe. He added a propane tank and valve on some 3D-printed mounts, and replaced the barrel to produce some intense firepower.

To ignite the fuel inside the combustion chamber, some taser circuitry creates the voltage needed to jump the spark gap inside whilst an added switch behind the trigger kicks off the whole process. After experimenting with different ignition methods, [Peter] eventually found that positioning the spark in the center of the chamber provided the best solution for efficient combustion and non-deafening volume.

Though highly dependant on the amount of gas in the chamber during combustion, the speed of the dart was able to reach a maximum of 220 fps – that’s a whopping 150mph!

Next follows the obligatory sequence for all souped-up Nerf guns:  slow motion annihilation of various food items and beverage containers. To obtain some extra punch, some custom Nerf darts were 3D-printed, including one with a fearsome nail spear-head.

We strongly advise against taking up [Peter] on any offer of Nerf based warfare, but you can check out his insane plane adventures or last winter’s air sled.

Continue reading “Nerf Blaster Goes Next-level With Propane Power”

Fast LED Matrix Graphics For The ESP32

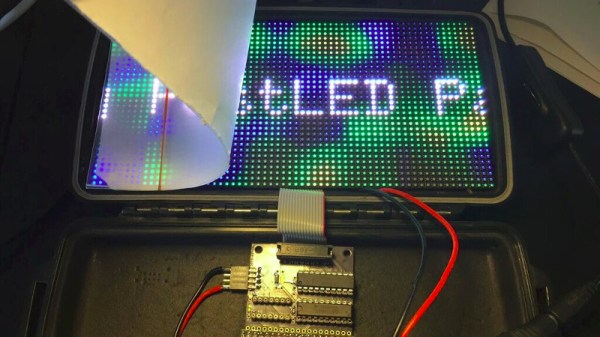
Many of you will have experimented with driving displays from your microcontroller projects, and for most people that will mean pretty simple status information for which you’d use standard libraries and not care much about their performance. If however any of you have had the need for quickly-updating graphics such as video or game content, you may have found that simpler software solutions aren’t fast enough. If you are an ESP32 user then, [Louis Beaudoin] may have some good news for you, because he has ported the SmartMatrix library to that platform. We’ve seen his demo in action, and the results as can be seen in the video below the break are certainly impressive.

In case you are wondering what the SmartMatrix library is, it’s an LED matrix library for the Teensy. [Louis]’s port can be found on GitHub, and as he was explaining to us over a beer at our Cambridge bring-a-hack, it takes extensive advantage of the ESP32’s DMA capabilities. Making microcontrollers talk with any sort of speed to a display is evidently a hot topic at the moment, [Radomir Dopieralski]’s talk at our Dublin Unconference a few weeks ago addressed the same topic.

We have to admit a soft spot for LED panels here at Hackaday, and given the ESP32’s power we look forward to writing up the expected projects that will come our way using this library.

Continue reading “Fast LED Matrix Graphics For The ESP32”

Home Made 5-Axis CNC Head Is A Project To Watch

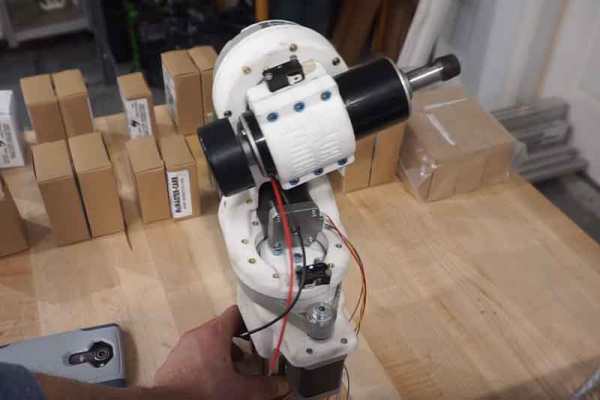
[Reiner Schmidt] was tired of renting an expensive 5-axis CNC head for projects, so he decided to build his own. It’s still a work in progress, but he’s made remarkable progress so far. The project is called Bridge Boy, and it is designed to use a cheap DC rotary mill to cut soft materials like plastic, wood and the like. Most of it is 3D printed, and he has released the Autodesk 360 plans that would allow you to start building your own. His initial version uses an Arduino with stepper drivers, and is designed to fit onto the end of a 60mm arm of a standard 3-axis CNC,  so technically it’s a 3+2 axis CNC. With the appropriate software, it should be able to work as a full 5-axis machine, though, and it should be possible to integrate it with a CNC that has a 5-axis driver board without too much effort.

Continue reading “Home Made 5-Axis CNC Head Is A Project To Watch”

Zippo Keeps Your Bits Safe

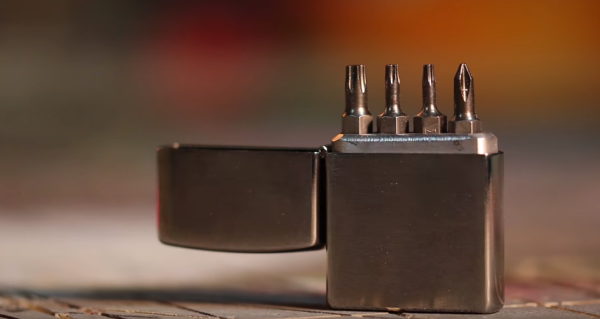
[Laura Kampf] found a new use for an old Zippo lighter by turning it into a carrier for her screwdriver bits. There are several multitools out there which can accept standard screwdriver bits. The problem is carrying those bits around. Leaving a few bits in your pocket is a recipe for pocket holes and missing bits.

[Laura’s] solution uses her old Zippo lighter. All she needs is the case, the lighter element itself can be saved for another project. A block of aluminum is cut and sanded down to a friction fit. Laura uses a band saw and bench sander for this. The aluminum block is then drilled out to fit four bits. Small neodymium magnets are taped into the holes with double-sided tape. These magnets retain the bits, ensuring none will fall out when the lighter is opened.

This is a great quick project and an excellent way to carry four bits. We’re curious if the second set of holes (and a shorter bar) could expand this carrier to 8 bits – 4 on top and 4 on the bottom. [Laura] noticed this too, but decided to keep the build simple with 4 bits.

We love Every Day Carry (EDC) projects like this – in fact, a few years back we had our own EDC contest featuring the Adafruit Trinket. Check out the awards announcement post for some awesome pocket projects!

Continue reading “Zippo Keeps Your Bits Safe”

Real-Time Polarimetric Imager From 1980s Tech

It’s easy to dismiss decades old electronics as effectively e-waste. With the rapid advancements and plummeting prices of modern technology, most old hardware is little more than a historical curiosity at this point. For example, why would anyone purchase something as esoteric as 1980-era video production equipment in 2018? A cheap burner phone could take better images, and if you’re looking to get video in your projects you’d be better off getting a webcam or a Raspberry Pi camera module.

But occasionally the old ways of doing things offer possibilities that modern methods don’t. This fascinating white paper from [David Prutchi] describes in intricate detail how a 1982 JVC KY-1900 professional video camera purchased for $50 on eBay was turned into a polarimetric imager. The end result isn’t perfect, but considering such a device would normally carry a ~$20,000 price tag, it’s good enough that anyone looking to explore the concept of polarized video should probably get ready to open eBay in a new tab.

Likely many readers are not familiar with polarimetric imagers, it’s not exactly the kind of thing they carry at Best Buy. Put simply, it’s a device that allows the user to visualize the polarization of light in a given scene. [David] is interested in the technology as, among other things, it can be used to detect man-made materials against a natural backdrop; offering a potential method for detecting mines and other hidden explosives. He presented a fascinating talk on the subject at the 2015 Hackaday SuperConference, and DOLpi, his attempt at building a low-cost polarimetric imager with the Raspberry Pi, got him a fifth place win in that year’s Hackaday Prize.

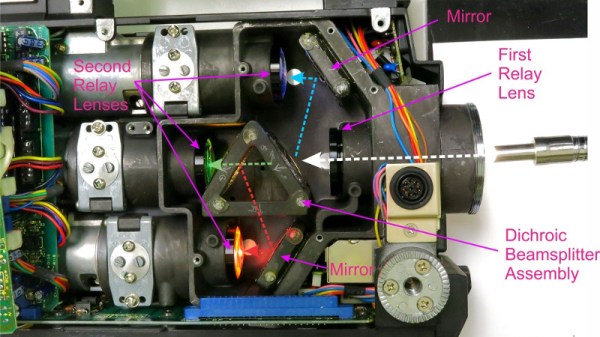
While he got good results with his Raspberry Pi solution, it took several seconds to generate a single frame of the image. To be practical, it needed to be much faster. [David] found his solution in an unlikely place, the design of 1980’s portable video cameras. These cameras made use of a dichroic beamsplitter to separate incoming light into red, blue, and green images; and in turn, each color image was fed into a dedicated sensor by way of mirrors. By replacing the beamsplitter assembly with a new 3D printed version that integrates polarization filters, each sensor now receives an image that corresponds to 0, 45, and 90 degrees polarization.

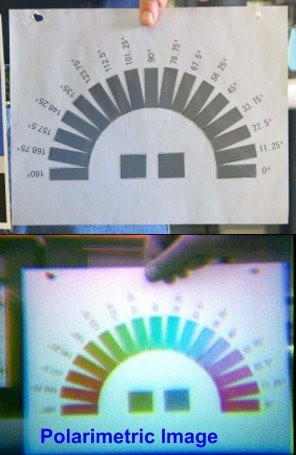
With the modification complete, the camera now generates real-time video that shows the angle of polarization as false color. [David] notes that the color reproduction and resolution is quite poor due to the nature of 30+ year old video technology, but that overall it’s a fair trade-off for running at 30 frames per second.

In another recent project, [David] found a way to hack optics onto a consumer-level thermal imaging camera. It’s becoming abundantly clear that he’s not a big fan of leaving hardware in an unmodified state.