Star Fox Comes To Arduboy

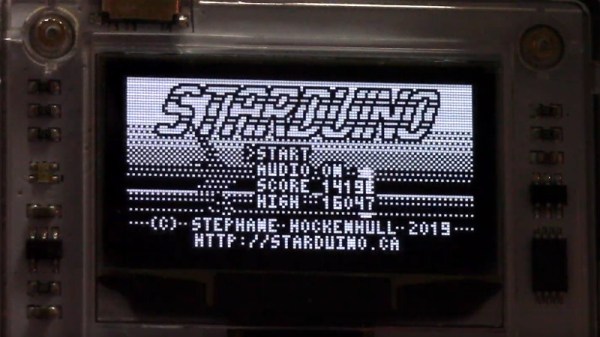
The original Star Fox for the SNES was a landmark game. With the Super FX chip built into the cartridge, it presented the first 3D accelerated home console experience. The series has spanned several consoles and over two decades. Now, it’s getting an (albeit unofficial) port to the Arduboy, thanks to [Stephane Hockenhull].

Impressively, the game fits in under 28KB, and [Stephane] hasn’t skimped on the development details. The process begun with setting up a basic 3D engine on the Arduboy, followed by some tests of various gameplay ideas. The final implementation bears a strong similarity to the original SNES gameplay. At this point, work moved out of the Arduino IDE into [Stephane]’s custom development environment to speed things along. A PC port was used to save time programming the flash every iteration.

The tricks used to pull this off are many and varied. There are neat hacks used to optimise the storage of the 3D model data, implement lightweight collision detection, and generate random levels. Everything was done in order to make the game fit into the smallest space possible.

Running smooth 3D graphics on a 16MHz 8-bit microcontroller is an impressive feat, and a testament to [Stephane]’s coding abilities. We can’t wait to see more 3D development on the platform. Meanwhile, if the Arduboy doesn’t quite have the look you want, there’s a solution for that too. Video after the break.

Continue reading “Star Fox Comes To Arduboy”

Towards Low Cost Biomedical Imaging

Medical imaging is one of the very best applications of technology — it allows us to peer inside of the human body without actually performing surgery. It’s non-destructive testing to the extreme, and one of the more interesting projects we’ve seen over the past year uses AC currents and an infinite grid of resistors to image the inside of a living organism. It’s called Spectra and it is the brainchild of [Jean Rintoul]. Her talk at the Hackaday Superconference is all about low cost and open source biomedical imaging.

We’ve seen some interesting medical imaging hacks in the Hackaday Prize over the years. There have been vein finders and even a CT scanner, but when it comes to biomedical imaging, the Spectra project is something different. Right now, it’s just good enough to image organs while they’re still inside your body, and there’s still a lot of potential to do more. Let’s take a closer look a how this works.

Continue reading “Towards Low Cost Biomedical Imaging”

Making An Ultrasonic Cutter For Post-processing Tiny 3D Prints

An ultrasonic knife is a blade that vibrates a tiny amount at a high frequency, giving the knife edge minor superpowers. It gets used much like any other blade, but it becomes far easier to cut through troublesome materials like rubber or hard plastics. I was always curious about them, and recently made my own by modifying another tool. It turns out that an ultrasonic scaling tool intended for dental use can fairly easily be turned into a nimble little ultrasonic cutter for fine detail work.

Cheap ultrasonic scaler. The blue disk is for adjusting power. Foot switch not shown.

I originally started thinking about an ultrasonic knife to make removing supports from SLA 3D prints easier. SLA resin prints are made from a smooth, hard plastic and can sometimes require a veritable forest of supports. These supports are normally removed with flush cutters, or torn off if one doesn’t care about appearances, but sometimes the density of supports makes this process awkward, especially on small objects.

I imagined that an ultrasonic blade would make short work of these pesky supports, and for the most part, I was right! It won’t effortlessly cut through a forest of support bases like a hot knife through butter, but it certainly makes it easier to remove tricky supports from the model itself. Specifically, it excels at slicing through fine areas while preserving delicate features. Continue reading “Making An Ultrasonic Cutter For Post-processing Tiny 3D Prints”

Controlling Non-Googley Devices With Google Assistant

In the near future of the Smart Home, you will be able to control anything with your voice. Assuming that everything supports the Smart Home standard you chose, that is. If you have a device that supports one of the other standards, you’ll end up uselessly yelling at it. Unless you use gBridge. As the name suggests, gBridge is a bridge between Google Assistant devices and the rest of the smart home universe. It’s an open source project that is available as a Docker image can be run on a low power device in the home, or on a hosted service.

Fundamentally, gBridge is a Google Assistant to MQTT translator. Message Queuing Telemetry Transport (MQTT) is the messaging protocol that many smart home devices use, as it runs over TCP and doesn’t take much power to implement. We’ve covered how to bash around in MQTT and do much of this yourself here, but gBridge looks to be somewhat easier to use. It’s just come out of beta test, and it looks like it might be a good way to get into Smart Home hacking.

There are, of course, plenty of other ways of doing this, such as IFFFT, but [Peter Kappelt], the brains behind gBridge, claims that it is more flexible, as it offers support for the whole Google Assistant vocabulary, so you can do things like put devices into groups or do more conditional control (such as if the light level in the hallway rises above a certain amount, start recording with a camera) with non-Google devices. [Peter] is also looking to run gBridge as a hosted service, where he does the behind the scenes stuff to update servers, etc, in return for a small fee.

Continue reading “Controlling Non-Googley Devices With Google Assistant”

The Age Of Hypersonic Weapons Has Begun

With a highly publicized test firing and pledge by President Vladimir Putin that it will soon be deployed to frontline units, Russia’s Avangard hypersonic weapon has officially gone from a secretive development program to an inevitability. The first weapon of its type to enter into active service, it’s capable of delivering a payload to any spot on the planet at speeds up to Mach 27 while remaining effectively unstoppable by conventional missile defense systems because of its incredible speed and enhanced maneuverability compared to traditional intercontinental ballistic missiles (ICBMs).

Rendering of Avangard reentering Earth’s atmosphere

In a statement made after the successful test of Avangard, which saw it hit a target approximately 6,000 kilometers (3,700 miles) from the launch site, President Putin made it clear that the evasive nature of the weapon was not to be underestimated: “The Avangard is invulnerable to intercept by any existing and prospective missile defense means of the potential adversary.” The former Soviet KGB agent turned head of state has never been one to shy away from boastful claims, but in this case it’s not just an exaggeration. While the United States and China have been working on their own hypersonic weapons which should be able to meet the capabilities of Avangard when they eventually come online, there’s still no clear deterrent for this type of weapon.

Earlier in the year, commander of U.S. Strategic Command General John Hyten testified to the Senate Armed Services Committee that the threat of retaliation was the best and perhaps only method of keeping the risk of hypersonic weapons in check: “We don’t have any defense that could deny the employment of such a weapon against us, so our response would be our deterrent force.” Essentially, the threat of hypersonic weapons may usher in a new era of “mutually assured destruction” (MAD), the Cold War era doctrine that kept either side from firing the first shot knowing they would sustain the same or greater damage from their adversary.

With President Putin claiming Avangard has already entered into serial production and will be deployed as soon as early 2019, the race is on for the United States and China to close the hypersonic gap. But exactly how far away is the rest of the world from developing an operational hypersonic weapon? Perhaps more to the point, what does “hypersonic weapon” really mean?

Continue reading “The Age Of Hypersonic Weapons Has Begun”

Teardown Shows Why Innovative Designs Sometimes Fail

Some ideas are real head-scratchers from a design standpoint: Why in the world would you do it that way? For many of us, answering that question often requires a teardown, which is what [Ben Katz] did when this PCB motor-powered weed whacker came across his bench. The results are instructive on what it takes to succeed in the marketplace, or in this case, how to fail.

The unit in question comes from an outfit called CORE Outdoor Power. The line trimmer was powered by a big lithium-ion battery pack, but [Ben] concentrated on the unique motor for his teardown. After a problematic entry into the very sturdy case at the far end of the trimmer’s shaft, he found what looks like a souped-up version of [Carl Bugeja]’s PCB brushless motors. The rotors, each with eight large magnets embedded, are sandwiched on either side of a very thick four-layer PCB with intricately etched heavy copper traces. The PCB forms the stator, with four flat coils. The designer pulled a neat trick with the Hall-effect sensors needed for feedback; rather than go with surface-mount sensors, which would add to the thickness of the board, they used through-hole packages soldered to surface pads, with the body of the sensor nestled in a hole in the board. The whole design is very innovative, but sadly, [Ben]’s analysis shows that it has poor performance for its size and weight.

Google around a bit and you’ll see that CORE was purchased some years back by MTD, a big player in the internal combustion engine outdoor power market. They don’t appear to be a going concern anymore, and it looks as though [Ben] has discovered why.

[Jozef] tipped us off to this one. Thanks!

UV Glow Clock Tells The Time Glowingly

Reddit user [TuckerPi] wanted to make something to thank his father for helping him get through his engineering degrees. He hit it out of the park with this awesome glowing clock. The clock uses a strip of UV glow tape, which is rotated by a small stepper motor. On one side a UV LED is moved up and down by a second motor to make the tape glow underneath it. A Raspberry Pi drives the whole system, writing the time on the tape and rotating it to face outwards. Once a minute the clock rewrites the time on the rubber.

This is a lovely build that shows what [TuckerPI] learned in college, as he built most of the mechanism himself, cutting his own metal gears and parts and making a nice, simple case from African mahogany. He also shows his mistakes, such as his first attempt to build the glowing mechanism from silicon rubber mixed with UV powder. Although it worked initially, he found that the UV powder fell out of the rubber after a short while, so he replaced it with UV glow tape.

[TuckerPi] hasn’t published the full schematics of the device, but there is a lot of detail in the Imgur photos of the build and in the Reddit thread where he discussed the build. Kudos to him for finding an interesting and unique way to thank his father for his help.

Continue reading “UV Glow Clock Tells The Time Glowingly”