How To Get Into Cars: Nat Atmo Engine Mods

While the car world is obsessed with everything boosted these days, many still yearn for the smooth power delivery and sonorous tone of a naturally aspirated engine. Of course, everyone still wants to go fast, so here’s how you go about getting more power out of your car without bolting on a big turbo or whining supercharger.

Intakes: This Can Get Pretty Invovled

A modified intake installed on a Honda S2000. Also referred to as “cold-air intakes”, they aim to suck in air at lower temperature which helps produce more power – hence the shield between the air filter and exhaust.

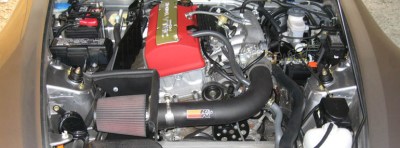
The intake is one of the first modifications made by many budding car enthusiasts. Throwing on a chromed intake pipe with a big pod filter was the mod to have back in the Fast and Furious era. Power gains can be had, though typically these are minor – on the order of 5-10 horsepower at most. It all depends on the car in question. A BMW M5 V10 was designed for high performance, with a highly advanced intake with individual throttle bodies from the factory. It’s unlikely any eBay parts are going to unlock horsepower that BMW’s engineers didn’t already find. Conversely, early Mazda Miatas are known to have a restrictive intake, largely due to the flap-type air flow meter. Replacing this with a freer-flowing setup has merit.

Continue reading “How To Get Into Cars: Nat Atmo Engine Mods”

Bolt-On Clog Detection For Your 3D Printer

Desktop 3D printing technology has improved by leaps and bounds over the last few years, but they can still be finicky beasts. Part of this is because the consumer-level machines generally don’t offer much in the way of instrumentation. If the filament runs out or the hotend clogs up and stops extruding, the vast majority of printers will keep humming along with nothing to show for it.

Looking to prevent the heartache of a half-finished print, [Elite Worm] has been working on a very clever filament detector that can be retrofitted to your 3D printer with a minimum of fuss. The design, at least in its current form, doesn’t actually interface with the printer beyond latching onto the part cooling fan as a convenient source of DC power. Filament simply passes through it on the way to the extruder, and should it stop moving while the fan is still running (indicating that the machine should be printing), it will sound the alarm.

Inside the handy device is a Digispark ATtiny85 microcontroller, a 128 x 32  I2C OLED display, a buzzer, an LED, and a photoresistor. An ingenious 3D printed mechanism grabs the filament on its way through to the extruder, and uses this movement to alternately block and unblock the path between the LED and photoresistor. If the microcontroller doesn’t see the telltale pulse after a few minutes, it knows that something has gone wrong.

In the video after the break, [Elite Worm] fits the device to his Prusa i3 MK2, but it should work on essentially any 3D printer if you can find a convenient place to mount it. Keep a close eye out during the video for our favorite part of the whole build, using the neck of a latex party balloon to add a little traction to the wheels of the filament sensor. Brilliant.

Incidentally, Prusa tried to tackle jam detection optically on the i3 MK3 but ended up deleting the feature on the subsequent MK3S since the system proved unreliable with some filaments. The official line is that jams are so infrequent with high-quality filament that the printer doesn’t need it, but it does seem like an odd omission when even the cheapest paper printer on the market still beeps at you when things have run afoul.

Continue reading “Bolt-On Clog Detection For Your 3D Printer”

2020 Hackaday Prize Reveals Four Open Challenges And New Dream Team Program

The 2020 Hackaday Prize begins right now. Our global engineering challenge seeks solutions to real-world problems. If you like to come up with creative solutions to tough problems, four non-profits can use your help. We need hackers, designers, and engineers throughout the world to work on designs for conservation, disaster relief, renewable resources, and assistive devices.

This is the seventh year of the Hackaday Prize, and like past years we want to see your ideas take shape, so share your design process in detail as a project page on Hackaday.io. Over $200,000 in prizes are at stake, with a $50,000 prize for the all around best solution which will then be designed for manufacture at Supplyframe’s DesignLab, produced in a limited run, and deployed in the field.

New this year is our partnership with non-profits that have each outlined challenges they are facing. Eight projects, one top finisher, and one runner up from each of the four categories of challenges, will receive $10,000 and $3,000 respectively. As with previous years, the bootstrap round offers some seed money for getting your prototype off the ground: up to $500 for each of the top twenty during early entry judging. There’s even a $5,000 wildcard prize for entries that don’t specifically address challenges from the four categories. Here’s a taste of the categories you can work on:

  • Develop solutions to combat invasive species in marine and island environments, and help craft tools for protecting our natural ocean landscapes
  • Low cost tools for use in the field like a heat sealers/welders, and medical devices like IV fluid warmers
  • Adaptive technologies for workstations like trackballs, joysticks, and large button controllers
  • Modular add-ons for earthen housing for connectivity, light, heating, and water storage

Continue reading “2020 Hackaday Prize Reveals Four Open Challenges And New Dream Team Program”

IMac G4 Reborn With Intel NUC Transplant

Released in 2002, Apple’s iMac G4 was certainly a unique machine. Even today, its hemispherical case and integrated “gooseneck” display is unlike anything else on the market. Whether or not that’s a good thing is rather subjective of course, but there’s no denying it’s still an attention grabber nearly 20 years after its release. Unfortunately, it’s got less processing power than a modern burner phone.

Which is why [Tom Hightower] figured it was the perfect candidate for a retrofit. Rather than being little more than a display piece, this Intel NUC powered iMac is now able to run the latest version of Mac OS. He even went as far as replacing the display with a higher resolution panel, though it sounds like it was dead to begin with so he didn’t have much choice in the matter.

Somewhere, an early 2000s Apple engineer is screaming.

The retrofit starts off with a brief teardown, which is quite interesting in itself. [Tom] notes a number of unique design elements, chief among them the circular motherboard. The two banks of memory also use different form factors, and only one of them is easily accessible to the end user. Something to think about the next time somebody tells you that Apple’s “brave” hardware choices are only a modern phenomena.

There was plenty of room inside the iMac’s dome to fit the NUC motherboard, and some extension cables and hot glue got the computer’s rear panel suitably updated with the latest-and-greatest ports and connectors. But the conversion wasn’t a total cakewalk. That iconic “gooseneck” put up quite a fight when it was time to run the new wires up to the display. Between the proprietary screws that had to be coerced out with a Dremel to the massive spring that was determined to escape captivity, [Tom] recommends anyone else looking to perform a similar modification just leave the wires on the outside of the thing. That’s what he ended up doing with the power wires for the display inverter.

If you like the idea of reviving old Apple hardware but don’t want to anger the goose, you could start on something a little easier. Like putting an iPad inside of a Macintosh Classic shell.

Self-Shutting Face Mask Is Hacker’s Delight

Most of us currently have to deal with wearing face masks in our daily life. An experience that is not entirely pleasurable as it is more difficult to breathe under the mask and can become hot after a while. In addition, you have to take off the mask whenever you want to eat or drink. [DesignMaker] has attempted to solve these problems by creating a mask with an opening that shuts automatically when other people are nearby.

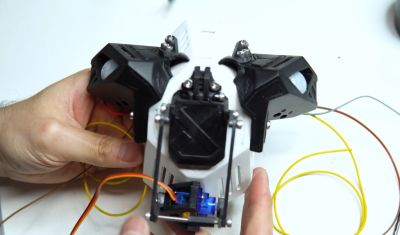
While homemade masks are usually made from fabric [DesignMaker]’s version is much more to a hacker’s taste and includes 3D-printed parts, an Arduino Nano, PIR sensors, an SG90 servo, and some Neopixels. [DesignMaker]’s background in industrial design certainly helped him when modeling the mask as it looks just plain awesome.

His goal was to use PIR sensors to detect when a person is moving nearby. The servo then shuts an opening located at the mouth part of the mask. However, he soon found out that the mask often shuts when nobody is around. The reason is that the sensor can be triggered by ambient IR radiation when it is moving by itself. In the end [DesignMaker] decided that having the mask shut when you are moving is not a bug, it’s a feature.

Of course, the mask is just a prop and should not be used as protective equipment. As shown in the video below, also the false triggering of the PIR sensors can be annoying at times. But [DesignMaker] is already thinking of improvements like having the mask properly sealed with fabric or replacing the PIR sensors by a camera with face detection.

If you want to learn how to sew a proper fabric face mask have a look here. It’s a lot less ridiculous, but a lot more effective. You can’t have everything.

Video after the break.

Continue reading “Self-Shutting Face Mask Is Hacker’s Delight”

Pinball Machine Needs No Wizard

Ever since he was a young boy, [Tyler] has played the silver ball. And like us, he’s had a lifelong fascination with the intricate electromechanical beasts that surround them. In his recently-completed senior year of college, [Tyler] assembled a mechatronics dream team of [Kevin, Cody, and Omar] to help turn those visions into self-playing pinball reality.

You can indeed play the machine manually, and the Arduino Mega will keep track of your score just like a regular cabinet. If you need to scratch an itch, ignore a phone call, or just plain want to watch a pinball machine play itself, it can switch back and forth on the fly. The USB camera mounted over the playfield tracks the ball as it speeds around. Whenever it enters the flipper vectors, the appropriate flipper will engage automatically to bat the ball away.

Our favorite part of this build (aside from the fact that it can play itself) is the pachinko multi-ball feature that manages to squeeze in a second game and a second level. This project is wide open, and even if you’re not interested in replicating it, [Tyler] sprinkled a ton of good info and links to more throughout the build logs. Take a tour after the break while we have it set on free play.

[Tyler]’s machine uses actual pinball machine parts, which could quickly ramp up the cost. If you roll your own targets and get creative with solenoid sourcing, building a pinball machine doesn’t have to be a drain on your wallet.

Continue reading “Pinball Machine Needs No Wizard”

Piddler Illustrates Aliasing And The Z-Transform

One of the problems about learning too much control system theory is that you start to realize almost everything is some sort of control system. That’s the case with [Fernando Zigunov]. After observing a Rayleigh-Plateau instability in his kitchen sink, he decided to build a little display piece that shows water apparently defying gravity that he calls The Piddler.

We’ve seen things like this before, of course. A coffee pump, a check valve, and a strobe lamp with a controller is all that it takes. What makes this project interesting is the over hour-long video lecture on the theory behind why this works and how it relates to aliasing and the z-transform. You can check out the video, below.

Continue reading “Piddler Illustrates Aliasing And The Z-Transform”