A Custom Raspberry Pi Spotted In The Wild

Since the first Raspberry Pi came to market back in 2012 there have been a variety of models released. Some of them are rarer than others, and unusual boards can even be rather sought-after. This one spotted at a Thai junk vendor won’t be in the hands of many collectors though, and investigating it sheds a bit of light on some of the most unusual boards from the company.

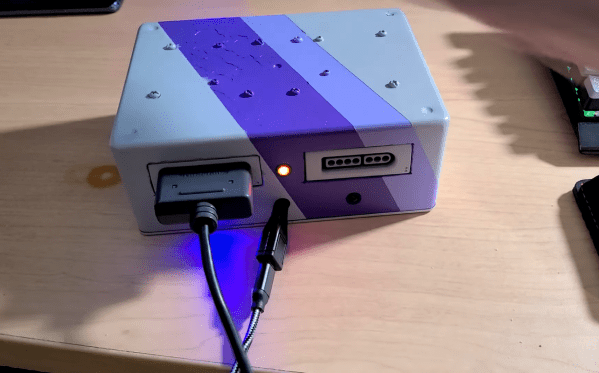
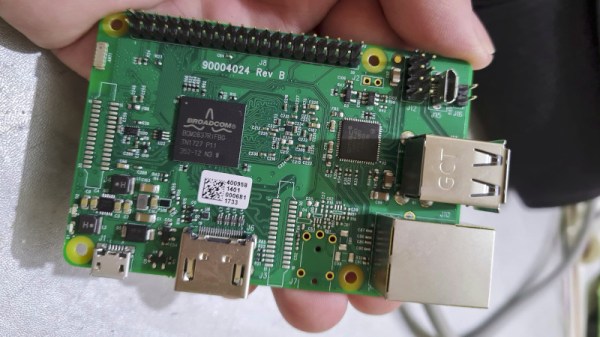
The board is recognisably very similar to a Pi 3 with a BCM2837 SoC, but despite all that it has no Pi logo. On the underside there is an eMMC in place of the SD socket, and one pair of USB sockets has been replaced by a micro USB socket and a header. The source is reported to have been a washing machine, but given that this SoC is exclusive to the the Pi Foundation there’s no way it could easily have been manufactured by anyone else. The answer comes in the 2015 launch of a customisation service for industrial customers, which allowed manufacturers to have their own versions made of the fruity SBC.

From the point of view of an experimenter this board offers nothing that a standard device can’t do. But it’s an interesting glimpse of an unseen side to the Pi story, and it holds the prospect of other special versions being unearthed. If you find one on your travels, let us know!

3D Zoetrope Uses Illusion To Double The Frames

Although film and animation have come quite a long way, there’s still something magical about that grandaddy of them all, the zoetrope. Thanks to persistence of vision, our eyes are fooled into seeing movement where there is none, only carefully laid-out still pictures strobing under the right lighting.

After four months of research, CAD, prototyping, and programming, [Harrison McIntyre] has built a 3D zoetrope that brings a gif to glorious physical life (video, embedded below). All the image pieces are printed and move under a fancy backlight that [Harrison] borrowed from work. It works essentially the same as a 2D zoetrope, as long as you get the spacing juuuuust right. 360° divided by 20 frames comes out to 18° per frame. So a motor spins the disk around, and every 18°, the light pulses for one millisecond and then turns off until the next frame is in position.

The really interesting thing is that there are actually more than 20 frames at play here. If you follow a single character through the loop, it takes 46 frames to complete the animation thanks to something 3D zoetrope pioneer [Kevin Holmes] dubbed ‘animation multiplexing‘, which in [Harrison]’s example, is easily explained as a relay race in which all runners run their section at the same time, creating the illusion of constant motion.

There’s more than one way to use a 3D printer to create a zoetrope, and we doubt we would have ever thought of this one that squashes four dimensions into three.

Continue reading “3D Zoetrope Uses Illusion To Double The Frames”

Understanding Custom Signal Protocols With Old Nintendos

For retro gaming, there’s really no substitute for original hardware. As it ages, though, a lot of us need to find something passable since antique hardware won’t last forever. If a console isn’t working properly an emulator can get us some of the way there, but using an original controller is still preferred even when using emulators. To that end, [All Parts Combined] shows us how to build custom interfaces between original Nintendo controllers and a PC.

The build starts by mapping out the controller behavior. Buttons on a SNES controller don’t correspond directly to pins, rather a clock latches all of the button presses at a particular moment all at once during each timing event and sends that information to the console. To implement this protocol an Adafruit Trinket is used, and a thorough explanation of the code is given in the video linked below. From there it was a simple matter of building the device itself, for which [All Parts Combined] scavenged controller ports from broken Super Nintendos and housed everything into a tidy box where it can be attached via USB to his PC.

While it might seem like a lot of work to get a custom Nintendo controller interface running just because he had lost his Mega Man cartridge, this build goes a long way to understanding a custom controller protocol. Plus, there’s a lot more utility here than just playing Mega Man; a method like this could easily be used to interface other controllers as well. We’ve even seen the reverse process where USB devices were made to work on a Nintendo 64.

Continue reading “Understanding Custom Signal Protocols With Old Nintendos”

$10 000 Physics Wager Settles The Debate On Sailing Downwind Faster Than The Wind

By now, many of you have seen the video of [Rick Cavallaro]’s Blackbird, the controversial wind-powered land vehicle that can outrun the wind. The video has led to a high-profile $10 000 wager between [Derek Muller] aka [Veritasium] and [Alex Kusenko], a professor of physics from UCLA. [Veritasium] won the wager with the help of a scale model built by [Xyla Foxlin], and you need to watch the videos after the break for some excellent lessons in physics, engineering, and civilized debate.

After seeing [Veritasium]’s video on Blackbird, [Professor Kusenko] contacted him and said the performance claims and explanation were incorrect. After a bit of debate [Veritasium] proposed a wager on the matter, which [Professor Kusenko] accepted, and it was made official with a written agreement witnessed by [Neil deGrasse Tyson], [Bill Nye], and [Sean Carrol]. From the start, it was agreed that the entire debate would be made public.

[Professor Kusenko] made a very thorough and convincing argument, backed by calculations, against the claims in the video. He claimed the observations were due to a combination of gusty winds, a vertical wind gradient. He was convinced and that the vehicle would not be able to maintain a speed higher than the wind, directly downwind. By [Veritasium]’s own admittance, his original video could have contained more details and proof of performance claims of the Blackbird vehicle. He added these to the latest video and included two model demonstrations. The model that brought the concept home for us is at 13:46 in the video, and substitutes the propeller for a large wheel being driven by a piece of lumber being bushed across it. The second model, built by [Xyla Foxlin] was designed to demonstrate the concept on a treadmill. The 4th version of [Xyla]’s model was the first to be successful after she found out from [Rick Cavallaro] that the key design detail is the Vehicle Speed Ratio, which must be 0.7 or less. It is the pitch of the propeller divided by the circumference of the driven wheel, assuming a 1:1 gear ratio. All the 3D files and details are available if you want to build your own downwind cart. Continue reading “$10 000 Physics Wager Settles The Debate On Sailing Downwind Faster Than The Wind”

From Printer To Vinyl Cutter

Some might look at a cheap inkjet printer and see a clunky device that costs more to replace the ink than to buy a new one. [Abhishek Verma] saw an old inkjet printer and instead saw a smooth gantry and feed mechanism, the perfect platform to build his own DIY vinyl cutter.

The printer was carefully disassembled. The feed mechanism was reworked to be driven by a stepper motor with some 3D printed adapter plates. A solenoid-based push/pull mechanism for the cutting blade was added with a 3D printed housing along with a relay module. An Arduino Uno takes in commands from a computer with the help of a CNC GRBL shield.

What we love about this build is the ingenuity and reuse of parts inside the old printer. For example, the old PCB was cut and connectors were re-used. From the outside, it’s hard to believe that HP didn’t manufacture this as a vinyl cutter.

If you don’t have a printer on hand, you can always use your CNC as a vinyl cutter. But if you don’t have a CNC, [Abhishek] shares all the STL files for his cutter as well as the schematic. Video after the break.

Continue reading “From Printer To Vinyl Cutter”

An OSHW IR Remote Control Powered By The ATtiny13A

The new hotness in consumer electronics might be RF remotes based on protocols like Bluetooth Low Energy, but there’s still plenty of life left in the classic infrared remote. Especially with projects like TinyRemoteXL from [Stefan Wagner], which let you build and program an IR “clicker” of your own. Whether you want to spin up your own custom universal remote or create a beefed up version of the TV-B-Gone, this open source effort is a great place to start.

The original TinyRemote.

As you might have guessed from the name, this project is actually a larger version of the TinyRemote that [Stefan] put together previously. The documentation for that project goes a bit more into the nuts and bolts of talking IR, and is definitely worth a read if you’re into the low level stuff. For the original five button TinyRemote, the hardware consists of little more than a ATtiny13A microcontroller, a pair of IR LEDs, and the transistors to drive them.

But on the XL, things are a bit trickier as there are now twelve buttons for the ATtiny13A to read. Obviously there aren’t enough pins to read so many buttons directly, but with a combination of BAS16TW diode arrays and resistors, [Stefan] is able to detect what button was pressed using the chip’s interrupt pin and ADC. Certainly a handy trick to have in the back of your mind, and the open source nature of this project gives you a great chance to see how it’s implemented.

Between this project and the impressive development board [Djordje Mandic] released recently, it seems we’re looking at something of an infrared hacking revival. Earlier this year we even saw the commercial release of an IR-equipped ESP8266 board.

Throne Of Dev: An Endgame Office Chair

They say you shouldn’t cheap out on anything that comes between you and the ground. Typically, that list includes shoes, tires, and mattresses. But it’s 2021, and it’s high time to add ‘office chair’ to that list. Take it from someone who bought a handful of hundred-dollar office chairs and finally invested in an Aeron. Your throne makes a difference.

We’re not sure if there is conclusive evidence of this phenomenon, but it seems that for many people, the fastest way to get those creative juices flowing is to lean back and put your feet up. Now it’s one thing to lean back in an office chair and hold yourself there, but it’s quite another to sit in, say, a recliner that keeps the position for you. What if there was an office chair that could switch between the two? [Peter van der Walt] has been working from home for a decade now and will soon be moving to a new base of operations. The new space has a little office next to the main area, so it’s the perfect opportunity to build the dream chair — a day-to-night endgame throne for working, gaming, and everything in between.

[Peter] is working with some cyborg additions to his body and doesn’t care for the standard office chair fare. Currently, he splits his sits between a plastic chair like you’d find outside a coffee house (hey, whatever works best) and a cushy recliner. The idea is to find comfort and focus, and build something comfortable enough to accommodate the occasional afternoon siesta. It will be completely CNC-machineable from 18 mm plywood, and will probably have some upholstery eventually. Your ideas for feature creep are welcome below, or better yet, in the discussion area of the project page.

Some of us like to stand once in a while, but don’t want to go all in on a robotic desk. There are budget-friendly ways around that problem too, of course.