Hackaday Prize 2022: A Hefty Hoverboard Rover

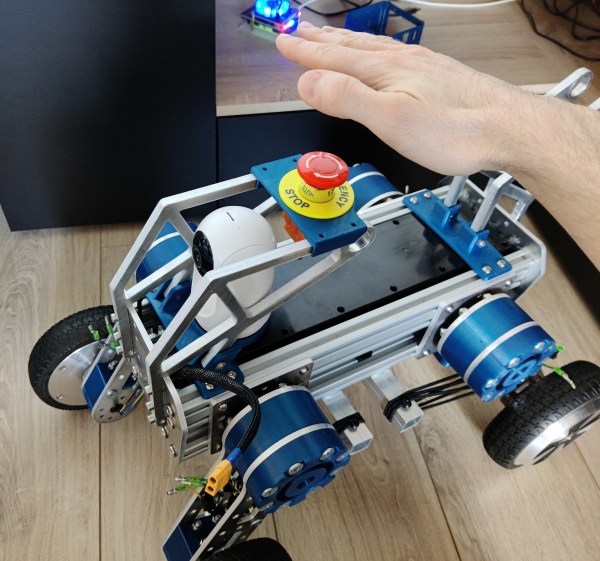
Popular consumer products often become the basis of many hacker projects, and hoverboards are a good example of this. [Tanguy] is using the drivetrain from a pair of hoverboards to build a beefy little rover platform with independent suspension.

Since hoverboards were designed to move around fully grown humans, the motors have the torque to spare for this 25 kilogram (55 pound) rover. For rough terrain, each of the four motor/wheel combos is mounted to arms bolted together with 3D printed parts and thick laser-cut aluminum. Suspension is simple and consists of a couple of loops of bungee cord. The chassis uses aluminum extrusion bolted together with aluminum plates and more printed fittings.

It doesn’t look like the rover is running yet, but [Tanguy] intends to power it with an electric scooter battery and control it with his own Universal Robot Remote. He also added an E-stop to the top and a cheap indoor PTZ camera for FPV. We look forward to seeing the functional rover and how it handles terrain.

We’ve seen hoverboard motors get used in other rover projects, but also for scootersskateboards, and even a hydroelectric turbine. It’s also possible to use them as is by mounting them to existing chassis’ to create electric carts.

Continue reading “Hackaday Prize 2022: A Hefty Hoverboard Rover”

The Hackaday Summer Camp Survival Guide

It’s a feature of summer for us, the round of hacker camps in which members of our community gather in fields and spend a few days relaxing and doing what we do best. This summer I’ll have been to four of them by September, one of which was unexpected because a last-minute ticket came my way. For Hackaday they’re a chance to connect with our readers and maybe see come of the coolest stuff in person.

If you consult the wiki for your hacker camp of choice then you’ll usually find a page of tips about what to bring. Starting with a tent and a sleeping bag and probably going on to sunscreen, a hat, and maybe how to avoid dehydration. I’d probably add spare toilet paper and disinfectant spray in case the toilets are nightmarish. All very practical stuff, but expressed in a dry list format that doesn’t really tell you what to expect. A hacker camp can be overwhelming if you’ve not been to one before, so how do you get the best out of it? Here are a few tips based on our experience. Continue reading “The Hackaday Summer Camp Survival Guide”

Saving Fuel With Advanced Sensors And An Arduino

When [Robot Cantina] isn’t busy tweaking the 420cc Big Block engine in their Honda Insight, they’re probably working on some other completely far out automotive atrocity. In the video below the break, you’ll see them take the concept of a ‘lean burn’ system from the Insight and graft hack it into their 1997 Saturn coupe.

What’s a lean burn system? Simply put, it tricks the car into burning less fuel when it’s cruising under a light load to improve the vehicle’s average mileage. The Saturn’s electronics aren’t sophisticated enough to implement a lean burn system simply, and so [Robot Cantina] did what any of us might have done: hacked it in with an Arduino.

The video does a wonderful job going into the details, but essentially by using an oxygen sensor with finer resolution (wide-band) and then outputting the appropriate narrow band signal to the ECU, [Robot Cantina] can fine tune the air/fuel ratio with nothing more than a potentiometer, and the car’s ECU is none the wiser. What were the results? Well… they weren’t as expected, which means more experimentation, more parts, and hopefully, more videos. We love seeing the scientific method put to fun use!

People are ever in the quest to try interesting new (and sometimes old) ideas, such as this hot rod hacked to run with a lawnmower carburetor.

Continue reading “Saving Fuel With Advanced Sensors And An Arduino”

Maximum Power Point Tracking: Optimizing Solar Panels

When looking at integrating a photovoltaic solar panel into a project, the naive assumption would be that you simply point the panel into the general direction of where the Sun is, and out comes gobs of clean DC power, ready to be used for charging a battery. To a certain extent this assumption is correct, but feeding a solar panel’s output into something like a regular old PWM buck or boost regulator is unlikely to get you anywhere close to the panel’s full specifications.

The keywords here are ‘maximum power point’ (MPP), which refers to the optimal point on the solar panel’s I-V curve. This is a property that’s important not only with photovoltaics, but also with wind turbines and other highly variable power sources. The tracking of this maximum power point is what is generally referred to as ‘MPPT‘, but within this one acronym many different algorithms are covered, each with its own advantages and disadvantages. In this article we’ll take a look at what these MPPT algorithms are, and when you would want to pick a particular one.

Continue reading “Maximum Power Point Tracking: Optimizing Solar Panels”

A Classic TV Trope For An Escape Room

No spooky mansion is complete without a secret passage accessed through a book shelf — or so Hollywood has taught us. What works as a cliché in movies works equally well in an escape room, and whenever there’s escape rooms paired with technology, [Alastair Aitchison] isn’t far. His latest creation: you guessed it, is a secret bookcase door.

For this tutorial, he took a regular book shelf and mounted it onto a wooden door, with the door itself functioning as the shelf’s back panel, and using the door hinges as primary moving mechanism. Knowing how heavy it would become once it’s filled with books, he added some caster wheels hidden in the bottom as support. As for the (un)locking mechanism, [Alastair] did consider a mechanical lock attached on the door’s back side, pulled by a wire attached to a book. But with safety as one of his main concerns, he wanted to keep the risk of anyone getting locked in without an emergency exit at a minimum. A fail-safe magnetic lock hooked up to an Arduino, along with a kill switch served as solution instead.

Since his main target is an escape room, using an Arduino allows also for a whole lot more variety of integrating the secret door into its puzzles, as well as ways to actually unlock it. How about by solving a Rubik’s Cube or with the right touch on a plasma globe?

Continue reading “A Classic TV Trope For An Escape Room”

Ultimate Bokeh With A Projector Lens

Bokeh is a photography term that’s a bit difficult to define but is basically soft, aesthetically pleasing background blur, often used to make a subject stand out. Also called “background separation” or “subject isolation”, achieving it optically requires a fast lens with an aperture below 2.8 or preferably lower. These lenses can get very expensive, but in the video after the break [Matt] from [DIY Perks] blows all the commercially available options out of the water. Using an old episcope projector, he built a photography rig with background separation equivalent to that of a non-existent 35mm f0.4 lens.

Unlike most conventional projectors used to project a prerecorded image, episcopes were used to project an image of physical objects, like books. To use this lens directly in a camera is impossible, due to the size of the imaging circle projected out the back of the lens. At a diameter of 500mm, there is simply no imaging sensor available to capture it. Instead, [Matt] built a projection screen for the image and photographed it from the opposite side with a normal camera.

The projection screen was made by sandwiching a sheet of diffuser film between two sheets of clear acrylic held in a frame of aluminum extrusions. To block out all other light, [Matt] added aluminum shrouds on either side of the screen, which also serves to mount the lens and a camera. The shroud on the lens’ side is mounted on a separate aluminum frame, enabling the image to be focused by adjusting the distance between the screen and lens. Linear rods and bearings on 3D printed mounts allow smooth motion, while a motor-driven lead screw connected to a wired remote does the actual adjustment. The gap between the two halves was covered with bellows made from black paper. Continue reading “Ultimate Bokeh With A Projector Lens”