Why Sony’s Trinitron Tubes Were The Best

If you’re old enough to remember Cathode Ray Tube (CRT) Televisions, you probably remember that Sony sold the top products. Their Trinitron tubes always made the best TVs and Computer Monitors. [Alec Watson] dives into the history of the Sony Trinitron tube.

Sony Color TVs didn’t start with Trinitron — for several years, Sony sold Chromatron tubes. Chromatron tubes used individually charged wires placed just behind the phosphor screen. The tubes worked, but they were expensive and didn’t offer any advantage over common shadow mask tubes. It was clear the company had to innovate, and thanks to some creative engineering, the Trinitron was born.

Closeup of a Trinitron tube shows unbroken vertical stripes which led to a brighter picture.

All color TV’s shoot three electron guns at a phosphor screen. Typical color TVs use a shadow mask — a metal sheet with tiny holes cut out. The holes ensure that the electron guns hit only the red, green and blue dots of phosphor. Trinitrons use vertical bars of single phosphor color and a picket fence like aperture grille. The aperture grill blocks less of the electron beam than a shadow mask, which results in a much brighter image. Trinitrons also use a single electron gun, with three separate cathodes.

[Alec] is doing some amazing work describing early TV systems and retro consumer electronics over on his YouTube channel, Technology Connections. We’ve added him to our Must watch subscription list.

Interested in retro CRTs? Check out Dan’s article on cleaning up the fogged plastic safety screen on the front of many CRTs.

Continue reading “Why Sony’s Trinitron Tubes Were The Best”

How Hackerspaces Spend Money

Running a hackerspace is no easy task. One of the biggest issues is money — how to collect in dues and donations, managing it, and how to spend it. Everyone has different interests and would like to see the budget go to their favorite project or resource. Milwaukee Makerspace has come up with a novel way to handle this. Members pay $40 a month in dues. $35 of that goes into the general budget. The member themselves can pick where the last $5 goes.

Using the hackerspace’s software, members chose where their $5 goes each month. It can all be spent in one area or split up among different resources at the hackerspace. Members choose from many different interests like the 3D printing area, the laser lab, the forge, or specific projects like the power racing series. This results in a budget for each area which can be used for materials and parts. It also gives the hackerspace board of directors information on which resources people are interested in, and which they aren’t.

In the current budget, no one is supporting the anodizing area, but lots of people are supporting the laser lab. This is just the sort of information the board could use when planning. Perhaps they could store the anodizing tools and expand the laser lab. Click through to the link above and see how this year’s cash voting panned out.

Of course, all this only works if you have a hackerspace with plenty of active members. In Milwaukee’s case, they have about 300 members. Would this work for your hackerspace? Let us know down in the comments!

Toy R/C Car Upgrade To Hobby Grade Parts

[HobbyPartz] wanted his toy grade Radio Controlled (R/C) to drive a bit more like the real thing, so he upgraded it to hobby grade electronics.

If you didn’t know, there’s a pecking order in the R/C world. There are the toy grade cars which you can find at your local big box store, and the hobby grade cars, which grace the shelves of the local hobby shop. Toy cars often come with great looking shells – Corvettes, Lamborghinis, Porsches,  or even Ferraris. It often seems like the manufacturer spent all their money licensing and molding the shell though because the mechanics and electronics leave a lot to be desired. You could pull the body off and put it on a hobby grade R/C car, but that could get expensive. It also can be tricky to find a car with exactly the right width and wheelbase.

[HobbyPartz] had just this problem with a great looking Ferrari Enzo model that you can see in the video below the break. As expected, the pretty shell hid some really cheap electronics underneath. This is easily fixed by pulling and tossing everything electronic. The steering system was non-proportional — only full left or right turns. He removed the existing steering hardware and hot glued in a standard R/C servo. Once the servo is in position, it’s  easy to connect the linkages to the wheels themselves.

Continue reading “Toy R/C Car Upgrade To Hobby Grade Parts”

34C3: North Korea’s Consumer Technology

[Will Scott] and [Gabe Edwards] shed some light on the current state of consumer computing technology at 34C3 in their talk DPRK Consumer Technology. The pair has also created a website to act as a clearinghouse for this information — including smartphone OS images up at koreaComputerCenter.org.

Not a whole lot is known about what technology North Korean citizens have available to them. We have seen Red Star OS, the Mac-like Linux based operating system used on PC based desktops. But what about other systems like smartphones?

[Will] and [Gabe] found that cell phones in North Korea are typically manufactured by Chinese companies, running a custom version of the Android Operating system. The phone hardware is common — the phone sold as the Pyongyang 2407 in North Korea is also sold in India as the Genie v5. If you can get your hands on the Genie, you can run the Korean version of the Android OS on that hardware.

Continue reading “34C3: North Korea’s Consumer Technology”

Sound Isolated Server Rack

Servers are most often found in climate controlled data centers. This means they aren’t exactly built for creature comforts like quiet operation. Quite the contrary — many server chassis include fans which absolutely scream when the machine is under load. [Whiskykilo] needed to set up a 12 U rack in his basement for working from home. He knew the sound would get on anyone’s nerves, but especially on those of his wife.

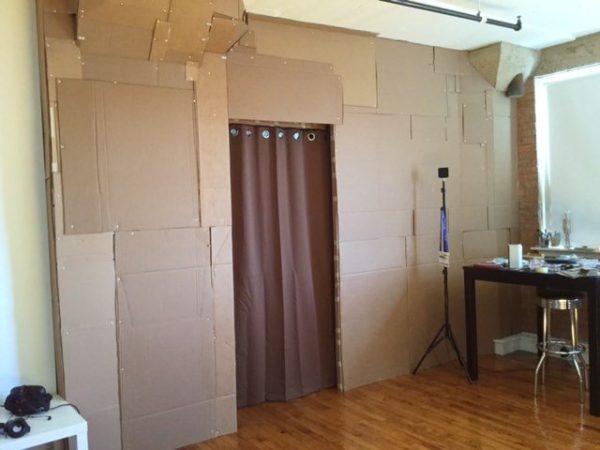
To solve this problem, he built a sound isolated rack. The build started with a standard 12 U metal rack frame. This is wrapped in 1/2″ MDF coated with automotive sound deadening material. An outer frame built of 1×4 lumber and another layer of 1/2″ MDF. Isolating the inner and outer boxes made the biggest contribution to quieting down the noisy servers.

Computers need to breathe, so the front and back doors of the rack enclosure include banks of intake and exhaust fans to keep air flowing through the servers. Two AC Infinity controllers keep the fans operating and monitor temperature. These machines do generate some heat – so 64 °F (18C) intake and 81 °F (27C) exhaust is not unheard of. The servers don’t seem to mind running at these temperatures. A Raspberry Pi 3 keeps an eye on UPS operation and displays the data on a 7″ HDMI LCD.

Interested in running a server at home? You don’t have to go to the lumberyard – check out this server made with Ikea components, or this server built from 96 MacBook Pros.

Rubik’s Cube Table Has A Hidden Surprise

[Nothorwitzer] built a pretty incredible Rubik’s Cube table with hidden storage. The coolest feature of this table is the way it opens. Twisting the top section of the cube causes two drawers to pop out from the sides. The further you turn the top, the more the drawers extend. As the top hits its rotational limit, the lid of the cube lifts up, revealing the entire top section is hollow.

[Nothorwitzer] built the table from plywood, hardboard, and MDF. Hiding inside the base is an old car wheel hub and bearing. The entire rotating system spins on this assembly. The drawers are actuated by an ingenious set of plywood cams which push the two opposing drawers out as the top assembly rotates. Two levers pop the top open.

The attention to detail here is amazing. [Nothorwitzer] build a set of hidden hinges that make the lid invisible, yet allows it to lift up and over the edge of the cube. A spring ensures that the heavy lid will pop open neatly. The lid fit is so close that air pressure ensures the top doesn’t slam down when it is dropped.

While the internal parts of the table are left in bare wood, that the external parts had to match a real Rubik’s Cube. [Nothorwitzer] scrambled a cube, then copied the colors. The panels are made of cut hardboard. Each panel is spray painted, then hot glued to the cube. The body is plywood which [Nothorwitzer] grooved with a router to match the profile of a real Rubick’s Cube.

The project doesn’t end here. [Nothorwitzer] has created a second cube, which is even more tricky. The lid pops by pressing in one section. The drawers operate in a similar way, but there is a lever to engage or disengage the drawer opening. This may be the perfect place to hide your retro gaming systems!

Continue reading “Rubik’s Cube Table Has A Hidden Surprise”

3D Printed Key Saves The Day

When [Odin917’s] parents went away on vacation, they took the apartment mailbox key with them. With the mail quickly piling up in the mailbox, he needed to get in there. He could have had the building super replace the lock, for a fee of course. Instead he had his parents email a photo of the key, which he used to 3D print his own copy.

Using a photograph as a template for a 3D printed copy is nothing new. We’ve covered it in-depth right here. However, this is the first time we’ve seen the technique put to use for good – in this case avoiding a hefty lock replacement fee.

He did his modeling in Autodesk’s free Fusion 360 CAD software. He then printed it out, and the box didn’t open. It took three revisions before the perfect key popped out of the printer. This particular mailbox uses a 4 pin tumbler, which makes it a bit less forgiving than other mailbox locks we’ve seen.

Admittedly this isn’t [Odin917’s] first time working with locks. Back in 2013, he submitted a parametric bump key model to Thingiverse.

Picking locks isn’t just for getting the mail. Locksport is a popular pastime for hardware hackers.