The Internet of Things has been applied to toasters, refrigerators, Christmas lights, Barbies, and socks. Unsurprisingly, the Internet of Things has yet to happen – that would require a useful application of putting the Internet in random devices. One of the best ideas is a smart electric meter, but the idea behind this is to give the power company information on how much electricity you’re using, not give you an idea of how much power you’re pulling down. The answer to this is the Internet-enabled Kill-A-Watt, and that’s exactly what [Solenoid] is building for his entry into the Hackaday Prize.
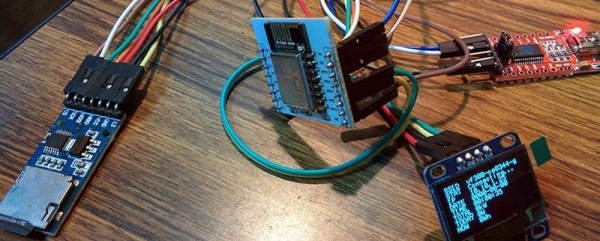
Modern power meters have an LED somewhere on the device that blinks every time a Watt is used. This is the data [Solenoid]’s creation is pushing up to the Internet to relay power consumption to himself or anyone else in the world.
The hardware, like many upcoming Hackaday Prize entries, we’re sure, is based on the ESP8266 WiFi module, with a light sensor, SD card reader, and OLED display. It’s meant to mount directly to a power meter, recording power consumption and pushing that data up the network. It’s simple, but it also allows for very granular monitoring of [Solenoid]’s power consumption, something the electric company’s smart meters can’t compete with.
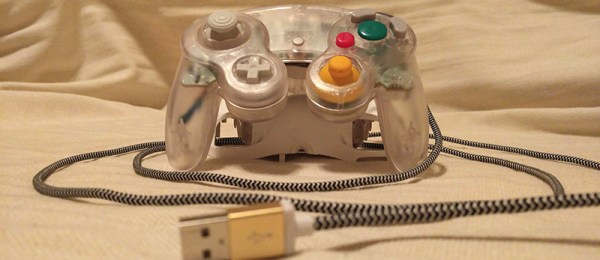
The GameCube controller is a favorite among the console enthusiasts new and old, and with Nintendo’s recent release of the Smash Bros. edition of this controller, this is a controller that has been in production for a very, very long time. [Garrett] likes using the GameCube controller on his PC, but this requires either a bulky USB adapter, or an off-brand GameCube ‘style’ controller that leaves something to be desired. Instead of compromising, [Garrett] turned his GameCube controller into a native USB device with a custom PCB and a bit of programming.
First, the hardware. [Garrett] turned to the ATtiny84. This chip is the big brother of the ubiquitous 8-pin ATtiny85. The design of the circuit board is just under a square inch and includes connections for the USB differential pairs, 5V, signal, and ground coming from the controller board.
The software stack includes the micronucleus bootloader for USB firmware updates and V-USB to handle the USB protocol. There are even a few additions inspired by [Garrett]’s earlier shinewave controller mod. This controller mod turns the GameCube controller into a glowing hot mess certain to distract your competitors while playing Super Smash Bros. It’s a great mod, and since [Garrett] kept the board easily solderable, it’s something that can be easily retrofitted into any GameCube controller.
3D printing is obviously best used in printing three-dimensional objects. Laser cutters, jig saws, and CNC routers are obviously well-equipped to machine flat panels with intricate shapes out of plastic sheets, plywood, or metal, but these devices have one drawback: they’re subtractive manufacturing, and 3D printers add material. What good is this? [Jason Preuss] demonstrated a very interesting 3D printing technique at this year’s Midwest RepRap Festival. He’s producing 2D paintings with a 3D printer, with results that look like something between very intricate inlay work and a paint by numbers kit.
[Jason Preuss]’ multicolor 2D print. Notice the toolpaths in the reflection of the upper left hand corner. Click to embiggen.[Jason] is using a 3D printer, a series of very specialized techniques, and a software stack that includes a half-dozen programs to print multicolor 2D scenes. This isn’t pigment, paint, dye, or ink; the artwork becomes a single piece of plastic with individual colors laid down one at a time.
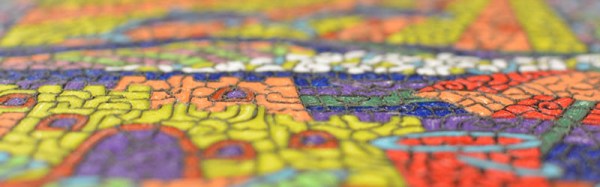
The best example of [Jason]’s work is a copy of a paint by numbers scene. Here, [Jason] makes an outline of all the shapes, separates onto different layers by color, and prints each color, one layer at a time. It’s an incredibly labor-intensive process to even get models into a slicer. Actually printing the model is even more difficult. [Jason]’s paint by numbers scene uses about twelve different colors.
[Jason]’s 3D printed paint by numbers scene. About a dozen different colors were used for this print.We’ve seen [Jason]’s work at MRRF before, including last year’s exhibition of a fantastic chocolate clock that was a 3D printed version of an old scroll saw pattern. Taking what is normally a 2D design and translating that into something that can be built with a 3D printer seems to be [Jason]’s forte, and the results are remarkable. If you don’t know what you were looking at, you would just think these art pieces are a strange industrial fabrication process. Once you look closer, you have an immediate respect for the artistry and craftsmanship that went into a sheet of plastic only a few millimeters thick and no bigger than a piece of paper.
[Jason] hasn’t documented his build process for these 2D pictures on a 3D printer quite yet. There’s a reason for that: it’s supposedly very complicated, and it’s going to take a while to get all the documentation together. Eventually, the process will be documented and a tutorial will pop up on [Jason]’s website. He’s also on Thingiverse, with a few semi-related designs available for download.
From what we’ve seen at MRRF, in the next few years, a dual extrusion printer will be a necessity. While dual extrusion won’t be able to recreate such colorful pictures, it will make the creation of these 2D plastic panels much easier, and they will surely be popular. We can’t wait to see what [Jason] comes up with next.
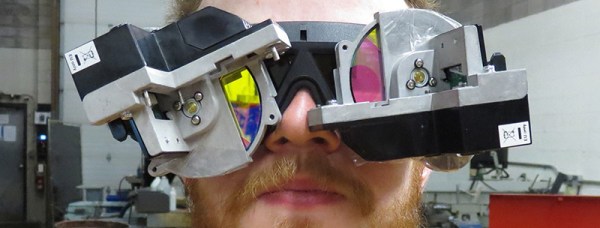
About five percent of the population is colorblind to one degree or another, and for them seeing the entire spectrum from Roy to Biv is simply impossible. Their eyes simply don’t have the cones to detect certain colors. The brain is the weirdest machine on the planet, though, and with the right tricks of light, even the colorblind can see more colors than they’re accustomed to. That’s the idea behind [PointyOintment]’s entry for the 2016 Hackaday Prize: color blindness correcting goggles.
Any device that claims to correct color blindness comes with a few caveats and a slightly loose interpretation of what ‘color blindness correcting’ actually is. For the same reason you can’t see deep infrared, someone with color blindness cannot distinguish between two colors; the eye simply doesn’t have the sensors to see a specific color of light. This doesn’t mean the ability to distinguish color in color blind individuals can’t be improved, though. The EnChroma glasses use an optical notch filter to block all colors between blue and green, and between green and red. This works, because the human brain is weird enough and can adapt to nearly anything.
[PointyOintmen] isn’t going with an optical notch filter. He’s using spinning color discs from a DLP projector and 3D ‘shutter’ glasses to present the world in different shades of color many times a second. It’s weird, untested, and will take a few hours to get used to, but it is a very interesting idea. Will it allow color blind people to see more colors? That’s a semantic issue, but if you define ‘seeing color’ as being able to differentiate between two different colors, yes, it will.
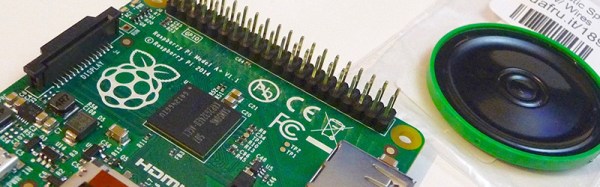
There are devices out there that will magnify text using fancy cameras and displays, devices that will convert these to Braille, and text-to-speech software has been around for thirty years. For his entry into our Raspberry Pi Zero contest, [Markus] decided to combine all these ideas into a simple device that will turn the printed word into speech.
The impetus for [Markus]’ project came to him in the form of a group of blind computer science students. These students used a specialized program that used specialized hardware and software such as mobile Braille terminals, OCR, and oral exams that allowed these students to study the same thing as everyone else. [Markus] wanted to produce something similar, using simple text-to-speech software instead of a complicated Braille display.
The physical design of [Markus]’ project is uniquely functional – a hand-held device with a camera up front, a Pi in the middle, and a speaker and headphone jack on the back. The hand grip includes a large battery and a trigger for telling the Pi to read a few words aloud.
The software is built around the SnapPicam and includes a lot of the functionality already needed. OCR is largely a solved problem with Tesseract, and text-to-speech is easy with Festival.
Although [Markus] is just plugging a few existing software modules together, he’s come up with a device that is certainly unique and could be exceptionally useful to anyone with a vision impairment.
The Raspberry Pi Zero contest is presented by Hackaday and Adafruit. Prizes include Raspberry Pi Zeros from Adafruit and gift cards to The Hackaday Store! See All the Entries
Western Digital introduced their second revision of the PiDrive this week. This is a native USB hard drive – formatted to 314GB – based on the WD Blue drive. The earlier version of the WD PiDrive was 1TB, and cost about $70 USD. The new, 314GB version, sells for about $35. Does Western Digital manufacture 314GB hard drives? No, that would be stupid. Who’s taking bets on the actual capacity of these drives?
[SopaXorsTaker] has introduced us to a brand new way of removing BGA chips. PCBs are usually more flexible than chips, and a few whacks with a hammer is all that’s needed.
For the last few months, [quarterturn] has been upgrading a PowerBook 520. He’s trying to replace the CPU with a 68040 that has an FPU. His first attempt failed, and his second attempt – a new Freescale part that certainly has an FPU – also failed. It’s great experience in desoldering and reworking fine-pitch QFP parts, but [quarterturn] has no idea why the Apple System Profile reports an FPU-less CPU. It might be something in the ROMthat tells the PowerBook not to use the FPU, in which case the obvious upgrade would be to replace the ROM with one from a PowerBook 550c or a Sonnet upgrade card. If you have either of those, I’m sure [quarterturn] would like to have a word with you.
We launched the 2016 Hackaday Prize this week. Why should you enter? Because last year, it seemed everyone who entered early won something. There’s $300,000 worth of prizes on the line. Need an idea? [Dave Darko] has just the thing for you. It’s the Hackaday Prize Buzzword Generator, the perfect thing for spitballing a few ideas and seeing what sticks.
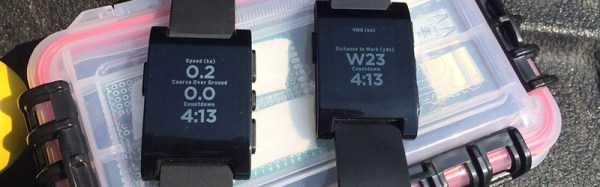
Sailing – specifically small boats in regattas – is a hobby that requires a lot of skill. Like any hobby, there are devices and electronics to make the hobby easier. For sailing, its tactical sailing compasses and GPS units. Remember, you probably don’t want to sail in a straight line, and that means offloading decades of experience to electronics. Instead of spending hundreds of dollars on a sailing computer, [Brook] thought it would be a better idea to build his own robot sailor from a Raspberry Pi and a Pebble smartwatch.
The sensors required for a sailing computer are par for the course – a Ublox GPS unit, a magnetometer, an acceleratometer, and a gyro. Being used on a sailboat also means there’s an anemometer thrown into the mix. These parts are stuffed into a waterproof polycarbonate field box with a USB power bank battery and a Bluetooth USB dongle.
With the hardware in place, it was time to write the software. The UI for this device is a Pebble smartwatch, which means there was a lot of futzing around with C# and Mono. This device is also a sailing data recorder, meaning [Brook] can integrate this project with VisualSail, a desktop application he wrote a few years ago to create 3D replays of sailing races using GPS data.
The Raspberry Pi Zero contest is presented by Hackaday and Adafruit. Prizes include Raspberry Pi Zeros from Adafruit and gift cards to The Hackaday Store! See All the Entries





![[Jason Preuss]' multicolor 2D print. Notice the toolpaths in the reflection. Click to embiggen.](https://hackaday.com/wp-content/uploads/2016/03/p2pchristmastree.jpg)
![[Jason]'s 3D printed paint by numbers scene. About a dozen different colors were used for this print.](https://hackaday.com/wp-content/uploads/2016/03/pppaintbynumber.jpg)