King Of Clever Reads 4-Pin Rotary Encoder With One Analog Pin

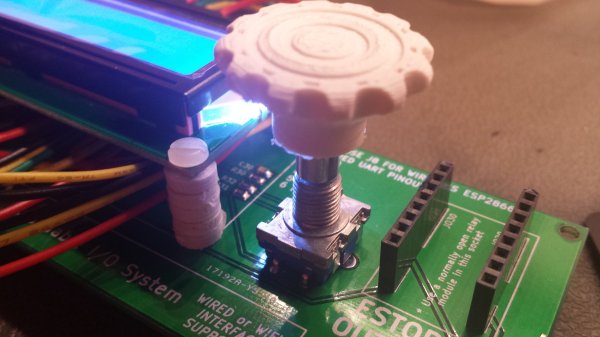
Rotary encoders are pretty interesting pieces of technology. They’re a solid way to accurately measure rotation including the direction. [David] recently wrote some software to handle these input devices, but unlike everyone else, his application can get by on only one microcontroller pin.

Most people will use three pins to handle a rotary encoder with a microcontroller: one to handle the switch and two to handle the quadrature inputs. With only one pin left available on his project [David] had to look for another solution, and he focused on the principle that the encoder pins behaved in very specific ways when turning the shaft. He designed a circuit that generates an analog voltage based on the state of those pins. He also wrote a program that can recognize the new analog patterns produced by his rotary encoder and his new circuit.

If you’ve been stuck on a project that uses a rotary encoder because you’ve run out of pins, this novel approach may help you get un-stuck. It’s a pretty impressive feat of circuit design to boot. Just think of how many other projects use these types of input devices and could benefit from it!

[via Hackaday.io Project Page go give it a Skull!]

Bringing A Century Stereo Into The 21st Century

Way back in the previous century, people used to use magnetized strips of tape to play music. It might be hard to believe in today’s digital world, but these “cassette” tapes were once all the rage. [Steve] aka [pinter75] recently found a Bang & Olufsen stereo with this exact type of antequated audio playback device, and decided to upgrade it with something a little more modern.

Once the unit arrived from eBay and got an electronic tune-up, [pinter75] grabbed a Galaxy S3 out of his parts drawer and got to work installing it in the old cassette deck location. He used a laser cutter to make a faceplate for the phone so it could be easily installed (and removed if he decides to put the tape deck back in the future).

The next step was wiring up power and soldering the audio output directly to the AUX pins on the stereo. Once everything was buttoned up [pinter75] found that everything worked perfectly, and mounted the stereo prominently on his wall. It’s always great when equipment like this is upgraded and repaired rather than thrown out.

Googly Eyes Follow You Around The Room

If you’re looking to build the next creepy Halloween decoration or simply thinking about trying out OpenCV for the first time, this next project will have you covered. [Glen] made a pair of giant googly eyes that follow you around the room using some servos and some very powerful software.

The project was documented in three parts. In Part 1, [Glen] models and builds the eyes themselves, including installing the servo motors that will eventually move them around. The second part involves an Arduino and power supply that will control the servos, and the third part goes over using OpenCV to track faces.

This part of the project is arguably the most interesting if you’re new to OpenCV; [Glen] uses this software package to recognize different faces. From there, the computer picks out the most prominent face and sends commands to the Arduino to move the eyes to the appropriate position. The project goes into great detail, from Arduino code to installing Ubuntu to running OpenCV for the first time!

We’ve featured some of [Glen]’s projects before, like his FPGA-driven LED wall, and it’s good to see he’s still making great things!

Continue reading “Googly Eyes Follow You Around The Room”

Transparent Alarm Clock Runs Linux

[Benoit] was using an extremely old alarm clock which normally ran on mains power, and he plugged it in to his computer’s UPS to keep it operational during power outages. He noticed that when the UPS switched on that the clock would run fast, though, and apparently it was keeping time by watching the power system frequency. To solve this problem he created his own feature-dense clock which runs Linux.

This alarm clock has everything: seven-segment displays housed in clear epoxy, a touch interface, battery backup, the ability to retrieve the time from an NTP server, and a web interface to change the clock’s settings over the network. That was a large part of [Benoit]’s decision to have the clock run Linux; the network capabilities add a lot of functionality to the clock like the ability to send commands to other devices at particular times. The clock runs on an Aria G25 SOM and has a custom case that looks very professional.

We’re suckers for a high-quality clock builds here, and [Benoit]’s most recent project hits all of our buttons. Even though it doesn’t currently drive people insane or tell confusing time, the Linux and networking capabilities could certainly open up options!

The Most Powerful Bitcoin Mining Rig Yet

In days of yore, one could mine Bitcoin without much more than an AMD graphics card. Now, without specialized hardware it’s unlikely that you’ll make any appreciable headway in the bitcoin world. This latest project, however, goes completely in the other direction: [Ken] programmed a 55-year-old IBM mainframe to mine Bitcoin. Note that this is technically the most powerful rig ever made… if you consider the power usage per hash.

Engineering wordplay aside, the project is really quite fascinating. [Ken] goes into great detail about how Bitcoin mining actually works, how to program an assembly program for an IBM 1401 via punch cards, and even a section about networking a computer from this era. (Bonus points if he can get retro.hackaday.com to load!) The IBM boasts some impressive stats for the era as well: It can store up to 16,000 characters in memory and uses binary-coded decimal. All great things if you are running financial software in the early ’60s or demonstrating Bitcoin in the mid-2010s!

If it wasn’t immediately obvious, this rig will probably never mine a block. At 80 seconds per hash, it would take longer than the lifetime of the universe to do, but it is quite a feat of computer science to demonstrate that it is technically possible. This isn’t the first time we’ve seen one of [Ken]’s mainframe projects, and hopefully there are more gems to come!

ESP8266 Keeps An Eye On Your Batteries

There are many more things to know about a battery than its voltage and current output at any given moment, and most of them can’t be measured with a standard multimeter unless you also stand there for a long time with an Excel spreadsheet. The most useful information is battery capacity, which can tell you how much time is left until the battery is fully charged or fully discharged. [TJ] set out to create a battery data harvester, and used the ubiquitous ESP8266 to make a fully-featured battery monitor.

Measuring battery capacity is pretty straightforward but it does take time. A battery is first benchmarked to find its ideal capacity, and then future voltage and current readings can be taken and compared to the benchmark test to determine the present capacity of the battery. The ESP8266 is a relatively good choice for this kind of work. Its WiFi connection allows it to report its information to a server which will store the data and make it available for the user to see.

The first page of this project details building the actual module, and the second page outlines how to get that module to communicate with the server. Once you’ve built all of this, you can use it to monitor your whole-house UPS backup system or the battery in your solar-powered truck. There is quite a bit of information available on the project site for recreating the build yourself, and there’s also a video below which shows its operation.

Continue reading “ESP8266 Keeps An Eye On Your Batteries”

Unix On Your Breadboard

As smartphones continue to get bigger and bigger, the race to have the smallest chip running Unix (or Linux, as the case may be) is still on. A new contender in this arena is [Serge] who has crammed RetroBSD on a Fubarino microcontroller for a powerful breadboard-friendly device.

The device uses a PIC32MX795 processor to run version 2.11BSD Unix for microcontrollers. It uses only 128 kbytes of RAM which is great for the limited space available, but it doesn’t skimp on software. It has a C compiler, assembler, and a whole host of other utilities that you’d expect to find in something much more powerful. All of this comes in a package that has breadboard-compatible pins so you can interface your Unix with the real world.

There’s a video below that shows the device in action, and a whole host of instructions that’ll get you up and running in no time if you have the hardware available. [Serge] mentioned that this would run on other architectures but is looking for others to join the project to port it to those processors. This isn’t the first time we’ve seen *nix installed on a microcontroller, but it is one of the more useful ones!

Continue reading “Unix On Your Breadboard”