“Bricking” Microcontrollers In LEGO Motivates Young Programmers

Back when he was about seven years old, [Ytai] learned to program on an Atari 800XL. Now he has a seven-year-old of his own and wants to spark his interest in programming, so he created these programmable LEGO bricks with tiny embedded microcontrollers. This is probably one of the few times that “bricking” a microcontroller is a good thing!

IMG_20150519_144818
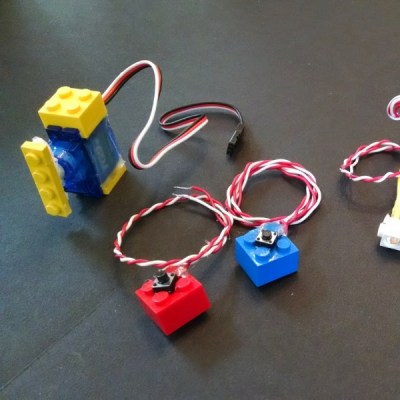
The core of the project is the Espruino Pico microcontroller which has the interesting feature of running a Java stack in a very tiny package. The Blocky IDE is very simple as well, and doesn’t bog users down in syntax (which can be discouraging to new programmers, especially when they’re not even a decade old). The bricks that [Ytai] made include a servo motor with bricks on the body and the arm, some LEDs integrated into Technic bricks, and a few pushbutton bricks.

We always like seeing projects that are geared at getting kids interested in creating, programming, and hacking, and this certainly does that! [Ytai] has plans for a few more LEGO-based projects to help keep his kid interested in programming as well, and we look forward to seeing those! If you’re looking for other ways to spark the curiosity of the youths, be sure to check out the Microbot, or if you know some teens that need some direction, perhaps these battlebots are more your style.

FPGAs Keep Track Of Your Ping Pong Game

It’s graduation time, and you know what that means! Another great round of senior design projects doing things that are usually pretty unique. [Bruce Land] sent in a great one from Cornell where the students have been working on a project that uses FPGAs and a few video cameras to keep score of a ping-pong game.

The system works by processing a live NTSC feed of a ping pong game. The ball is painted a particular color to aid in detection, and the FPGAs that process the video can keep track of where the net is, how many times the ball bounces, and if the ball has been hit by a player. With all of this information, the system can keep track of the score of the game, which is displayed on a monitor near the table. Now, the players are free to concentrate on their game and don’t have to worry about keeping score!

This is a pretty impressive demonstration of FPGAs and video processing that has applications beyond just ping pong. What would you use it for? It’s always interesting to see what students are working on; core concepts from these experiments tend to make their way into their professional lives later on. Maybe they’ll even take this project to the next level and build an actual real, working ping pong robot to work with their scoring system!

Continue reading “FPGAs Keep Track Of Your Ping Pong Game”

Vacuum Gauge Display; Arduino Replaces Industrial

Arduinos! They’re a great tool that make the world of microcontrollers pretty easy, and in [cptlolalot]’s case, they also give us an alternative to buying expensive, proprietary parts. [cptlolalot] needed a gauge for an expensive vacuum pump, and rather than buying an expensive part, built a circuit around an Arduino to monitor the vacuum.

pressure-gauge-thumb
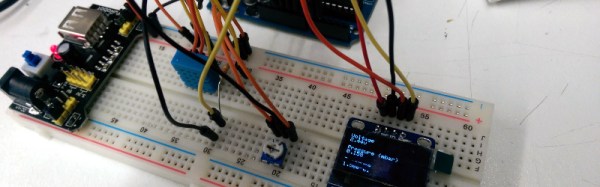
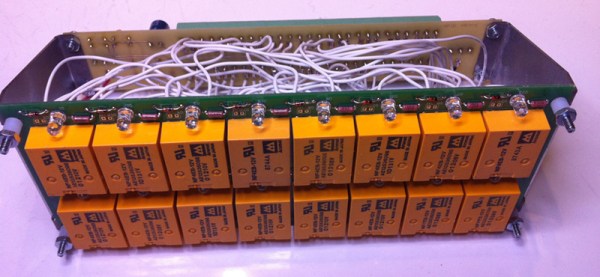
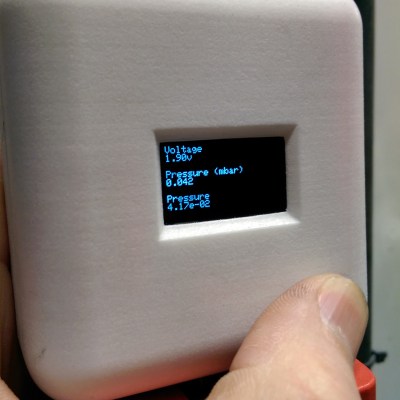
This project goes a little beyond simple Arduino programming though. A 12V to 5V power supply drives the device, which is laid out on a blank PCB. The display fits snugly over the circuit which reduces the footprint of the project, and the entire thing is housed in a custom-printed case with a custom-printed pushbutton. The device gets power and data over the RJ45 connection so no external power is needed. If you want to take a look at the code, it’s linked on [cptlolalot]’s reddit thread.

This project shows how much easier it can be to grab an Arduino off the shelf to solve a problem that would otherwise be very expensive. We’ve been seeing Arduinos in industrial applications at an increasing rate as well, which is promising not just because it’s cheap but because it’s a familiar platform that will make repairs and hacks in the future much easier for everyone.

Relays Calculate Square Roots

After seeing an exhibit of an old relay-based computer as a kid, [Simon] was inspired to build a simple two-relay latching circuit. Since then, he’s been fascinated by how relays can function to do computation. He’s come quite a long way from that first latching circuit, however, and recently finished a huge five-year project which uses electromechanical relays to calculate square roots.

DSC_0240-e1394580570356

The frame of the square root calculator can hold up to 30 identical relay modules, each of which hold 16 relays on PCBs, for a total of 480 relays. The module-based setup makes repair and maintenance a breeze. Numbers are entered into the computer by a rotary dial from an old phone and stored in the calculator’s relay memory. A nixie tube display completes the bygone era-theme of the device and shows either the current number that’s being entered, or the square root of that number as it’s being calculated.

The real magic of this project is that each relay has an LED which illuminates whenever the relay is energized, which shows the user exactly where all of the bits of the machine are going. [Simon] worked on this project from 2009 and recently completed it in 2014, and it has been featured at the San Mateo Maker Faire and at Microsoft Research in Redmond, WA. We’ve seen smaller versions of this before, but never on this scale and never for one specific operation like square roots.

Video below. Thanks to [Bonsaichop] for the tip!

Continue reading “Relays Calculate Square Roots”

LEDs Strips Tell You The Trains Aren’t Running

[James] is a frequent user of the London Underground, a subway system that is not immune to breakdowns and delays. He wanted a way to easily tell if any of the trains were being disrupted, and thanks to some LEDs, he now has that information available at a glance without having to check a webpage first.

Inspired by the Blinky Tape project at FT Engineering, [James] thought he could use the same strip of addressable LEDs to display information about the tube. A Raspberry Pi B+ gathers data from the London Underground’s TfL API and does a few calculations on the data. If there is a delay, the LEDs in the corresponding section of the strip will pulse, alerting the user to a problem with just a passing glance.

The project is one of many that displays data about the conditions you’ll find when you step outside the house, without having to look at a computer or smartphone. We recently featured an artistic lamp which displays weather forecasts for 12 hours into the future, and there was an umbrella stand which did the same thing. A lot is possible with LEDs and a good API!

Continue reading “LEDs Strips Tell You The Trains Aren’t Running”

Fibonacci Clock Is Hard To Read, Looks Good

Artists have been incorporating the golden ratio in their work for many hundreds of years, and it is thought that when proportions are in line with this ratio, it tends to be more aesthetically pleasing. With that in mind, the clock that [Philippe] created must mathematically be the best looking clock we’ve ever featured, even if it is somewhat difficult to tell time from it.

The clock is made up of squares which represent the first five numbers of the Fibonacci sequence. The squares are backlit with LEDs, which will illuminate red for the hour, green for the minute, and blue representing the overlap of hours and minutes. Simply add up the red and blue squares to get the hour, and add the green and blue squares to get the minutes. The minutes are displayed in 5 minute increments since there aren’t enough blocks though, so you’ll also have to multiply. Confused yet? If not, it turns out that there are several ways to display certain times using this method, any of which can be randomly selected by the clock. [Philippe] reports that there are 16 different ways to represent 6:30, for example.

The clock is driven by an ATmega328P and is housed in a wooden case. There are schematics and code available on [Philippe]’s site if you want to build your own, there are detailed descriptions of how to tell time with this clock. You’ll probably need those. If you like getting confused by clocks, you might also like this one as well.

Continue reading “Fibonacci Clock Is Hard To Read, Looks Good”

Pinball Simulator Makes The Neighbors Happy

There are a lot of simulators out there if you want to try something out that would be otherwise impossible. Great examples are flight simulators for simulating the piloting of a fighter jet, or goat simulators for simulating the life of a goat who destroys a town. [Erland] wanted a pinball machine, but like planes and goats, found it was impractical to get a real one because it would probably upset his neighbors in his apartment. Instead, he set out to build a pinball simulator.

The cabinet is miniature-sized compared to a regular pinball machine so it can more easily fit in the apartment. It utilizes three monitors, a 24″ one in portrait mode for the main playing area, a 20″ one for the back screen, and a smaller one for the “dot matrix” style scoreboard. Once the woodwork was completed, a PC was put together to control everything and an Arduino was installed to handle the buttons and output USB commands to the PC.

Of course, we’ve featured many other pinball simulators before, but this one is no slouch when it comes to features either. It is very well crafted and the project is very well documented, and the miniature size sets it apart as well. However, if you want to go a step further with your pinball simulator, you might want to check out this augmented reality pinball system.