Nightmare Fuel Telepresence ‘Bot May Become Your Last Friend

After this pandemic thing is all said and done, historians will look back on this period from many different perspectives. The one we’re most interested in of course will concern the creativity that flourished in the petri dish of anxiety, stress, and boredom that have come as unwanted side dishes to stay-at-home orders.

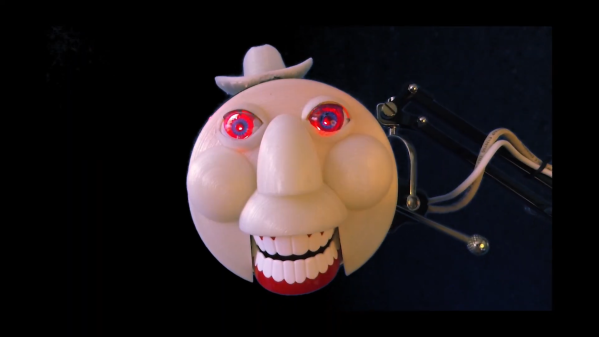
[Hunter Irving] and his brother were really missing their friends, so they held a very exclusive hackathon and built a terrifying telepresence robot that looks like a mash-up of Wilson from Castaway and that swirly-cheeked tricycle-riding thing from the Saw movies. Oh, and to make things even worse, it’s made of glow-in-the-dark PLA.

Now when they video chat with friends, TELEBOT is there to make it feel as though that person is in the room with them. The Arduino Uno behind its servo-manipulated vintage doll eyes uses the friend’s voice input to control the wind-up teeth based on their volume levels. As you might imagine, their friends had some uncanny valley issues with TELEBOT, so they printed a set of tiny hats that actually do kind of make it all better. Check out the build/demo video after the break if you think you can handle it.

Not creepy enough for you? Try building your own eyes from the ground up.

Continue reading “Nightmare Fuel Telepresence ‘Bot May Become Your Last Friend”

Open Laser Blaster Shells Out More Bang For The Buck

[a-RN-au-D] was looking for something fun to do with his son and dreamed up a laser blaster game that ought to put him in the running for father of the year. It was originally just going to be made of cardboard, but you know how these things go. We’re happy the design went this far, because that blaster looks fantastic.

Both the blaster and the target run on Arduino Nanos. There’s a 5mW laser module in the blaster, and a speaker for playing the pew pew-related sounds of your choice. Fire away on the blaster button, and the laser hits a light-dependent resistor mounted in the middle of the target. When the target registers a hit, it swings backward on a 9g servo and then returns quickly to vertical for the next shot.

There are some less obvious features that really make this game a hit. The blaster can run in 10-shooter mode (or 6, or whatever you change it to in the code) with a built-in reload delay, or it can be set to fully automatic. If you’re short on space or just get sick of moving the target to different flat surfaces, it can be mounted on the wall instead — the target moves forward when hit and then resets back to flat. Check out the demo video we loaded up after the break.

No printer? No problem — here’s a Node-RED shooting gallery that uses simple wooden targets.

Continue reading “Open Laser Blaster Shells Out More Bang For The Buck”

Sun-Seeking Sundial Self-Calibrates In No Time

Sundials, one of humanity’s oldest ways of telling time, are typically permanent installations. The very good reason for this is that telling time by the sun with any degree of accuracy requires two-dimensional calibration — once for cardinal direction, and the other for local latitude.

[poblocki1982] is an amateur astronomer and semi-professional sundial enthusiast who took the time to make a self-calibrating equatorial ‘dial that can be used anywhere the sun shines. All this solar beauty needs is a level surface and a few seconds to find its bearings.

Switch it on, set it down, and the sundial spins around on a continuous-rotation servo until the HMC5883L compass module finds the north-south orientation. Then the GPS module determines the latitude, and a 180° servo pans the plate until it finds the ideal position. Everything is controlled with an Arduino Nano and runs on a 9V battery, although we’d love to see it run on solar power someday. Or would that be flying too close to the sun? Check out how fast this thing calibrates itself in the short demo after the break.

Not quite portable enough for you? Here’s a reverse sundial you wear on your wrist.

Celebrate Spring With A DIY Vibration Sensor

Is your heaving pile of electronic parts shrinking by the day as you finish old back-burnered projects and come up with new ones? Try an old pastime that never gets old: rolling your own sensors using household objects. [Nematic!] needs a way to sense vibration for an upcoming project. Instead of spending $1 plus shipping and waiting who knows how long for a spring vibration sensor to come in the mail, they made one in a matter of minutes.

A spring vibration sensor is a simple device that can be used as a poor man’s accelerometer, or simply to detect vibration. All you need is a length of conductive wire, a 10 kΩ resistor, and a way to pick up those good vibrations. For the purposes of demonstration, [Nematic!] is using an Arduino Nano in the short build video after the break.

The wire is wound around the threads of a bolt to form a coil that’s just large enough for a resistor to fit inside. One end of the coil is connected to 5 V, and one leg of the resistor connects to an input pin. Together, they form a normally-open switch. When vibrations force the free ends of both to touch, the circuit is complete and the pin is pulled high.

If you make one of these and find the sensitivity is off, just twist up a new coil with stiffer or softer wire depending on the problem. Iterating doesn’t get much cheaper than wrapping wire around a bolt. We can’t wait to see how [Nematic!] will use this sensor. In the meantime, we’re planning to use one to detect when the dryer stops running and send a text.

Speaking of bargain basement sensors, did you know you can detect water leaks with two pennies, an aspirin, and a clothespin? These projects demonstrate the kind of ingenuity that can win you a pile of toys in our new Making Tech At Home contest, running now through July 28th, 2020.

Continue reading “Celebrate Spring With A DIY Vibration Sensor”

Inputs Of Interest: I’m Building An ErgoDox!

I’ve been using my Kinesis Advantage keyboard for two months, and I love it. I’ll never go back to a regular keyboard again if I can help it.

There are a few downsides to it, however. The biggest one is that split distance between the two sides is fixed. It doesn’t have Cherry MX blues (although the browns plus the firmware beeps is pretty nice). It doesn’t have layers, really — just a ten-key under the right hand. And honestly, it’s not very portable.

ErgoDox with Nuclear Data keycaps via geekhack

I took the Kinesis out to a coffee shop a few times before they all dried up into drive-thrus, and plunking it down on a four-top out in public made me realize just how large and loud it really is.

And so I’m building an ErgoDox keyboard. What I really want to build is a Dactyl — a curved variation on the ErgoDox — but I can’t just go whole-hog into that without building some type of keyboard first. That’s just my practical nature, I guess. I realize that the comparison is weak, because I’ll have to hand-wire the keyboard matrix when I make the dactyl. Assembling an ErgoDox is child’s play, comparatively. Our goal today is to lay out just what I’m getting myself into with a build like this one.

Continue reading “Inputs Of Interest: I’m Building An ErgoDox!”

The ABCs Of Adding QMK To A WASD Keyboard

[Oleg] is a software engineer who appreciates a good keyboard, especially since coming over to the dark side of mechanical keebs. It’s true what they say — once you go clack, you never go back.

Anyway, before going full nerd with an ortholinear split ergo keyboard, [Oleg] had a nice little WASD with many upsides. Because the ErgoDox is oh so customizable, his use of the WASD had fallen by the wayside.

That’s because the ErgoDox can run QMK firmware, which allows the user to customize every key they see and add layers of functionality. Many people have converted all kinds of old keebs over to QMK by swapping out the native controller for a Teensy, and [Oleg] was sure it would work for the WASD.

[Oleg] got under the hood and found that the controller sits on a little removable board around the arrow keys and talks to the main PCB through two sets of double-row header pins. After some careful probing with a ‘scope, the controller board revealed its secrets and [Oleg] was able to set up a testing scheme to reverse engineer the keyboard matrix by connecting each row to an LED, and all the columns to ground. With next to no room for the Teensy, [Oleg] ended up strapping it to the back of the switch PCB and wiring it quite beautifully to the header pins.

With Teensy and QMK, it’s easy to make a keyboard any way you want, even if you’re all thumbs.

Sticking Up For The Stick Shift

It seems that stick shift has become a sticking point, at least for American car buyers. Throughout 2019, less than 2% of all the cars sold in the US had a manual transmission. This sad picture includes everything from cute two-seater commuters to — surprisingly enough —  multi-million dollar super cars built for ultimate performance.

But aside from enthusiasts like myself, it seems no one cares too much about this shift away from manual transmissions. According to this video report by CNBC (embedded below), the fact that demand is in free-fall suggests that Americans on the whole just don’t enjoy driving stick anymore. And it stands to reason that as more and more people live their lives without learning to drive them, there would be a decline in the number of teachers and proponents. It’s a supply and demand problem starring the chicken and the egg.

But giving up the stick is one more example of giving up control over the vehicle. It’s not something everyone cares about, but those that do care a lot. Let’s grind through the ebb and flow of the manual transmission — more lovingly called the stick shift.

Continue reading “Sticking Up For The Stick Shift”