Pocket Woodwind MIDI Controller Helps You Carry A Tune

It’s easy to become obsessed with music, especially once you start playing. You want to make music everywhere you go, which is completely impractical. Don’t believe me? See how long you can get away with whistling on the subway or drumming your hands on any number of bus surfaces before your fellow passengers revolt. There’s a better way, and that way is portable USB MIDI controllers.

[Johan] wanted a pocket-sized woodwind MIDI controller, but all the existing ones he found were too big and bulky to carry around. With little more than a Teensy and a pressure sensor, he created TeensieWI.  It uses the built-in cap sense library to read input from the copper tape keys, generate MIDI messages, and send them over USB or DIN. Another pair of conductive pads on the back allow for octave changes. [Johan] later added a PSP joystick to do pitch bends, modulation, and glide. This is a simple build that creates a versatile instrument.

You don’t actually blow air into the mouthpiece—just let it escape from the sides of your mouth instead. That might take some getting used to if you’ve developed an embouchure. The values are determined by a pressure sensor that uses piezoresistivity to figure out how hard you’re blowing. There’s a default breath response value that can be configured in the settings.

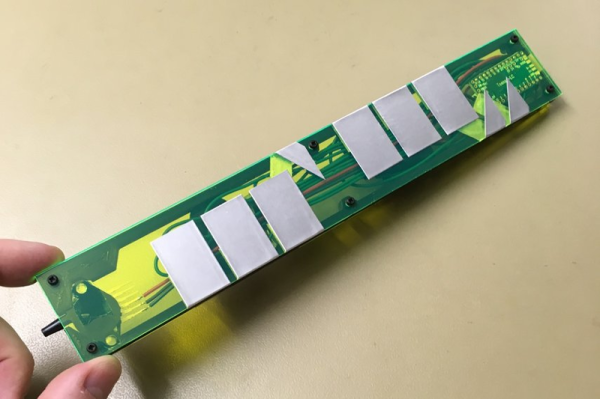
TeensiWI should be easy to replicate or remix into any suitable chassis, though the UV-reactive acrylic looks pretty awesome. [Johan]’s documentation on IO is top-notch and includes a user guide with a fingering chart. For all you take-my-money types out there, [Johan] sells ’em ready to rock on Tindie. Check out the short demo clips after the break.

We saw a woodwind MIDI controller a few years ago that was eventually outfitted with an on-board synthesizer. Want to build a MIDI controller ? , like this beautiful build that uses hard drive platters as jog wheels.

Continue reading “Pocket Woodwind MIDI Controller Helps You Carry A Tune”

Modern Technology For An Ancient Contest

Certamen is a special class of  high school quiz bowl tournament that’s focused solely on the classics. No, not Austen and Dickens, the actual classics. All the questions are about stuff like ancient Greek and Roman civilization and culture, classical mythology, and the finer points of Latin grammar. Like any other quiz bowl, the contestants use buttons to buzz in and answer the questions.

To win at Certamen, a team needs more than just a vast working knowledge of classical antiquity. They also have to be fast on the buzzer. The best way to do that is to practice with official equipment. But this is Hackaday, so you know what comes next: all the ones you can buy cost five times more than they should, so [arpruss] made an awesome open-source version for a fraction of the cost.

The practice machine consists of 12 arcade-style buttons connected to a control box. An Arduino Mega in the control box records the order of button presses as they arrive and displays a corresponding code on an LCD. A toggle switch selects between Certamen mode, where one button press locks out the rest of the team, and a Quiz mode with no lockout.

Our favorite thing about this build is the way [arpruss] took care of managing long cables, which was one of his main must-haves. The buttons are wired to the control box with Cat6 in three groups of four—one cable per table, one pair per chair. Our other favorite thing is the Easter eggs. Hold down the clear button on the control box when the system is booting and one of two things happens: either the buttons band together and turn into piano keys, or some Latin poetry appears on the screen.

[arpruss]’s 3D-printed buzzer bases look pretty slick. If Certamen practice ever starts to get out of hand, he might consider more robust packaging, like these Devo hat buttons.

A Sandbox For DIY Pinball Design

If you’ve always wanted to build your own pinball machine but have no idea where to start, this is the project for you. [Chris] is in the process of building a 3/4 size pinball table and is currently in the waiting-for-parts stage. As they arrive, he is testing them in a sandbox he built in an afternoon. Let [Chris]’s proving ground be your quick-start guide to all the ways you could approach the two most important parts of any pin: the flippers and targets.

The field of play is a sturdy piece of particle board, and the cardboard walls are attached with hot glue. [Chris] designed and printed a pair of flippers that are driven by some cheap remote door lock motors he found at a popular online auction house. You can see how snappy are in the test video after the break.

We love the crisp action and elegant simplicity of the spring-loaded drop targets [Chris] designed. Right now he resets them manually, but soon they will be reset by a solenoid or maybe a motor. We can’t wait to see how the table turns out. In the meantime, we’ll have to go back to drooling over this amazing life-size 3D-printed pinball machine.

Continue reading “A Sandbox For DIY Pinball Design”

Go From Resin Caster To Resin Master

When it comes to resin casting, time is of the essence. It helps to gather everything you’ll need and have it within reach before starting. But if you don’t know what you don’t know, it can be difficult to anticipate needs. Luckily, [Botzen Design] has a few tricks up his sleeve that will save time, materials, and sanity for novices and old hands alike.

It may seem somewhat obvious to mix up resin in a disposable or reusable plastic cup. But not all cups are created equal. Polypropylene cups won’t outgas into your resin, but polystyrene will. If you use a silicone cup or any polypropylene food container marked #5/PP, cured resin will peel cleanly off of the cup walls.

For some reason, the giant jugs of resin [Botzen Design] uses don’t come with pumps. How do they expect someone to meter out exact amounts of resin and hardener while pouring them out of gallon jugs? Stadium-style condiment pumps at a restaurant supply store make things much simpler while avoiding costly spillage.

Our favorite tip (and seemingly [Botzen Design]’s as well) is the drip hammer. When air bubbles mature into craters, they can be filled easily and precisely with a drop or two of wet resin. A pipette would probably just get clogged, but an icicle of cured resin hanging from a stick makes the perfect drip applicator.

Want to get into resin casting but don’t know where to start? Hackaday’s own [Gerrit] has you more than covered.

Continue reading “Go From Resin Caster To Resin Master”

Evil Hotspot Costume Makes Valuable Connections

This year for Hallowe’en, [Scott] went out dressed as a Comcast xfinity hotspot. Funny, yes, but there’s a deeper meaning here. [Scott] really went as a walking PSA that illustrates the dangers of making assumptions about the relative safety of WiFi networks based solely on their broadcast names.

[Scott] could have gone chaotic evil with this setup, but he didn’t. No one could actually get on the Internet through him. Inside the “hotspot” are a Wi-Fi adapter and a Pi Zero running a captive portal. It broadcasts the default ‘XFINITY’ and ‘xfinitywifi’ SSIDs, plus a bunch of other common network names. Whenever anyone tries to connect, or worse, their phone automatically connects, they’ll hear a sad tuba cadence. This comes courtesy of a multi-sound effects box that’s controlled by the Pi through a relay board.

Meanwhile, the mark’s device is redirected to an internally-hosted “xfinity” login page. Anyone who actually goes on to enter their login credentials is treated to a classic horror film scream sample while the evil hotspot quietly stores their name and password and displays them on an e-ink display for all to see — a walking e-ink wall of sheep. Check out the demo after the break.

[Scott]’s evil hotspot is powered by a huge battery that can run it for 24 hours. Here’s a wind- and solar-powered WAP we covered several years ago.

Continue reading “Evil Hotspot Costume Makes Valuable Connections”

Mendocino Motor Drives Cubicle Conversations

Mendocino motors are solar-powered electric motors that rely on pseudo-levitation.  The levitation comes from magnets mounted on either end of the shaft, which repel same-field magnets fixed below them into the base.  When light shines on the solar panels, current flows through connected magnet wire windings, creating an electromagnetic field that interacts with a large stationary magnet mounted underneath. These constantly repelling forces spin the shaft, and the gaps between the solar panels provide the on-off cycle needed to make it spin 360°.

As [Konstantin] discovered, building this simple motor and getting it to spin depends on a lot of factors. The number of windings, the weight of each solar panel, and the magnet sizes all figure in. [Konstantin]’s struggles are your gain, however. His Instructable takes the guesswork out of the tolerances and he designed a nice, open-source 3D-printed structure to boot.

You’re right, these motors can’t do much work. But it would definitely look cool on your desk and might even start a conversation or two. If not, whip up this little electromagnetic train.

Continue reading “Mendocino Motor Drives Cubicle Conversations”

DIY Multi-Touch All The Surfaces

Ever wanted to build a touch table or other touch-input project, but got stuck figuring out the ‘touch’ part? [Jean Perardel] has your back with his multi-touch frame over on IO that makes any surface touch-reactive. In [Jean]’s case, that surface is ultimately a TV inside of a table.

Of course, it’s a bit of a misnomer to say the surface itself becomes touch-reactive. What’s really happening here is that [Jean] is using light triangulation to detect shadows and determine the coordinates of the shadow-casting object. Many barcode scanners and consumer-level document scanners use a contact image sensor (CIS) to detect objects in the path of IR LEDs. These are a low-power, lower-resolution alternative to the CCDs found in high-grade scanners.

As [Jean] explains in the video below, an object placed in the path of a single IR LED facing a sensor array of either type will block the light from reaching the sensors. Keep adding LEDs and their emission angles will begin to overlap, increasing the detection precision. [Jean] reverse engineered a couple of different types of scanners until he found a suitable one. He ended up with CIS that has 2700 light sensors lined up in the space of 20cm (7.87″).

[Jean] designed a 3D-printable frame to hold 96 IR LEDs in stacks of three. A Teensy turns on the LEDs, detects the touch event, calculates the position, and sends those coordinates to a Pi to be displayed on the screen. He eventually went wireless and then built a nice looking touch table to house a 32″ TV.

This is not the only way to build a multi-touch table, nor is it the simplest. Here’s one that uses finger presses to scatter light and an industrial strength projection-based table that was open-sourced a few years ago.

Continue reading “DIY Multi-Touch All The Surfaces”