ChaiBot: A Tea Robot Steeped In Utility

On the surface, a cup of tea is a simple thing to make. Heat up some water, insert tea leaves, and wait for it to steep. The wait time is a matter of taste, and it is absolutely crucial to remove the bag or infuser before it’s too late. Otherwise, you end up with a liquid that’s almost, but not quite, entirely unlike tea.

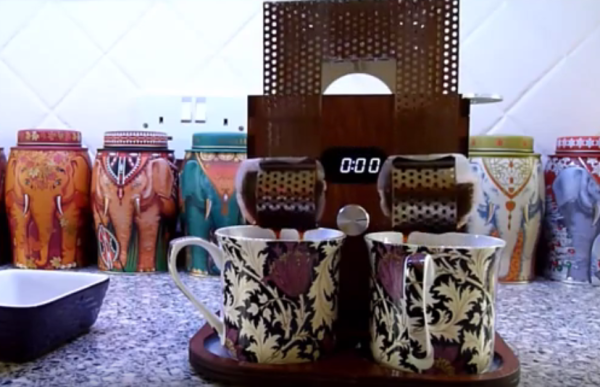
[Adrian] and his son would often find themselves lost in conversation during the steeping process and let it go too long. But that was before they built ChaiBot, an automatic tea minder. This fine-looking machine uses an old CD drive to raise and lower the tea bags, which are held by a thin piece of stainless steel mesh. Once the bags are lowered, [Adrian] pours hot water into the cups. The weight of the water is detected by a capacitive sensor under the cup cutouts, and this triggers the timer to start counting down to the perfect cuppa.

One of the coolest features of ChaiBot is the built-in circulation. Every minute, the bags are lifted out briefly and reinserted, disturbing the water so the steeping is more uniform. Since the final step to making great tea is drinking it before it goes cold, ChaiBot sends a push notification to [Adrian]’s phone. Be sure to check out the demo after the break.

Here’s another CD drive-based tea bot we covered a while back. It’s not quite as pretty, but it gets the job done. If you’re not one to wander off while your tea steeps but prefer not to watch a clock, here’s a compact timer that’ll fit in your pocket.

Continue reading “ChaiBot: A Tea Robot Steeped In Utility” →

A Field Guide To The North American Communications Tower

The need for clear and reliable communication has driven technology forward for centuries. The longer communication’s reach, the smaller the world becomes. When it comes to cell phones, seamless network coverage and low power draw are the ideals that continually spawn R&D and the eventual deployment of new equipment.

Almost all of us carry a cell phone these days. It takes a lot of infrastructure to support them, whether or not we use them as phones. The most recognizable part of that infrastructure is the communications tower. But what do you know about them?

Continue reading “A Field Guide To The North American Communications Tower” →

MRRF: Tasty Filament From Proto-Pasta

Alongside printers from all walks of manufacturing, one can naturally expect to find people selling different kinds of filament at a 3D printing festival. One of these purveyors of plastic was Proto-pasta out of Vancouver, WA. Proto-pasta prides themselves on unique offerings and complete transparency about their manufacturing processes.

Almost all of their filaments are either PLA or HTPLA with something special added during extrusion. The menu includes steel, iron, carbon, and finely ground coffee. The coffee filament was one of our favorites for sure. The print they brought with them looked solidified light roast and had a transparent kind of lollipop quality to it. I couldn’t detect the coffee scent due to allergies, but [Alex] assured me that printing with this filament will make your house or hackerspace smell terrific.

[Alex] was giving away samples of their stainless steel composite PLA. This one can be polished to a smooth shine with a series of papers that run from 400 to 8,000-grit. Another of their newer offerings is PLA infused with magnetic iron particles. Prints made with this stuff can be rusted to achieve an antique, steampunk, or shabby chic aesthetic.

Proto-pasta also has an electrically conductive composite carbon PLA. This one is great for capacitive applications like making a custom, ergonomic stylus or your own game controller. According to the site, the resistivity of printed parts is 30 ohms per centimeter as measured perpendicular to the layers, and 115 ohms along the layers.

Have you made anything awesome with conductive or magnetic filament? Have you had any problems with unorthodox filaments? Let us know in the comments.

MRRF: Jellybox, A STEM-Oriented Printer

It’s the first full day of fun here at the Midwest RepRap Festival. This year’s turnout is quite impressive—as I’m writing this, we’re an hour or so in and there are already hundreds of people and a couple of R2D2 units milling about.

The talks will begin in a few hours. This year MRRF has expanded to another building, which should tell you something about the growth of this festival. We are excited to hear [Filip] and [Ladi] give a presentation about Jellybox, a STEM-driven project he started to bring 3D printing into education in a comprehensive and hands-on way. The initial idea was based on [Jean Piaget]’s theory of constructionism. [Piaget] was a clinical psychologist who helped advance the idea that human learning is greatly influenced by connecting a person’s ideas with their experiences.

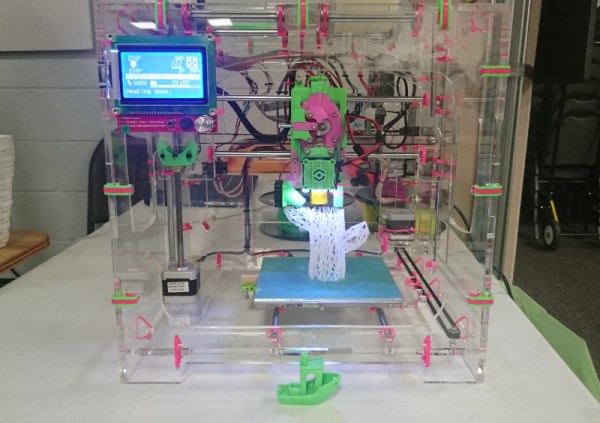
Building a Jellybox printer is about as easy as it gets, and takes about 4-6 hours depending on your skill level. The laser-cut clear acrylic panels are connected with zip ties that lock around 90° plastic brackets. The back panel even has a etched diagram that shows where all the connectors should go, and the wiring is neat and tidy by design. It’s meant to be easy to tear down so that teachers can use them again and again with middle and high school-aged students. The Jellybox is open-source; both the extruder and the hot end can be swapped out in a flash.

IMade3D offers one- and two-day intensive courses in the DC area that cover building a Jellybox and learning some things about 3D modeling. The kit is included in the price of admission. Jellybox kits will be available in a few weeks, but can be preordered today for $799.

Third Person Driving IRL

It’s a dream come true: remote control of a real car. Besides being a lot of fun, a life-size RC vehicle has some practical applications, like performing rescue operations or delivering supplies to dangerous areas. For [Carter], [Dave], [Ryan], and [Sean], the dream became reality in the span of 24 caffeine-and-chicken-finger-fueled hours during an Ohio State University hackathon. They dubbed the system MagiKarpet because it sits in place of the floor mat and runs on pixies.

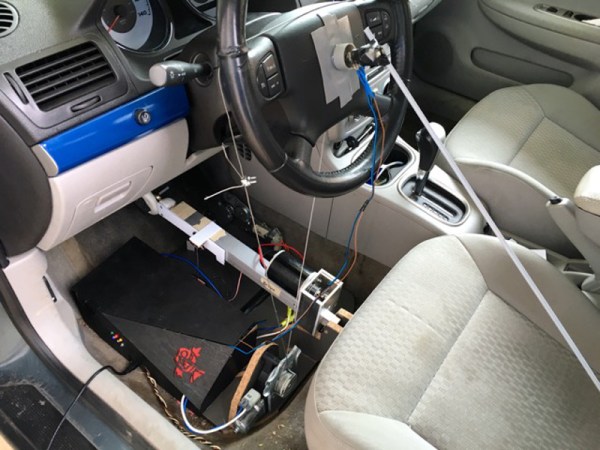
The plan was to control the throttle, brake, and steering of a Chevy Cobalt using a PlayStation controller. For added fun, a camera mounted high above the back bumper would provide a third-person view, and this feed would be displayed on a monitor in the backseat. Everything is controlled by an Arduino Mega. A beefy linear actuator works the brake and is attached temporarily with a band of Shapelock that slips around the pedal. The throttle is pushed by a lever attached to a car window motor. Another motor connects to the steering wheel with cables that can turn it 90° left and right. Although the build was successful, they ran into a couple of issues. But what’s a hackathon experience without a few problems?

The linear actuator was jammed for about an hour after some early testing, but they got it unstuck. The PS controller was borked, so they had to roll their own joysticks. The school wouldn’t let them actually drive it around because of safety (killjoys but we get it), so they put it up on a jack to demonstrate it for the judges. They took second place, though we can’t imagine what would have beat this. Check out the complete build video after the break.

You might remember these guys from last year around this time. They took first place at the same hackathon with Robottermilk Puncakes, a app-controlled pancake machine. Now that you’re hungry for pancakes, feast your eyes on this endless one.

Continue reading “Third Person Driving IRL” →

TrainLight: Transit Info At A Glance

In a world of sensory overload, sometimes it’s nice to get the information you need without a bunch of clutter. [Savage] has created an attractive and minimalist system to display the current wait times for specific trains in his San Francisco neighborhood.

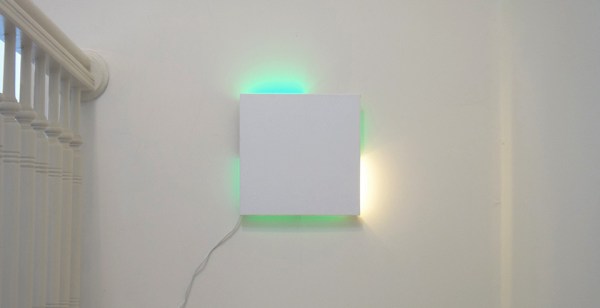
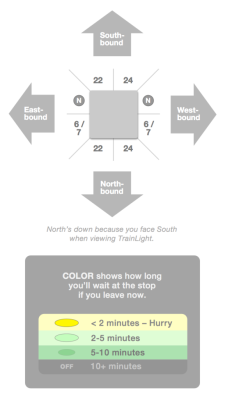
trainlight-legendIt’s basically a Spark Core and a 60 LED-per-meter strip of WS2812Bs. A 1000µF cap filters the power coming in from a switching adapter and a resistor limits the level-shifted logic going to the LEDs. Eight barriers made from card stock keep the light zones from bleeding together. The sides of the square canvas panel indicate cardinal directions and are oriented to [Savage]’s southern-facing house.


The server gets prediction data every 30 seconds using the RESTbus JSON API. [Savage] added in a bit of time for walking down the stairs, putting shoes on, and walking to each stop. TrainLight receives these times over WiFi and lights the LEDs accordingly. If a section isn’t lit at all, the wait time for that line is greater than 10 minutes. Dark green means you have 5-10 minutes to get there, and pale green means 2-5 minutes. If the LEDs are yellow, you’d better put on your running shoes.

This is a fairly simple build with a focus on subtlety. Even before guests in his house understand what they’re looking at, [Savage]’s TrainLight makes for an interesting conversational piece of blinkenlights and doubles as illumination for the stairs. There’s a slightly sped-up demo after the break.

Want to make your own? [Savage] has a tutorial page and his code is up on the gits. Blinky lights are also good for telling you whether the trains are running at all.

Continue reading “TrainLight: Transit Info At A Glance” →

Adventures In Small Screen Video

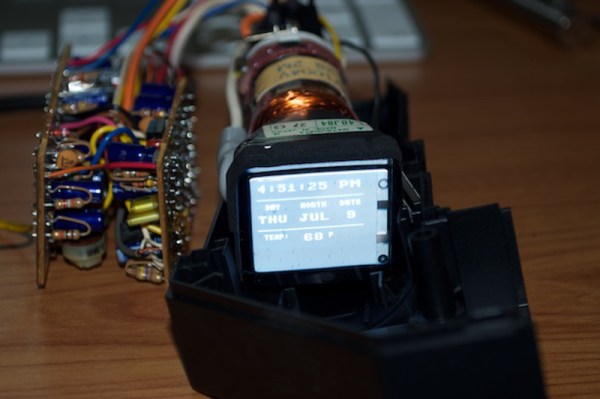
[Kevin] wanted to make something using a small CRT, maybe an oscilloscope clock or something similar. He thought he scored big with a portable black and white TV that someone threw away, but it wouldn’t power on. Once opened, he thought he found the culprit—a couple of crusty, popped capacitors. [Kevin] ordered some new ones and played with the Arduino TVout code while he waited.

The caps arrived, but the little TV still wouldn’t chooch. Closer inspection revealed that someone had been there before him and ripped out some JST-connected components. Undaunted, [Kevin] went looking for a new CRT and found a vintage JVC camcorder viewfinder on the electronic bay with a 1-1/8″ screen.

At this point, he knew he wanted to display the time, date, and temperature. He figured out how the viewfinder CRT is wired, correctly assuming that the lone shielded wire is meant for composite video. It worked, but the image was backwards and off-center. No problem, just a matter of tracing out the horizontal and vertical deflection wires, swapping the horizontal ones, and nudging a few pixels in the code. Now he just has to spin a PCB, build an enclosure, and roll his own font.

[Kevin]’s CRT is pretty small, but it’s got to be easier on the eyes than the tiniest video game system.