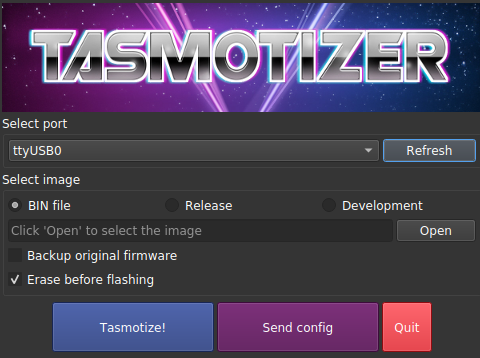
PixMob LED Wristband Teardown (Plus IR Emitters And How To Spot Them)

PixMob units are wearable LED devices intended for crowds of attendees at events like concerts. These devices allow synchronized LED effects throughout the crowd. [yeokm1] did a teardown of one obtained from a preview for the 2019 Singapore National Day Parade (NDP), and in the process learned about the devices and their infrastructure.

Suspected IR emitter for the PixMob units, mounted on a lighting tower (marked here in white).

PixMob hardware has been known to change over time. This version has two RGB LEDs (an earlier version had only one), an unmarked EEPROM, an unmarked microcontroller (suspected to be the Abov MC81F4104), and an IR receiver module. Two CR1632 coin cells in series power the device. [yeokm1] has made the schematic and other source files available on the teardown’s GitHub repository for anyone interested in a closer look.

One interesting thing that [yeokm1] discovered during the event was the apparent source of the infrared emitter controlling the devices. Knowing what to look for and reasoning that such an emitter would be mounted with a good view of the crowd, [yeokm1] suspected that the IR transmitter was mounted on a lighting tower. Viewing the tower through a smartphone’s camera revealed a purplish glow not visible to the naked eye, which is exactly the way one would expect an IR emitter to look.

Sadly, there wasn’t any opportunity to record or otherwise analyze the IR signals for later analysis but it’s possible that the IR protocol might be made public at some point. After all, running custom code on an earlier PixMob board was made possible in part by asking the right people for help.

ATX2AT Makes Retrocomputing Safer, Heads To Kickstarter

It’s easy to take power supplies for granted in modern computing, but powering vintage hardware is not always so simple or worry-free. The power supplies for old electronics are themselves vintage, and the hardware being powered can be quite precious. A power problem can easily cause fried components and burned traces on a board. As [Doc TB] observes, by the time you hear crackling, it’s already far too late.

To address this, [Doc TB] designed the ATX2AT Smart Converter as an open source project and recently decided to make it available through a Kickstarter campaign. ATX2AT is a way to safely and securely replace some vintage power supplies with a standard PC ATX power supply, and adds a large number of protection features such as current monitoring and programmable reaction time for overcurrent protection. All of this can help prevent a retrocomputer enthusiast’s precious vintage hardware from being damaged in the event of a problem. It’s not just for powering known-good hardware; it can be invaluable when testing or repairing hardware that might be in an unknown state.

When we first came across [Doc TB]’s ATX2AT project we recognized it as a well-made device to address a specific niche, and to do it well. Assessing risk takes into account not only the probability of a problem occurring, but also just how bad things would be if it did happen. If your old hardware is precious enough to warrant the extra protection, or you are into repairing or assessing old hardware, then an ATX2AT might be just what you need. You can see it in action in the video embedded below.

Continue reading “ATX2AT Makes Retrocomputing Safer, Heads To Kickstarter”

Fail Of The Week: The 3D Printer Nozzle Wipe That Won’t

Some of you will be familiar with the idea of using a brush as a nozzle wipe on a 3D printer. The idea is that passing the hot end over the brush cleans any stray plastic from the nozzle, ensuring that those plastic bits don’t end up in unwelcome places. [Mark Rehorst] attempted to implement a nozzle brush system in his own printer, but hasn’t so far been successful.

One of the things [Mark] makes is 3D printed lamp shades and this led to his experiments in setting up an automatic nozzle cleaner. Despite best efforts, the hot ends of 3D printers can occasionally accumulate bits of molten plastic which can sometimes end up deposited on the print. Because the lamp shades are so thin and so big, having a charred blob end up on the print is pretty unwelcome. Having the nozzle automatically wiped clean would be a very handy feature, but is proving to be a troublesome one.

[Mark] based his design on a small, dense wire brush used for cleaning the print nozzle of a Stratasys printer. Sadly, he found no combination of motion or brush height that got the nozzle reliably clean every time. Sometimes a blob would be dislodged, but the hot end would pick it back up again on subsequent passes. You can see it in slow motion from a variety of angles in the video below.

Continue reading “Fail Of The Week: The 3D Printer Nozzle Wipe That Won’t”

Improved Outdoor Solar Harvester Now Handles All The Parts

[Vadim Panov]’s 3D printed solar harvester is in effect a rechargeable outdoor battery, and the real challenge he faced when designing it was having it handle the outdoors reliably. The good news is that part is solved, and his newest design is now also flexible enough to handle a variety of common and economical components such as different battery connectors, charge controllers, and solar panel sizes. All that’s left is to set it up using the GoPro-style mounting clamp and let it soak up those solar rays.

We saw his first version earlier this year, which uses inventive and low-cost solutions for weatherproofing like coating the 3D print with epoxy (the new version makes this easier and less messy, by the way.) It was a fine design, but only worked with one specific solar panel size and one specific configuration of parts. His newest version makes a few mechanical improvements and accommodates a wide variety of different components and solar panel sizes. The CAD files are all available on the GitHub repository but he’s conveniently provided STL files for about a dozen common sizes.

When it comes to harvesting light, staying indoors offers less power but requires a far less rugged setup. If that interests you, be sure to check out the Tiny Solar Energy Module (TSEM) which can scrape up even indoor light.

Behold A 3D Display, Thanks To A Speeding Foam Ball

We’ve seen 3D image projection tried in a variety of different ways, but this is a new one to us. This volumetric display by Interact Lab of the University of Sussex creates a 3D image by projecting light onto a tiny foam ball, which zips around in the air fast enough to create a persistence of vision effect. (Video, embedded below.) How is this achieved? With a large array of ultrasonic transducers, performing what researchers call ‘acoustic trapping’.

This is the same principle behind acoustic levitation devices which demonstrate how lightweight objects (like tiny polystyrene foam balls) can be made to defy gravity. But this 3D display is capable of not only moving the object in 3D space, but doing so at a high enough speed and with enough control to produce a persistence of vision effect. The abstract for their (as yet unreleased) paper claims the trapped ball can be moved at speeds of up to several meters per second.

It has a few other tricks up its sleeve, too. The array is capable of simultaneously creating sounds as well as providing a limited form of tactile feedback by letting a user touch areas of high and low air pressure created by the transducers. These areas can’t be the same ones being occupied by the speeding ball, of course, but it’s a neat trick. Check out the video below for a demonstration.
Continue reading “Behold A 3D Display, Thanks To A Speeding Foam Ball”

Ask Hackaday: Is Anyone Sad Phone VR Is Dead?

It’s official: smartphone-based VR is dead. The two big players in this space were Samsung Gear VR (powered by Oculus, which is owned by Facebook) and Google Daydream. Both have called it quits, with Google omitting support from their newer phones and Oculus confirming that the Gear VR has reached the end of its road. Things aren’t entirely shut down quite yet, but when it does it will sure leave a lot of empty headsets laying around. These things exist in the millions, but did anyone really use phone-based VR? Are any of you sad to see it go?

Google Cardboard, lowering cost and barrier to entry about as low as it could go.

In case you’re unfamiliar with phone-based VR, this is how it works: the user drops their smartphone into a headset, puts it on their head, and optionally uses a wireless controller to interact with things. The smartphone takes care of tracking motion and displaying 3D content while the headset itself takes care of the optics and holds everything in front of the user’s eyeballs. On the low end was Google Cardboard and on the higher end was Daydream and Gear VR. It works, and is both cheap and portable, so what happened?

In short, phone-based VR had constraints that limited just how far it could go when it came to delivering a VR experience, and these constraints kept it from being viable in the long run. Here are some of the reasons smartphone-based VR hit the end of the road: Continue reading “Ask Hackaday: Is Anyone Sad Phone VR Is Dead?”

Adding Sensors To Improve Your Curling Game? Turns Out It’s Really Hard

Sometimes, a project turns out to be harder than expected at every turn and the plug gets pulled. That was the case with [Chris Fenton]’s efforts to gain insight into his curling game by adding sensors to monitor the movement of curling stones as well as the broom action. Luckily, [Chris] documented his efforts and provided us all with an opportunity to learn. After all, failure is (or should be) an excellent source of learning.

The first piece of hardware was intended to log curling stone motion and use it as a way to measure the performance of the sweepers. [Chris] wanted to stick a simple sensor brick made from a Teensy 3.0 and IMU to a stone and log all the motion-related data. The concept is straightforward, but in practice it wasn’t nearly as simple. The gyro, which measures angular velocity, did a good job of keeping track of the stone’s spin but the accelerometer was a different story. An accelerometer measures how much something is speeding up or slowing down, but it simply wasn’t able to properly sense the gentle and gradual changes in speed that the stone underwent as the ice ahead of it was swept or not swept. In theory a good idea, but in practice it ended up being the wrong tool for the job.

The other approach [Chris] attempted was to make a curling broom with a handle that lit up differently based on how hard one was sweeping. It wasn’t hard to put an LED strip on a broom and light it up based on a load sensor reading, but what ended up sinking this project was the need to do it in a way that didn’t interfere with the broom’s primary function and purpose. Even a mediocre curler applies extremely high forces to a broom when sweeping in a curling game, so not only do the electronics need to be extremely rugged, but the broom’s shaft needs to be able to withstand considerable force. The ideal shaft would be a clear and hollow plastic holding an LED strip with an attachment for the load sensor, but no plastic was up to the task. [Chris] made an aluminum-reinforced shaft, but even that only barely worked.

We’re glad [Chris] shared his findings, and he said the project deserves a more detailed report. We’re looking forward to that, because failure is a great teacher, and we’ve celebrated its learning potential time and again.